FordParts
My Garage
My Account
Cart
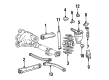
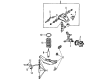
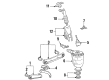
OEM 2001 Lincoln Town Car Shock Absorber
Suspension Shock Absorber- Select Vehicle by Model
- Select Vehicle by VIN
Select Vehicle by Model
orMake
Model
Year
Select Vehicle by VIN
For the most accurate results, select vehicle by your VIN (Vehicle Identification Number).
4 Shock Absorbers found


2001 Lincoln Town Car Shock Absorber Part Number: XW7Z-18125-B
Product Specifications- Other Name: Kit - Shock Absorber; Shock
- Replaces: AA-527, AA-524, AA-526, ASH-24679, ASH-24680, XW7Z-18125-BB, XW7Z-18125-A, 1W7Z-18125-A, F8VZ-18125-AA, XW1Z-18125-AB, XW7Z-18125-AB
- Item Weight: 5.20 Pounds
- Item Dimensions: 27.5 x 4.8 x 4.8 inches
- Condition: New
- Fitment Type: Direct Replacement
- SKU: XW7Z-18125-B
- Warranty: This genuine part is guaranteed by Ford's factory warranty.

2001 Lincoln Town Car Shock Absorber Part Number: F8AZ-18124-CA
Product Specifications- Other Name: Shock Absorber Assembly; Air Spring to Coil Spring Conversion Kit; Suspension Kit.; Shock
- Manufacturer Note: RH & LH, heavy duty/Police/Taxi
- Replaces: AS-2028, ASH-24678, AS-1094-G, XW3Z-18124-AA, F8VZ-18124-AA, 3U2Z-18124-ZA, ASH-702, XW7Z-18124-A, XW7Z-18124-AB, F8AZ-18124-AA
- Base No.: 18124
- Item Weight: 3.50 Pounds
- Item Dimensions: 19.9 x 2.9 x 2.9 inches
- Condition: New
- Fitment Type: Direct Replacement
- Require Quantity: 2
- SKU: F8AZ-18124-CA
- Warranty: This genuine part is guaranteed by Ford's factory warranty.
2001 Lincoln Town Car Shock Absorber Part Number: F8VZ-18125-BA
Product Specifications- Other Name: Shock Absorber Assembly; Air Spring to Coil Spring Conversion Kit; Suspension Kit.; Shock
- Manufacturer Note: RH & LH - attaching hardware not included, heavy duty suspension, with handling or trailer tow packages
- Base No.: 18125
- Item Weight: 4.70 Pounds
- Item Dimensions: 2.6 x 3.6 x 24.4 inches
- Condition: New
- Fitment Type: Direct Replacement
- Require Quantity: 2
- SKU: F8VZ-18125-BA
- Warranty: This genuine part is guaranteed by Ford's factory warranty.

2001 Lincoln Town Car Shock Absorber, Front Part Number: 3U2Z-18124-AE
Product Specifications- Other Name: Shock Absorber Assembly; Shock; Shock Absorber Assembly - Front
- Manufacturer Note: RH & LH, with attaching hardware (replacing F8VZ-18124-BA), with handling package
- Position: Front
- Base No.: 18124
- Item Weight: 5.40 Pounds
- Item Dimensions: 2.5 x 3.1 x 18.4 inches
- Condition: New
- Fitment Type: Direct Replacement
- Require Quantity: 2
- SKU: 3U2Z-18124-AE
- Warranty: This genuine part is guaranteed by Ford's factory warranty.
2001 Lincoln Town Car Shock Absorber
If you're seeking quality and affordability, look no further than our extensive inventory of genuine 2001 Lincoln Town Car Shock Absorber available at FordPartsDeal.com. You can confidently purchase our OEM 2001 Lincoln Town Car Shock Absorber as they are supported by the manufacturer's warranty and our hassle-free return policy, alongside the benefit of our fast delivery service.
2001 Lincoln Town Car Shock Absorber Parts Q&A
- Q: What precautions should be taken before servicing the rear suspension shock absorber on 2001 Lincoln Town Car?A: The first step in repairing and servicing the rear suspension shock absorber should include powering off the electrical system controlling the air suspension to avoid unexpected air spring pressure changes that may cause vehicle shifts during operations. Lift the vehicle with proper support so you can use a Hi-Lift Jack to hold the rear axle. Before handling air springs it is essential to purge pressure from their systems since active pressure poses a danger to personnel. Individual shock absorber replacement becomes necessary and the upper attachment removal process utilizes a plastic dust tube fitted with an open-end wrench to the hex stamp of its metal cap. When dealing with shock absorbers that have steel dust tubes you should hold onto the tube with your hands to stop stud rotation until you loosen the retaining nut. First remove and discard the self-locking retaining nut and washer together with the insulator from the upper frame stud followed by disconnecting the shock absorber lower stud from the mounting bracket on the rear axle assembly. The removal steps need to be performed in the reverse sequence to finish the installation.
Related 2001 Lincoln Town Car Parts
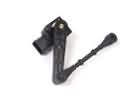 2001 Lincoln Town Car Ride Height Sensor
 2001 Lincoln Town Car Control Arm Bushing
 2001 Lincoln Town Car Axle Support Bushings
 2001 Lincoln Town Car Coil Spring Insulator
 2001 Lincoln Town Car Radius Arm Bushing
 2001 Lincoln Town Car Spindle
 2001 Lincoln Town Car Sway Bar Bracket
 2001 Lincoln Town Car Sway Bar Bushing
 2001 Lincoln Town Car Sway Bar Kit
 2001 Lincoln Town Car Sway Bar Link
 2001 Lincoln Town Car Track Bar
 2001 Lincoln Town Car Trailing Arm Bushing