FordParts
My Garage
My Account
Cart
OEM 2002 Ford Focus Windshield
Glass Windshield- Select Vehicle by Model
- Select Vehicle by VIN
Select Vehicle by Model
orMake
Model
Year
Select Vehicle by VIN
For the most accurate results, select vehicle by your VIN (Vehicle Identification Number).
1 Windshield found

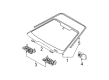
2002 Ford Focus Windshield, Front Part Number: 8S4Z-5403100-A
$228.70 MSRP: $335.83You Save: $107.13 (32%)Product Specifications- Other Name: Glass - Windscreen; Windshield, Front
- Position: Front
- Replaces: 7S4Z-5403100-A, 5S4Z-5403100-AA
- Base No.: 03100
- Item Weight: 36.70 Pounds
- Condition: New
- Fitment Type: Direct Replacement
- SKU: 8S4Z-5403100-A
- Warranty: This genuine part is guaranteed by Ford's factory warranty.
2002 Ford Focus Windshield
If you're seeking quality and affordability, look no further than our extensive inventory of genuine 2002 Ford Focus Windshield available at FordPartsDeal.com. You can confidently purchase our OEM 2002 Ford Focus Windshield as they are supported by the manufacturer's warranty and our hassle-free return policy, alongside the benefit of our fast delivery service.
2002 Ford Focus Windshield Parts Q&A
- Q: How to remove and install a windshield on 2002 Ford Focus?A: The first step to remove the windshield includes removing the Polyurethane (PU) adhesive cap followed by heating the PU adhesive for at least thirty minutes. Use the hood and disconnect the battery ground wire while the wiper motor stays in park position before uninstalling windshield wiper arms. First remove the cowl panels through three steps which include taking off the screw cover then removing the screw while releasing the clips. Start by lowering the hood and removing the panels located on the A-pillar trim sections. Vehicles equipped with a rooftop opening panel require removal of the overhead console while vehicles without this panel ought to disassemble the interior lamp that resides within the console. Start by eliminating the electrical connectors from their place and proceed to remove the interior mirror and sun visors and their retaining clips after opening the covers and unscrewing. Place two suitable blocks of material beside the headliner leading edge so they can act as spacers between headliner and roof. A suitable direct glazing cutter inside the vehicle must be used to prepare PU adhesive for maximum depths reaching 23 mm, 75 mm and 160 mm while wearing protective gloves and eye equipment against splinter injuries. Use fresh blades during glass removal because cutting blades need replacement to prevent damage to surrounding body parts and trim panels while you must note increased resistance while cutting through the glass locating pegs at the lower corners. The windshield glass should be removed by glazing suction cups in combination with weather strip removal. First remove all remaining glass locating pegs from the windshield glass flange then cut off the PU adhesive until it exposes 1 mm only on the flange but keeps away from the adhesive surface. The flange requires inspection for damages and rust before applying warm air (25°C) from a hot air gun to remove any moisture. Proper PU adhesive curing depends on this process. The technician must follow adhesive kit directions to prepare glass, flange and trimmed PU adhesive before building an 8 to 10 mm high continuous bead of PU adhesive along the bond line while discarding the first 100 mm as needed during setup to allow working time and overlapping any break in the bead by 20 mm to stop leaks. Install the windshield glass weather strip and position the windshield glass for installation by using glazing suction cups along with assistance until the adhesive cure has completed through suitable tape application. Open all door windows during the curing period to avoid pressure from building up inside the vehicle. Warm air at 25°C for 15 minutes must be used when ambient temperature stays below 10°C. The process ends with adding the headliner to the roof panel followed by installing the sun visor retaining clips and screws while closing both covers and placing the sun visors along with the interior mirror. The interior lamp electrical connectors need to be connected followed by lamp installation in vehicles without roof opening panels. Vehicles with roof opening panels need to receive their overhead consoles. The installation process concludes with placing A-pillar trim panels then raising the hood to complete the task by locating clips and installing the screw and screw cover followed by windshield wiper arm installation and battery ground cable reconnection and hood lowering.
Related 2002 Ford Focus Parts
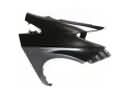 2002 Ford Focus Fender
 2002 Ford Focus Washer Pump
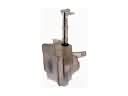 2002 Ford Focus Washer Reservoir
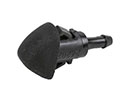 2002 Ford Focus Windshield Washer Nozzle
 2002 Ford Focus Wiper Arm
 2002 Ford Focus Wiper Motor
 2002 Ford Focus Ashtray
 2002 Ford Focus Car Mirror
 2002 Ford Focus Center Console Base
 2002 Ford Focus Door Latch Cable
 2002 Ford Focus Windshield Wiper
 2002 Ford Focus Wiper Blade