FordParts
My Garage
My Account
Cart
OEM 2005 Ford Crown Victoria Mirror Switch
Power Mirror Control Switch- Select Vehicle by Model
- Select Vehicle by VIN
Select Vehicle by Model
orMake
Model
Year
Select Vehicle by VIN
For the most accurate results, select vehicle by your VIN (Vehicle Identification Number).
1 Mirror Switch found


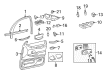 Product Specifications
- Other Name: Lever Assembly - Mirror Control; Door Mirror Switch, Front Left; Power Mirror Switch; Switch
- Manufacturer Note: Black, all w/power mirror
- Position: Front Driver Side
- Base No.: 17B676
- Item Weight: 0.50 Pounds
- Item Dimensions: 8.5 x 6.3 x 4.0 inches
- Condition: New
- Fitment Type: Direct Replacement
- SKU: F5TZ-17B676-A
- Warranty: This genuine part is guaranteed by Ford's factory warranty.
2005 Ford Crown Victoria Mirror Switch
If you're seeking quality and affordability, look no further than our extensive inventory of genuine 2005 Ford Crown Victoria Mirror Switch available at FordPartsDeal.com. You can confidently purchase our OEM 2005 Ford Crown Victoria Mirror Switch as they are supported by the manufacturer's warranty and our hassle-free return policy, alongside the benefit of our fast delivery service.
2005 Ford Crown Victoria Mirror Switch Parts Q&A
- Q: How to service the power mirror switch on 2005 Ford Crown Victoria?A: The first task for servicing the power mirror switch demands the use of a shop towel or equivalent to shield the front door trim panel from damages. The front part of the window regulator switch plate needs lifting out of the front door trim panel before the switch plate can be placed aside. The service for power mirror switch begins by removing the exterior mirror control switch after disconnecting its electrical connector and releasing its two locking tabs. The reverse steps used in dismantling will finalize the installation process.
Related 2005 Ford Crown Victoria Parts
 2005 Ford Crown Victoria Headlight Switch
 2005 Ford Crown Victoria Air Bag Control Module
 2005 Ford Crown Victoria Air Bag Sensor
 2005 Ford Crown Victoria Brake Controller
 2005 Ford Crown Victoria Car Key
 2005 Ford Crown Victoria Cylinder Head Temperature Sensor
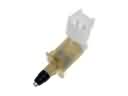 2005 Ford Crown Victoria Door Jamb Switch
 2005 Ford Crown Victoria Mirror Actuator
 2005 Ford Crown Victoria Neutral Safety Switch
 2005 Ford Crown Victoria Spark Plug
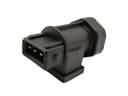 2005 Ford Crown Victoria Vehicle Speed Sensor
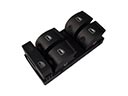 2005 Ford Crown Victoria Window Switch