FordParts
My Garage
My Account
Cart
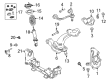
OEM 2005 Mercury Grand Marquis Control Arm
Suspension Arm- Select Vehicle by Model
- Select Vehicle by VIN
Select Vehicle by Model
orMake
Model
Year
Select Vehicle by VIN
For the most accurate results, select vehicle by your VIN (Vehicle Identification Number).
4 Control Arms found

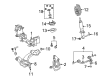
2005 Mercury Grand Marquis Lower Control Arm, Front Driver Side Part Number: 6W1Z-3079-AA
$439.76 MSRP: $608.37You Save: $168.61 (28%)Ships in 1-2 Business DaysProduct Specifications- Other Name: Arm Assembly - Front Suspension; Front Left Lower Control Arm and Ball Joint Assembly.; Control Arm
- Manufacturer Note: L.H., standard suspension, without special packages, FROM 08/03/05 TO 12/05/05
- Position: Front Lower Driver Side
- Replaces: 5W1Z-3079-AA
- Base No.: 3078
- Item Weight: 21.80 Pounds
- Item Dimensions: 5.1 x 18.9 x 22.1 inches
- Condition: New
- Fitment Type: Direct Replacement
- SKU: 6W1Z-3079-AA
- Warranty: This genuine part is guaranteed by Ford's factory warranty.

2005 Mercury Grand Marquis Upper Control Arm, Front Passenger Side Part Number: 6W1Z-3084-U
$89.73 MSRP: $147.64You Save: $57.91 (40%)Ships in 1-3 Business DaysProduct Specifications- Other Name: Arm Assembly - Front Suspension; Suspension Control Arm, Front Right Upper; Control Arm
- Position: Front Upper Passenger Side
- Replaces: 6W1Z-3084-R, 6W1Z-3084-T, 6W1Z-3084-S, MCSOE-35, 4W1Z-3084-RH, 5W1Z-3084-AA
- Item Weight: 8.20 Pounds
- Item Dimensions: 5.2 x 15.7 x 13.7 inches
- Condition: New
- Fitment Type: Direct Replacement
- SKU: 6W1Z-3084-U
- Warranty: This genuine part is guaranteed by Ford's factory warranty.
2005 Mercury Grand Marquis Upper Control Arm, Front Driver Side Part Number: 6W1Z-3085-N
$95.03 MSRP: $156.36You Save: $61.33 (40%)Ships in 1-3 Business DaysProduct Specifications- Other Name: Arm Assembly - Front Suspension; Suspension Control Arm, Front Left Upper; Control Arm
- Position: Front Upper Driver Side
- Replaces: 6W1Z-3085-L, 6W1Z-3085-M
- Item Weight: 8.60 Pounds
- Item Dimensions: 5.4 x 13.5 x 12.9 inches
- Condition: New
- Fitment Type: Direct Replacement
- SKU: 6W1Z-3085-N
- Warranty: This genuine part is guaranteed by Ford's factory warranty.
 Product Specifications
- Other Name: Arm Assembly - Front Suspension; Front Right Lower Control Arm and Ball Joint Assembly; Control Arm
- Manufacturer Note: R.H., standard suspension, without special packages, FROM 08/03/05 TO 12/05/05
- Position: Front Lower Passenger Side
- Replaces: 5W1Z-3078-AA
- Base No.: 3078
- Item Weight: 23.90 Pounds
- Item Dimensions: 5.0 x 18.9 x 22.3 inches
- Condition: New
- Fitment Type: Direct Replacement
- SKU: 6W1Z-3078-AA
- Warranty: This genuine part is guaranteed by Ford's factory warranty.
2005 Mercury Grand Marquis Control Arm
If you're seeking quality and affordability, look no further than our extensive inventory of genuine 2005 Mercury Grand Marquis Control Arm available at FordPartsDeal.com. You can confidently purchase our OEM 2005 Mercury Grand Marquis Control Arm as they are supported by the manufacturer's warranty and our hassle-free return policy, alongside the benefit of our fast delivery service.
2005 Mercury Grand Marquis Control Arm Parts Q&A
- Q: How Does the Control Arm Impact Suspension Service and Repair on 2005 Mercury Grand Marquis?A: The upper control arm service and repair process depends heavily on proper understanding that suspension fasteners represent vital elements that determine system performance and broken fastener failures result in expensive service-related costs. It is essential to use new fasteners that bear the same part number or equal-rated alternative components which should never include inferior replacement designs. The correct torque specifications must guide reinstallations and fasteners in their normal mounting direction on every rear suspension arm. The safe method to prevent accidental air spring changes during hoisting jacking or towing operations requires operators to disable the air suspension service switch. Record the wheel hub center to fender lip distance measurement when the vehicle rests on level ground for future guide in installation. Wheels should be detached first followed by gradual removal of right suspension arm-to-axle bracket bolts to prevent damage to the brake line. Throw away the flag nut before taking out the bolt as well as the upper arm. You can switch the rear suspension upper arms between the left and right positions but their labeling indicates correct front or outboard positioning when you install them. Use a suitable lifting system to elevate the suspension until the wheel hub center stands at the same distance from the fender lip as was recorded during disassembly. Follow the backward process to install the component.
Related 2005 Mercury Grand Marquis Parts
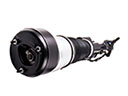 2005 Mercury Grand Marquis Air Suspension
 2005 Mercury Grand Marquis Coil Springs
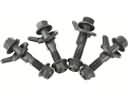 2005 Mercury Grand Marquis Alignment Bolt
 2005 Mercury Grand Marquis Axle Support Bushings
 2005 Mercury Grand Marquis Control Arm Bushing
 2005 Mercury Grand Marquis Radius Arm Bushing
 2005 Mercury Grand Marquis Shock And Strut Mount
 2005 Mercury Grand Marquis Steering Knuckle
 2005 Mercury Grand Marquis Sway Bar Bracket
 2005 Mercury Grand Marquis Sway Bar Kit
 2005 Mercury Grand Marquis Trailing Arm Bushing
 2005 Mercury Grand Marquis Wheel Seal