FordParts
My Garage
My Account
Cart
OEM 2008 Mercury Sable Windshield
Glass Windshield- Select Vehicle by Model
- Select Vehicle by VIN
Select Vehicle by Model
orMake
Model
Year
Select Vehicle by VIN
For the most accurate results, select vehicle by your VIN (Vehicle Identification Number).
1 Windshield found

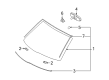
2008 Mercury Sable Windshield, Front Part Number: 8G1Z-5403100-AA
$265.83 MSRP: $390.35You Save: $124.52 (32%)Ships in 1-3 Business DaysProduct Specifications- Other Name: Glass - Windscreen; Windshield, Front
- Position: Front
- Base No.: <03100
- Item Weight: 36.40 Pounds
- Condition: New
- Fitment Type: Direct Replacement
- SKU: 8G1Z-5403100-AA
- Warranty: This genuine part is guaranteed by Ford's factory warranty.
2008 Mercury Sable Windshield
If you're seeking quality and affordability, look no further than our extensive inventory of genuine 2008 Mercury Sable Windshield available at FordPartsDeal.com. You can confidently purchase our OEM 2008 Mercury Sable Windshield as they are supported by the manufacturer's warranty and our hassle-free return policy, alongside the benefit of our fast delivery service.
2008 Mercury Sable Windshield Parts Q&A
- Q: How to reseal a windshield on 2008 Mercury Sable?A: The first step for windshield resealing requires you to remove the cowl panel grille followed by setting aside the left-hand (LH) and right-hand (RH) weather strips. Remove first the LH and RH A-pillar trim panels then proceed with removing the LH and RH sun visors. The technician should remove the overhead console and both the LH and RH assist handles when they apply. Place a supportive material beneath the front part of the headliner before proceeding. Apply glass cleaner to clean all windshield surfaces on both inside and outside parts. A 6mm (0.24 inch) trimmed piece of urethane adhesive applicator should be used with a high-ratio electric or battery-operated caulk gun to create a smooth adhesive bead without any openings. The vehicle receives urethane adhesive on the existing urethane covering both top and sides of the windshield from the inside and the bottom section from outside. Exam the urethane adhesive for completion through leak tests after one hour has passed. Continue adding urethane when necessary. The front part of the headliner must be repositioned before reattaching the assist handles on both sides and the overhead console followed by sun visors and the trim panels on A-pillars and weather strips before placing the cowl panel grille. Use glass cleaner to clean both windshield glass surfaces for a second time.
Related 2008 Mercury Sable Parts
 2008 Mercury Sable Ashtray
 2008 Mercury Sable Car Mirror
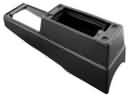 2008 Mercury Sable Center Console Base
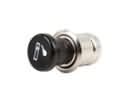 2008 Mercury Sable Cigarette Lighter
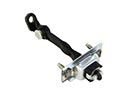 2008 Mercury Sable Door Check
 2008 Mercury Sable Door Hinge
 2008 Mercury Sable Floor Pan
 2008 Mercury Sable Fuel Filler Housing
 2008 Mercury Sable Mirror Cover
 2008 Mercury Sable Seat Cover
 2008 Mercury Sable Seat Switch
 2008 Mercury Sable Windshield Washer Nozzle