FordParts
My Garage
My Account
Cart
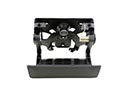
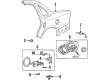
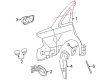
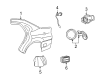
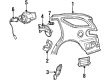
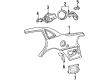
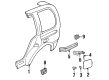
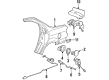
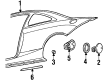
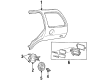
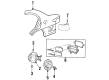
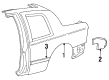
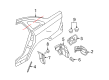
OEM Mercury Fuel Filler Housing
Fuel Pocket- Select Vehicle by Model
- Select Vehicle by VIN
Select Vehicle by Model
orMake
Model
Year
Select Vehicle by VIN
For the most accurate results, select vehicle by your VIN (Vehicle Identification Number).
21 Fuel Filler Housings found


Mercury Fuel Pocket, Rear Part Number: 8L2Z-7827936-A
$29.69 MSRP: $42.12You Save: $12.43 (30%)Ships in 1-2 Business DaysProduct Specifications- Other Name: Housing; Fuel Filler Housing, Rear; Fuel Filler Housing
- Position: Rear
- Replaces: 1L2Z-7827936-AA


Mercury Filler Pocket, Rear Part Number: 9E5Z-5427936-A
$47.60 MSRP: $68.10You Save: $20.50 (31%)Ships in 1-2 Business DaysProduct Specifications- Other Name: Housing; Fuel Filler Housing, Rear; Filler Neck Housing; Fuel Filler Housing
- Position: Rear

Mercury Housing, Rear Part Number: 8L8Z-7827936-A
$86.46 MSRP: $133.05You Save: $46.59 (36%)Ships in 1-2 Business DaysProduct Specifications- Other Name: Fuel Filler Housing, Rear
- Position: Rear

Mercury Fuel Pocket, Rear Part Number: 3W7Z-5427936-BA
$42.45 MSRP: $58.73You Save: $16.28 (28%)Ships in 1-2 Business DaysProduct Specifications- Other Name: Housing; Fuel Filler Housing, Rear; Fuel Filler Housing
- Manufacturer Note: w/o remote release
- Position: Rear
- Replaces: F5AZ-5427936-A

Mercury Filler Pocket, Rear Part Number: 6G1Z-5427936-A
$35.19 MSRP: $47.89You Save: $12.70 (27%)Product Specifications- Other Name: Housing - Fuel Tank; Fuel Filler Housing, Rear
- Position: Rear
- Replaces: 5G1Z-5427936-BA


Mercury Filler Pocket, Rear Part Number: 6E5Z-5427936-A
Product Specifications- Other Name: Housing - Fuel Tank Filler Pipe; Fuel Filler Housing, Rear; Fuel Filler Housing
- Position: Rear

Mercury Fuel Pocket Part Number: YF4Z5427936AA
Product Specifications- Other Name: Housing; Fuel Filler Housing

Mercury Fuel Pocket, Rear Part Number: YF1Z7427936AA
Product Specifications- Other Name: Housing; Fuel Filler Housing, Rear; Fuel Filler Housing
- Position: Rear

Mercury Fuel Pocket, Rear Part Number: YF1Z5427936AA
Product Specifications- Other Name: Housing; Fuel Filler Housing, Rear; Fuel Filler Housing
- Position: Rear

Mercury Fuel Pocket Part Number: XF5Z1227936BA
Product Specifications- Other Name: Housing; Fuel Filler Housing

Mercury Housing Part Number: F8RZ5427936BA
Product Specifications- Other Name: Housing - Fuel Tank Filler; Housing - Fuel Tank Filler Pipe

Mercury Filler Pocket Part Number: F8RZ-6327936-AA
Product Specifications- Other Name: Housing; Fuel Filler Housing

Mercury Fuel Pocket Part Number: F7CZ7427936AA
Product Specifications- Other Name: Housing; Fuel Filler Housing
Mercury Fuel Pocket Part Number: F7CZ-5427936-AD
Product Specifications- Other Name: Housing; Fuel Filler Housing
Mercury Housing Part Number: F6SZ6327936A

Mercury Housing Part Number: F1TZ-7827936-A

Mercury Filler Pocket, Rear Part Number: 8G1Z-5427936-A
Product Specifications- Other Name: Housing - Fuel Tank; Fuel Filler Housing, Rear
- Position: Rear

Mercury Filler Pocket Part Number: 4F2Z-1727936-AA
Product Specifications- Other Name: Housing; Fuel Filler Housing
- Replaces: XF2Z-1627936-AA
Mercury Fuel Pocket, Rear Part Number: 1W7Z-5427936-AA
Product Specifications- Other Name: Housing; Fuel Filler Housing, Rear; Fuel Filler Housing
- Manufacturer Note: w/remote release
- Position: Rear
Mercury Fuel Pocket Part Number: 1F4Z-5427936-AA
Product Specifications- Other Name: Housing; Fuel Filler Housing
- Manufacturer Note: After 3/12/01
| Page 1 of 2 |Next >
1-20 of 21 Results
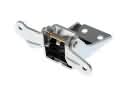
Mercury Fuel Filler Housing
If you own Mercury and want to keep it in top shape, choosing OEM Fuel Filler Housing is a smart move. They are precisely engineered and follow strict factory standards. They are made in advanced facilities that use cutting edge technology. Each part goes through thorough testing to confirm strength and safety, so you can trust it. FordPartsDeal.com gives you genuine Mercury Fuel Filler Housing at some of the affordable online prices without cutting quality. Every OEM Mercury part includes the manufacturer's warranty, easy returns, and super-fast delivery. So why wait? Shop now and get your vehicle back to peak condition.
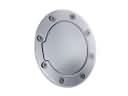
Mercury Fuel Filler Housing keeps the filler neck dry and clean and ensures each refueling stop is fast and clean. Since its inception in 1938, Mercury has won admirers with its mid sized vehicles combining speedy performance with smooth ride and eye-catching design, and the Cougar and Grand Marquis seemed like sports cars and comfortable roadsters. The brand applied the fleet footed Roman messenger as its logo that assured them that the cars of Mercury would provide speed, dependability and a good value and offered silent cabins, early power choices and trunk space to keep families content on extended vacation. Although it was shut down in 2011, Mercury continued to be praised even as a production came to an end due to striking a balance between posh features and affordable prices, as the owners go on to carry the legacy in the form of meticulous cruises. Mercury waterfall grilles and two tone paint are still appreciated by the collectors. The Fuel Filler Housing is a tough plastic pocket that holds the fuel door, directs the nozzle and ensures that the cap keeps dry. In order to install new Fuel Filler Housing, park your Mercury on a level surface, turn off the engine, open the fuel door and take all the inner liner off to expose fasteners. Unbolt the old Fuel Filler Housing, remove it by sliding it off the filler neck, remove rubber seals, replace with new ones, align tabs, press them together until they clamp, tighten the hardware, reattach the tube and tether, fit the liner back on, open and close the door, ensuring that the seal fits flushly, and lastly wipe everything down as the area might still have some dust.