FordParts
My Garage
My Account
Cart
OEM Mercury Villager Starter
Starter Ignition- Select Vehicle by Model
- Select Vehicle by VIN
Select Vehicle by Model
orMake
Model
Year
Select Vehicle by VIN
For the most accurate results, select vehicle by your VIN (Vehicle Identification Number).
2 Starters found

Mercury Villager Starter Part Number: F5XY-11002-A
Mercury Villager Starter Part Number: XF5Z-11002-AA
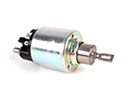
Mercury Villager Starter
OEM Starter boasts unmatched quality. Each part goes through full quality checks. They adhere to Mercury's official factory standards. These steps remove flaws and inconsistencies. So you can get Starter with long life and a perfect fit. Come to our website and find genuine Mercury Villager parts. We keep a wide inventory of OEM Villager parts at the highly affordable prices. It's easy to search, compare, and pick what you need. You'll love the clear info and simple checkout. We offer top-rated customer service, and we reply fast. We also ship promptly to ensure your order arrives on time.
Mercury Villager Starter spins the VG30E or 3.0L V6 to life in a hurry, providing owners with reliable ignition on a daily basis. Mercury engineers design the Villager minivan that combined sedan-style handling with the space required by families, with 151 horsepower its first few years and later 170 horsepower with more powerful torque for confident passing. The first generation Mercury Villager had a non-interference V6 which saved repair costs in the event of a timing belt snap and practical sliding doors, generous glass area and optional Autovision screens kept the passengers happy on long trips. The second generation Mercury Villager included such standard features as anti-lock brakes, front side airbags, and trim models such as GS, LS, and Nautica for shoppers to customize comfort and appearance to budget, all while keeping the reputation of reliable performance when serviced with factory parts. The Starter is low on the transaxle bell housing, pulling battery power in via a thick cable and its small electric motor spins a pinion which engages the flywheel so the engine starts instantly. Built to factory specs, the Starter resists heat soak and vibration, provides rapid cranking even in cold weather and a worn unit will show itself by grinding, slow spins or sharp clicks so replacing the Starter restores some confidence and protects the vehicle's electronics. Installation is simple, disconnect the battery, lift the van, unbolt the old one, set the new one snugly, tighten the bolts, reattach the wires, then test.