FordParts
My Garage
My Account
Cart
OEM Mercury Villager Timing Belt
Engine Timing Belt- Select Vehicle by Model
- Select Vehicle by VIN
Select Vehicle by Model
orMake
Model
Year
Select Vehicle by VIN
For the most accurate results, select vehicle by your VIN (Vehicle Identification Number).
1 Timing Belt found

Mercury Villager Timing Belt Part Number: F3XZ6268BA
Mercury Villager Timing Belt
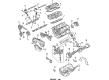
OEM Timing Belt boasts unmatched quality. Each part goes through full quality checks. They adhere to Mercury's official factory standards. These steps remove flaws and inconsistencies. So you can get Timing Belt with long life and a perfect fit. Come to our website and find genuine Mercury Villager parts. We keep a wide inventory of OEM Villager parts at the highly affordable prices. It's easy to search, compare, and pick what you need. You'll love the clear info and simple checkout. We offer top-rated customer service, and we reply fast. We also ship promptly to ensure your order arrives on time.
The Mercury Villager Timing Belt is well-known as well as an original part popular for its durability and efficiency, which is instrumental in the proper functioning's of Mercury Villager vehicles. This Timing Belt coordinates the crankshaft and the camshaft making sure that the engine valves open and close in the correct time with piston movements for the premier performance of the engine. Suitable for diverse Mercury Villager types, this Timing Belt boosts performance and reliability; a properly working belt is crucial for the smooth operation of the vehicle; should it fail, especially in interference engines, serious consequences are possible. The Mercury Villager Timing Belt is constructed with special materials and designs such as the curved teeth to enhance durability and reduce noise in addition to increased power making it unique in the market. Due to longer replacement intervals of over 60,000 miles, this Timing Belt highlights the contemporary automotive engineering stressing on the need for regular checking and replacement. The Mercury Villager since its launch in 1992 has evolved its performance and the parts and the Timing Belt is no exception. Besides the standard advantages to the vehicle's performance when subjected to the Mercury Villager Timing Belt, the improved tension and pulley alignment provided by the tensioner and idler pulleys also work to make it safer to drive the car. In summary, the Mercury Villager Timing Belt is highly reliable hence making it the premier for those who want to ensure that their Mercury Villager is running efficiently and without any issues.
Mercury Villager Timing Belt Parts and Q&A
- Q: How to service and repair the timing belt on Mercury Villager?A:The maintenance process for the timing belt begins with draining the engine cooling system followed by removing bolts from the crankshaft pulley and water pump pulley. The next step of servicing the timing belt requires removing the six bolts from the lower timing belt cover followed by lowering the vehicle. Begin by unclipping the clamps above the Radiator Hose and removing the bolt before moving to detach the coolant bypass hose that needs its clamps to be released. Dispose the A/C compressor idler pulley and bracket through bolt removal before placing wire harnesses to the side after unclipping them. First disconnect the vacuum reservoir vacuum hose and unclip the main wire harness before repositioning it and unclip another wire harness to place it aside. Start by releasing the clamps of the spark plug wire and removing the bolt before taking out the positive crankcase ventilation breather hoses and tubing followed by removing the bolt. The timing belt covers require removal through separation of seven upper and seven lower cover bolts. The mechanic first positions the number 1 piston at Top Dead Center (TDC) of its compression stroke then removes the timing belt guide and belt through nut and tension loosening. Before placing the new timing belt be certain to position the arrow toward the opposite direction of the engine along with precise alignment of the three white timing marks with their respective camshaft and crankshaft timing marks. The timing marks on the left and right camshaft sprockets should have 40 teeth separation while the left camshaft sprocket and crankshaft sprocket should have 43 teeth separation. Check that the camshaft timing marks located on the seal plate match the crankshaft sprocket timing mark while it points to the oil pump timing mark. First, begin belt installation at the crankshaft sprocket before moving it in a counterclockwise direction to attach to the camshaft sprockets with no looseness in the belt. Install the timing belt on the tensioner after proper timing mark alignment then raise the vehicle before installing the crankshaft pulley bolt. To properly set piston number one at TDC the technician must rotate the tensioner clockwise then counterclockwise twice before locking the nut and manually moving the crankshaft two full rotations clockwise. Press the timing belt in its center point then measure the amount of deflection that results between both camshaft sprockets. Start by removing the crankshaft pulley bolt then lower the vehicle before installing the outer timing belt guide followed by the upper timing belt cover through bolt installation of its seven components. Join all PCV breather tubes and tubes to their clamps before installing the securing bolt. First reinstall the wire harness bracket and then put on the spark plug wire followed by connection of the main wire harness. Follow these steps to attach the vacuum reservoir vacuum hose while the technician returns the wire harness back before they mount both the A/C compressor idler pulley and bracket using their bolts. Bypass the coolant hose and secure its clamps while connecting the upper hose and positioning both clamps before installing the bolt. You should raise the vehicle for installing the six lower timing belt cover bolts followed by the water pump pulley and crankshaft pulley. Fill the complete engine cooling system as the last step.
Related Mercury Villager Parts
 Mercury Villager Camshaft
 Mercury Villager Crankshaft Pulley
 Mercury Villager Crankshaft Seal
 Mercury Villager Dipstick
 Mercury Villager Dipstick Tube
 Mercury Villager Engine Mount Bracket
 Mercury Villager Exhaust Valve
 Mercury Villager Oil Filler Cap
 Mercury Villager Oil Filter
 Mercury Villager Oil Pan Gasket
 Mercury Villager Piston Ring Set
 Mercury Villager Timing Cover Gasket