My Garage
Cart
Make sure this part fits

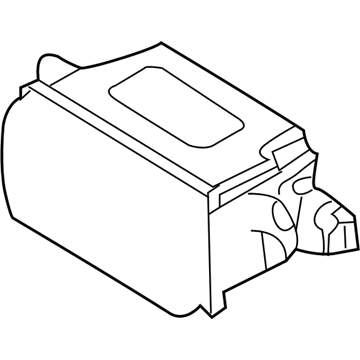
Ford 4R8Z-9E731-A
Speed Sensor

2009-2010 Lincoln MKS 4R8Z9E731A

Customer Questions & Expert Answers (2)
Ford 4R8Z-9E731-A Speed Sensor
  • Part Description
    Sensor Assembly - Speed
  • Base No.
    9S339
  • Manufacturer
    Ford
Make sure this part fits
$1372.25 MSRP: $1898.38
You Save: $526.13 (28%)
Ships in 1-2 Business Days
1
ADD TO CART
  • Related Parts
  • Product Specifications
  • Vehicle Fitment
  • Customer Questions & Expert Answers
  • Product Specifications

    BrandGenuine Ford
    Base No.9S339
    Manufacturer Part Number4R8Z-9E731-A
    Part DescriptionSensor Assembly - Speed
    Other NamesDistance Sensor
    Item Dimensions4.1 x 4.3 x 7.6 inches
    Item Weight3.10 Pounds
    ConditionNew
    Fitment TypeDirect Replacement
    ManufacturerFord
    SKU4R8Z-9E731-A
    Shipping & ReturnShipping Policy Return Policy
    Warning: California's Proposition 65
  • Vehicle Fitment

    Year Make Model Trim Engine
    2009-2010 Lincoln MKSBase, EcoBoost6 Cyl 3.5 L GAS, 6 Cyl 3.7 L GAS
  • Customer Questions & Expert Answers

    Q:
    Is this 4R8Z-9E731-A compatible with my car? Posted by FordPartsDeal Specialist
    A:
    Select Your Vehicle model to verify if part number 4R8Z-9E731-A fits your car.
    Posted by FordPartsDeal Specialist
    Q:
    How to Service and Repair a Vehicle Speed Sensor on a 6F50 Transmission on Lincoln MKS? Posted by Customer
    A:
    Start the service and repair process of the Output Shaft Speed (OSS) sensor for a 6F50 transmission when you place your vehicle on a hoist while keeping it in NEUTRAL position. The vehicle requires disconnecting two components: the Mass Air Flow (MAF) sensor electrical connector and the engine breather from the Air Cleaner (ACL) assembly. Begin by unscrewing both ACL assembly bracket bolts while loosening the outlet pipe clamp at the Throttle Body and afterward remove the ACL and outlet pipe assembly. You should drain transmission fluid with the drain plug and reinstall it by tightening it to a torque of 9 Nm (80 lb-in). First remove the selector lever cable from its connection point with the manual control lever and next move away the coolant hoses from the transmission fluid filler tube. Tear off the transmission fluid level indicator before removing the nut which allows you to detach the transmission fluid filler tube by rotating it counterclockwise 90 degrees. Cresent the thermal bypass valve connector on the transmission fluid cooler tube, discard the bolt from the hose and detach the tube. Verify that the transmission fluid cooler tube seal along with its backing ring do not remain stuck inside the transaxle case. Remove the obstructions if they are present. First disconnect the transaxle electrical connector before removing the fastener which secures the wiring harness to the main control cover stud. You should start by removing the nut and manual control lever before taking out the two nuts which will allow you to pull the thermal bypass valve upward. First remove the 14 bolts from the main control cover while making a mental note of where the stud bolts should be placed for subsequent reinstallation. The user must disconnect the Transmission Range (TR) sensor electrical connector followed by detaching the Turbine Shaft Speed (TSS) and OSS sensor electrical connectors. Handle the solenoid body carefully when removing its eleven bolts because the leadframe area and solenoid body filter screens should be avoided to prevent damage during removal. Detach the solenoid body filter assembly in an upward direction and discard the filter component. Disassemble the 10 bolts and TR sensor detent spring and main control valve body where you should later install the bolt and OSS sensor. The first installation step requires you to fit the OSS sensor along with its bolt which needs to be tightened to 12 Nm (106 lb-in). Before placing the main control valve body always make sure to correctly install the manual pin from the TR sensor within the manual valve. Screw in the ten bolts and TR sensor detent spring in the proper order while tightening them to 12 Nm (106 lb-in). The new solenoid body filter assembly needs correct alignment before its installation with 11 bolts of different lengths until it reaches 12 Nm (106 lb-in) torque. Connect the electrical connectors of OSS, TR and TSS sensors while making sure the wiring harnesses avoid any pinching. Check the transaxle side cover seal for damage then conduct replacement when needed. Attach the main control cover after positioning the solenoid body connector seal in the correct spot and tighten the 14 bolts to a torque of 12 Nm (106 lb-in). Fasten the thermal bypass valve together with the cooler tube assembly while tightening its connecting nuts to 9 Nm (80 lb-in). Install the wiring harness fastener while connecting both the transaxle electrical connector to its components. Subject the transmission fluid cooler tube seal to inspection then lubrication before installing it with a new bolt tightened to 9 Nm (80 lb-in) along with the cooler tube fitting tightened to 25 Nm (18 lb-ft). After installation of the manual control lever along with its tightening nut to 18 Nm (159 lb-in) the service technician must tighten the transmission fluid filler tube with its nut to 11 Nm (97 lb-in). The technician then performs the installation of the transmission fluid level indicator. Guide the coolant hoses to their original placement which should be at the transmission fluid filler tube location. After placing the manual control lever into DRIVE position separate the selector lever cable end from the manual control lever before fixing the adjuster in place. The ACL assembly requires installation with 11 Nm (97 lb-in) of torque on the two bracket bolts while the ACL outlet pipe clamp at the TB needs 5 Nm (44 lb-in) of torque for the installation and reconnecting the engine breather to the ACL assembly and MAF sensor electrical connector reattachment. The transmission space requires clean fluid at its proper measurement.
    Posted by FordPartsDeal Specialist
    If you have any questions about this product, please don't hesitate to ask us. We will be happy to help you!

OEM Ford 4R8Z-9E731-A, Excellent Performance and Perfect Fitment

To ensure reliability, purchase Ford part # 4R8Z-9E731-A Speed Sensor. It is sometimes referred to as Ford Vehicle Speed Sensor. For those Ford owners who aspire to maintain their vehicles in optimal shape, opting for OEM parts is a wise choice. Precisely engineered, these components adhere to stringent factory guidelines and are produced in state-of-the-art facilities using cutting-edge technologies. Moreover, they are subjected to thorough testing to certify their resilience and safety, thereby making them a dependable option for Ford owners.

FordPartsDeal.com is a leading supplier of genuine Ford parts such as Ford 4R8Z9E731A Speed Sensor. A vast selection of genuine Ford parts is available on our website, all offered at discounted prices. Every OEM Ford part is covered by the manufacturer's warranty, which also applies to our hassle-free return policy. Enjoy fast delivery service, ensuring you get your parts when you need them. Your shopping experience here is guaranteed to be pleasurable. For detailed Lincoln parts information, click here.
Choose FordPartsDeal for discounted prices, exceptional service and fast delivery