FordParts
My Garage
My Account
Cart
Fender & Components
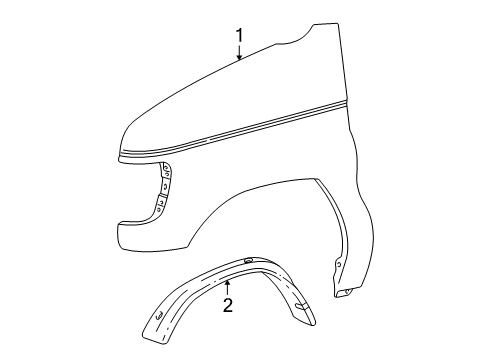
2005 Ford E-250 Fender
Currently shopping for
2005 Ford E-250
Change VehicleVehicle Options
BaseVehicle Options
BaseCategories Close X
Currently selected
Body & Hardware
- Back Door - Lock & Hardware
- Back Door & Components
- Bumper & Components - Front
- Bumper & Components - Rear
- Console
- Cowl
- Door - Hardware
- Door & Components
- Engine Cover & Components
- Fender & Components
- Floor
- Front Door
- Glass - Door
- Glass - Side Door
- Glass - Side Panel
- Glass - Windshield
- Grille & Components
- Hardware
- Hood & Components
- Inner Structure & Rails - Side Panel
- Instrument Panel
- Outside Mirrors
- Radiator Support
- Rear Door
- Rear Floor & Rails
- Reveal Moldings
- Roof & Components
- Seat Belt
- Side Door
- Side Panel & Components
- Spare Tire Carrier
- Stripe Tape
- Structural Components & Rails
- Tracks & Components
- Uniside
- Wiper & Washer Components
Other Categories
A/C & Heating
Air & Fuel Delivery
Belts & Cooling
Brakes
Charging & Starting
Driveline & Axles
Electrical
Emission Control & Exhaust
Engine
Headlights & Lighting
Interior & Exterior Trim
Maintenance & Lubrication
Steering
Suspension
Transmission
How to use OE catalog
Diagram (1 of 1): Fender - Fender & Components
Sort by:
Ref No.
Ref No.
Part No. & Part Description
Price & Qty.
Part No. &
Part Description
Part Description
- 1


 MSRP: $496.02 Your Price: $318.441
 - 1
- 2

 MSRP: $23.67 Your Price: $16.691
 - 2MSRP: $22.45 Your Price: $15.831
 MSRP: $13.95 Your Price: $9.831
 MSRP: $72.57 Your Price: $48.461
 MSRP: $72.57 Your Price: $50.721
 MSRP: $56.03 Your Price: $38.491
- MSRP: $55.13 Your Price: $38.541
 2C2Z-16005-AA
Fender Assy - Front- Part Notes: Fender Assy - Front
- Location: Passenger Side
- Production Date: 08/2004-08/2006
- Fitting Vehicle Options: Cutaway, Extended Van, Extended Wagon, Regular Van, Regular Wagon
- Callout Name: 16005
- Replaced By: 7C2Z-16005-A
MSRP: $496.02 Your Price: $318.44
 2C2Z-16006-AA
Fender Assy - Front- Part Notes: Fender Assy - Front
- Location: Driver Side
- Production Date: 08/2004-08/2006
- Fitting Vehicle Options: Cutaway, Extended Van, Extended Wagon, Regular Van, Regular Wagon
- Callout Name: 16005
- Replaced By: 7C2Z-16006-A
 -N805024-S901
Nut And Washer Assy - Hex.- Part Notes: M8 Hex , Nut , Nut & Washer - Hex
- Production Date: From 08/2004
- Fitting Vehicle Options: With Gas Engines
- Callout Name: HM1
MSRP: $4.00 Your Price: $2.35
OEM 2005 Ford E-250 Parts for Fender & Components
Genuine OEM 2005 Ford E-250 parts are made using the original design, the high standards, in the Ford official factories, and all of these ensure that they always fit perfectly and easily. FordPartsDeal.com is a trusted source for finding these authentic OEM Fender & Components parts at very competitive prices. Our professional team is here to help you choose the right 2005 Ford E-250 Fender, and our fast delivery options ensure that your parts are always delivered quickly.
Fender Installation and Repair Tips for 2005 Ford E-250
- Q: How to service the front fender on 2005 Ford E-250?A: In order to service the front fender, take out the radiator grille opening panel reinforcement and the screws holding the splash shield. Disassemble the fender-to- cowl side brackets and take out the front fender-to-radiator support screw. Lastly, remove the front fender by removing the upper apron retaining screws. Uninstall these steps in reverse order to install.