FordParts
My Garage
My Account
Cart
Antenna & Radio
2006 Ford E-250 Antenna Base, Car Speakers
Currently shopping for
2006 Ford E-250
Change VehicleVehicle Options
BaseVehicle Options
BaseCategories Close X
Currently selected
Electrical
Other Categories
A/C & Heating
Air & Fuel Delivery
Belts & Cooling
Body & Hardware
Brakes
Charging & Starting
Driveline & Axles
Emission Control & Exhaust
Engine
Headlights & Lighting
Interior & Exterior Trim
Maintenance & Lubrication
Steering
Suspension
Transmission
How to use OE catalog
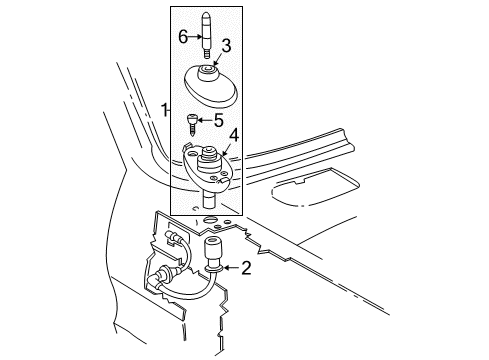
Diagram (1 of 1): Electrical - Antenna
Sort by:
Ref No.
Ref No.
Part No. & Part Description
Price & Qty.
Part No. &
Part Description
Part Description
- 1
 MSRP: $45.55 Your Price: $32.111
- 2


- 3


 MSRP: $28.33 Your Price: $19.98
- 4
 MSRP: $28.33 Your Price: $19.98
- 5

 MSRP: $2.50 Your Price: $1.474


 MSRP: $26.58 Your Price: $18.261
 3R3Z-18936-AA
Support - Radio Aerial- Fit Note: With Radio
- Production Date: 08/2004-08/2007
- Callout Name: 18936B
- Replaced By: 3C2Z-18936-AA
MSRP: $28.33 Your Price: $19.98

 5C3Z-18813-AA
Kit - Aerial- Part Notes: Black Coated
- Fit Note: With Radio
- Production Date: 05/2005-08/2007
- Fitting Vehicle Options: All Reg/Extended Vans/Wagons
- Callout Name: 18813
- Replaced By: MCPZ-18813-D
MSRP: $45.55 Your Price: $32.11
OEM 2006 Ford E-250 Parts for Antenna & Radio
Genuine OEM 2006 Ford E-250 parts are made using the original design, the high standards, in the Ford official factories, and all of these ensure that they always fit perfectly and easily. FordPartsDeal.com is a trusted source for finding these authentic OEM Antenna & Radio parts at very competitive prices. Our professional team is here to help you choose the right 2006 Ford E-250 Antenna Base, Car Speakers, and our fast delivery options ensure that your parts are always delivered quickly.
Antenna Installation and Repair Tips for 2006 Ford E-250
- Q: How to service and repair the radio antenna on 2006 Ford E-250?A: To remove the radio antenna, unscrew the radio antenna base cap and three screws to remove the antenna mast and base. Reposition of the lead-in cable, disposition of fender splash shield, instrument panel and trim panel. Lastly, unconnection of the audio unit and lead-in cable and repeat the process when attaching it.