FordParts
My Garage
My Account
Cart
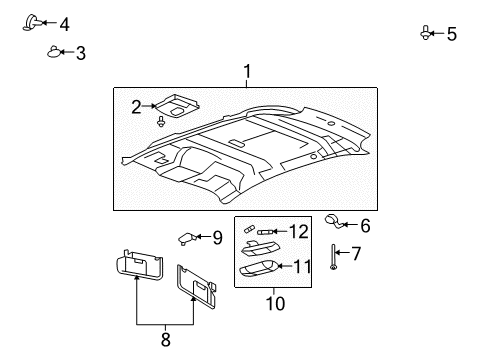
Interior Trim - Roof
2008 Lincoln MKX Sun Visor
Currently shopping for
2008 Lincoln MKX
Change VehicleVehicle Options
Base; 6 Cyl 3.5 L GASVehicle Options
Base; 6 Cyl 3.5 L GASCategories Close X
Currently selected
Interior & Exterior Trim
- Exterior Trim - Fender
- Exterior Trim - Front Door
- Exterior Trim - Hood
- Exterior Trim - Lift Gate
- Exterior Trim - Pillars
- Exterior Trim - Rear Door
- Interior Trim - Front Door
- Interior Trim - Lift Gate
- Interior Trim - Pillars
- Interior Trim - Quarter Panels
- Interior Trim - Rear Body
- Interior Trim - Rear Door
- Interior Trim - Roof
- Roof Trim
Other Categories
A/C & Heating
Air & Fuel Delivery
Belts & Cooling
Body & Hardware
Brakes
Charging & Starting
Driveline & Axles
Electrical
Emission Control & Exhaust
Engine
Headlights & Lighting
Maintenance & Lubrication
Steering
Suspension
Transmission
How to use OE catalog
Diagram (1 of 1): Roof - Interior Trim
Sort by:
Ref No.
Ref No.
Part No. & Part Description
Price & Qty.
Part No. &
Part Description
Part Description
- 1

- 1
- 1
- 1
- 1
- 1
- 3
 MSRP: $19.27 Your Price: $14.161
- 4

 MSRP: $16.00 Your Price: $9.401
- 5
 MSRP: $2.13 Your Price: $1.254
 - 5
- 6

 MSRP: $19.73 Your Price: $13.911
 - 6
- 7
 -W504349-S300
Screw - Pan Head - Self-TappingCoat Hook Screw- Part Notes: 2007-08
- Location: Driver Side;Passenger Side
MSRP: $3.25 Your Price: $1.924
- 8

- 8MSRP: $61.38 Your Price: $44.371
- 8MSRP: $71.75 Your Price: $51.861
- 8
 MSRP: $160.10 Your Price: $115.731
 - 8MSRP: $275.42 Your Price: $199.091
- 8MSRP: $287.62 Your Price: $207.911
- 9


 MSRP: $24.22 Your Price: $17.071
 - 9
- 10
 MSRP: $50.64 Your Price: $37.221
- 11

 MSRP: $16.25 Your Price: $11.461
- 12


 MSRP: $7.17 Your Price: $5.0510


 MSRP: $21.05 Your Price: $14.461
 7T4Z-7811600-AC
Liner - Load Compartment- Part Notes: 5.00 LBS , Cargo Logic , Medium Dark Pebble
- Production Date: 11/2006-09/2008
- Callout Name: <11600B
- 8A1Z-7827406-CC
Panel Assy - Door Trim- Part Notes: (-W*)
- Location: Passenger Side
- Fit Note: Charcoal Black Interior, Limited Edition Package
- Production Date: 09/2007-12/2014
- Callout Name: <27406
MSRP: $492.58 Your Price: $356.07

 3W1Z-13776-A
Lamp Assy - Luggage Compartment- Part Notes: Luggage Compartment Lamp
- Production Date: 11/2006-09/2008
- Callout Name: 13776C
- Replaced By: 3W1Z-13A756-AA
MSRP: $17.73 Your Price: $11.16
OEM 2008 Lincoln MKX Parts for Interior Trim - Roof
Genuine OEM 2008 Lincoln MKX parts are made using the original design, the high standards, in the Lincoln official factories, and all of these ensure that they always fit perfectly and easily. FordPartsDeal.com is a trusted source for finding these authentic OEM Interior Trim - Roof parts at very competitive prices. Our professional team is here to help you choose the right 2008 Lincoln MKX Sun Visor, and our fast delivery options ensure that your parts are always delivered quickly.
Dome Light Installation and Repair Tips for 2008 Lincoln MKX
- Q: How to service and repair the Dome Light on 2008 Lincoln MKX?A: The lighting on top of the dome has to be serviced, so pull down the overhead console and unplug the electrical connectors. Disassemble the lamp assembly and lens with the help of the clips. Replace bulbs as needed. In the case of the rear lamp, take the lens out, loosen the clips and also loosen the electric connection. Reverse to reinstall.