FordParts
My Garage
My Account
Cart
OEM 2001 Ford Focus Blower Motor
A/C Heater Blower Motor- Select Vehicle by Model
- Select Vehicle by VIN
Select Vehicle by Model
orMake
Model
Year
Select Vehicle by VIN
For the most accurate results, select vehicle by your VIN (Vehicle Identification Number).
1 Blower Motor found

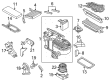
2001 Ford Focus Blower Motor Part Number: YS4Z-19805-AB
$87.07 MSRP: $143.27You Save: $56.20 (40%)Product Specifications- Other Name: Blower Assembly; HVAC Blower Motor Assembly; HVAC Blower Motor; HVAC Blower Motor and Wheel
- Replaces: MM-1018, 2T1Z-18568-A, YS4Z-19805-AA
- Base No.: 18568
- Item Weight: 4.30 Pounds
- Item Dimensions: 10.5 x 7.8 x 9.1 inches
- Condition: New
- Fitment Type: Direct Replacement
- SKU: YS4Z-19805-AB
- Warranty: This genuine part is guaranteed by Ford's factory warranty.
2001 Ford Focus Blower Motor
If you're seeking quality and affordability, look no further than our extensive inventory of genuine 2001 Ford Focus Blower Motor available at FordPartsDeal.com. You can confidently purchase our OEM 2001 Ford Focus Blower Motor as they are supported by the manufacturer's warranty and our hassle-free return policy, alongside the benefit of our fast delivery service.
2001 Ford Focus Blower Motor Parts Q&A
- Q: How to service and repair the blower motor on 2001 Ford Focus?A: Service and repair of the blower motor begins with trimming the lower passenger side footwell as well as disconnecting the floor level ventilation hose. The first step involves unplugging the motor and removing its three screws before extracting the blower device. Begin the installation procedure by removing the floor level ventilation hose along with the glove compartment before starting. In order to prevent heater system noises you should select the "Head area" position on the air distribution switch combined with "MAX cooling" on the temperature control. Remove the passive side defrost nozzle air duct after unclipping it then position it over the open glove compartment cover. The installation requires cutting off the two-part plastic joining tang from the heater housing by using side cutters which starts at the top then breaks off at the bottom before disposal to prevent any component access behind the fascia crash padding. The technician will need to cut a 50x50 mm square from sealing tape before locating the heater housing gap and securely attaching the tape from inside with careful pressure application. Reassemble all components beginning from the opposite order yet maintain attention to heater housing edges to avoid injuries.
Related 2001 Ford Focus Parts
 2001 Ford Focus Cabin Air Filter
 2001 Ford Focus A/C Compressor
 2001 Ford Focus Heater Core
 2001 Ford Focus Blend Door Actuator
 2001 Ford Focus Blower Motor Resistor
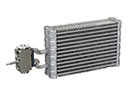 2001 Ford Focus Evaporator
 2001 Ford Focus A/C Accumulator
 2001 Ford Focus A/C Condenser
 2001 Ford Focus A/C Hose
 2001 Ford Focus A/C Orifice Tube
 2001 Ford Focus A/C System Valve Core
 2001 Ford Focus HVAC Pressure Switch