FordParts
My Garage
My Account
Cart
OEM 2002 Lincoln Town Car Timing Cover
Engine Timing Cover- Select Vehicle by Model
- Select Vehicle by VIN
Select Vehicle by Model
orMake
Model
Year
Select Vehicle by VIN
For the most accurate results, select vehicle by your VIN (Vehicle Identification Number).
1 Timing Cover found


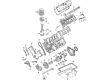
2002 Lincoln Town Car Timing Cover, Front Part Number: 2W7Z-6019-AB
$142.32 MSRP: $207.17You Save: $64.85 (32%)Product Specifications- Other Name: Cover - Cylinder Front; Engine Timing Cover; Front Cover
- Manufacturer Note: Includes 6020 gaskets, 6B209 tensioner & attaching hardware., 2v; With guided tensioner
- Position: Front
- Replaces: 2W7Z-6019-AA
- Base No.: 6019
- Item Weight: 13.10 Pounds
- Item Dimensions: 6.6 x 22.6 x 21.7 inches
- Condition: New
- Fitment Type: Direct Replacement
- SKU: 2W7Z-6019-AB
- Warranty: This genuine part is guaranteed by Ford's factory warranty.
2002 Lincoln Town Car Timing Cover
If you're seeking quality and affordability, look no further than our extensive inventory of genuine 2002 Lincoln Town Car Timing Cover available at FordPartsDeal.com. You can confidently purchase our OEM 2002 Lincoln Town Car Timing Cover as they are supported by the manufacturer's warranty and our hassle-free return policy, alongside the benefit of our fast delivery service.
2002 Lincoln Town Car Timing Cover Parts Q&A
- Q: How to service and repair the timing cover on 2002 Lincoln Town Car?A: The service and repair of the timing cover starts with battery ground cable disconnection followed by the removal of both valve covers. Raise the vehicle after removing the water pump to work on the necessary areas. Drain engine oil from the pan when you detach all power steering pump bolts and move it away from the rest of the components. The operation starts with removing four bolts from the engine front cover followed by lowering the vehicle to extract the crankshaft front seal. Start by taking off the bolt holding the belt idler pulley and then removing the engine front cover by disconnecting its bolts and stud bolts from the front-cover-to-cylinder-block dowel. Before installation begins, cleaning the sealing area with metal surface cleaner followed by drying time of two minutes will be necessary. Spare areas for sealant must be applied between the cylinder head and block as well as between the oil pan and block. Mount the front cover on the dowel after that install its bolts in a loose manner. Secure the engine front cover bolts by first torquing fasteners 1 through 7 to 20-30 Nm (15-22 ft. lbs.) then continuing with fasteners 6 through 15 to 40-55 Nm (29-40 ft. lbs.). Position the belt idler pulley then bolt it into place before setting a new front oil seal onto the engine front cover. You should raise the vehicle again to put the front oil pan bolts in position before performing this two-step tightening procedure first at 20 Nm (15 ft. lbs.) then an additional 60 degrees. Position the pump where the front lower power steering hole is unused before installing the bolts. After lowering the vehicle you must reinstall the drain plug before putting on both valve covers and the new water pump. After reconnecting the battery ground cable the user should fill the engine compartment with engine oil.
Related 2002 Lincoln Town Car Parts
 2002 Lincoln Town Car Camshaft
 2002 Lincoln Town Car Crankshaft Seal
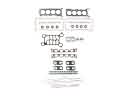 2002 Lincoln Town Car Cylinder Head Gasket
 2002 Lincoln Town Car Dipstick
 2002 Lincoln Town Car Drain Plug
 2002 Lincoln Town Car Engine Mount
 2002 Lincoln Town Car Harmonic Balancer
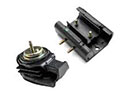 2002 Lincoln Town Car Motor And Transmission Mount
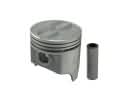 2002 Lincoln Town Car Piston
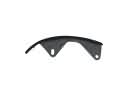 2002 Lincoln Town Car Timing Chain Guide
 2002 Lincoln Town Car Timing Chain Tensioner
 2002 Lincoln Town Car Valve Stem Seal