FordParts
My Garage
My Account
Cart
OEM 2002 Mercury Villager Air Duct
Air Hose- Select Vehicle by Model
- Select Vehicle by VIN
Select Vehicle by Model
orMake
Model
Year
Select Vehicle by VIN
For the most accurate results, select vehicle by your VIN (Vehicle Identification Number).
2 Air Ducts found

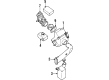
2002 Mercury Villager Air Outlet Tube Part Number: XF5Z-9B659-BA
$132.25 MSRP: $192.50You Save: $60.25 (32%)Product Specifications- Other Name: Tube
- Item Weight: 1.30 Pounds
- Condition: New
- Fitment Type: Direct Replacement
- SKU: XF5Z-9B659-BA
- Warranty: This genuine part is guaranteed by Ford's factory warranty.

2002 Mercury Villager Air Inlet Duct Part Number: XF5Z-9C675-AA
Product Specifications- Other Name: Tube - Air Cleaner Inlet; Tube - Air Cleaner Intake
- Item Weight: 0.90 Pounds
- Condition: New
- Fitment Type: Direct Replacement
- SKU: XF5Z-9C675-AA
- Warranty: This genuine part is guaranteed by Ford's factory warranty.
2002 Mercury Villager Air Duct
If you're seeking quality and affordability, look no further than our extensive inventory of genuine 2002 Mercury Villager Air Duct available at FordPartsDeal.com. You can confidently purchase our OEM 2002 Mercury Villager Air Duct as they are supported by the manufacturer's warranty and our hassle-free return policy, alongside the benefit of our fast delivery service.
2002 Mercury Villager Air Duct Parts Q&A
- Q: How to service and repair the auxiliary air duct on 2002 Mercury Villager?A: The repair and servicing process of the auxiliary air duct starts by taking out the right-hand quarter trim panel and the C-pillar upper trim panel. Start the auxiliary A/C duct service by removing screws from the lower duct then taking out the duct itself. Remove the duct at the C-pillar auxiliary A/C location after taking out its screws. Service the overhead auxiliary A/C duct by first unclipping the roof opening panel drain hose and then removing screws followed by removing the duct. Terminating work involves loosening and extracting both the forward overhead auxiliary A/C duct followed by its duct removal. Installation of the ducts involves executing the backward steps from the removal process.
Related 2002 Mercury Villager Parts
 2002 Mercury Villager Fuel Pump
 2002 Mercury Villager Air Filter
 2002 Mercury Villager Air Filter Box
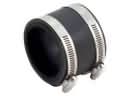 2002 Mercury Villager Air Intake Coupling
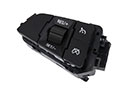 2002 Mercury Villager Cruise Control Switch
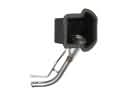 2002 Mercury Villager Fuel Filler Neck
 2002 Mercury Villager Fuel Filter
 2002 Mercury Villager Fuel Pressure Regulator
 2002 Mercury Villager Fuel Tank Strap
 2002 Mercury Villager Gas Cap
 2002 Mercury Villager Throttle Body
 2002 Mercury Villager Throttle Cable