FordParts
My Garage
My Account
Cart
OEM 2004 Ford Crown Victoria Intake Manifold
Engine Intake Manifold- Select Vehicle by Model
- Select Vehicle by VIN
Select Vehicle by Model
orMake
Model
Year
Select Vehicle by VIN
For the most accurate results, select vehicle by your VIN (Vehicle Identification Number).
3 Intake Manifolds found


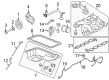
2004 Ford Crown Victoria Intake Manifold Part Number: 3W7Z-9424-AE
$334.83 MSRP: $491.67You Save: $156.84 (32%)Product Specifications- Other Name: Manifold Assembly - Inlet; Engine Intake Manifold
- Replaced by: PU7Z-9424-A
- Base No.: 9424
- Item Weight: 19.00 Pounds
- Item Dimensions: 21.9 x 18.2 x 12.7 inches
- Condition: New
- Fitment Type: Direct Replacement
- SKU: 3W7Z-9424-AE
- Warranty: This genuine part is guaranteed by Ford's factory warranty.
 Product Specifications
- Other Name: Manifold Assembly - Inlet
- Position: Lower
- Base No.: 9424
- Item Weight: 9.10 Pounds
- Item Dimensions: 15.8 x 16.7 x 14.3 inches
- Condition: New
- Fitment Type: Direct Replacement
- SKU: YR3Z-9424-BA
- Warranty: This genuine part is guaranteed by Ford's factory warranty.

2004 Ford Crown Victoria Intake Manifold Part Number: 3W3Z-9424-BB
Product Specifications- Other Name: Manifold Assembly - Inlet
- Base No.: 9424
- Item Weight: 7.20 Pounds
- Item Dimensions: 18.3 x 15.8 x 13.1 inches
- Condition: New
- Fitment Type: Direct Replacement
- SKU: 3W3Z-9424-BB
- Warranty: This genuine part is guaranteed by Ford's factory warranty.
2004 Ford Crown Victoria Intake Manifold
If you're seeking quality and affordability, look no further than our extensive inventory of genuine 2004 Ford Crown Victoria Intake Manifold available at FordPartsDeal.com. You can confidently purchase our OEM 2004 Ford Crown Victoria Intake Manifold as they are supported by the manufacturer's warranty and our hassle-free return policy, alongside the benefit of our fast delivery service.
2004 Ford Crown Victoria Intake Manifold Parts Q&A
- Q: How to remove the intake manifold from natural gas engines on 2004 Ford Crown Victoria?A: The first step to remove natural gas engine intake manifolds involves taking off wiper arms with pivot shafts and air cleaner outlet tubes. A set of procedures connects the eight ignition coils to eight fuel injectors while severing connections between these components and the fuel pressure sensor and the fuel temperature sensor as well as the engine coolant temperature sensor and the fuel line and the fuel charging wiring electrical connectors. Detach the wiring inserted into the isolation valve before disconnecting it from the upper generator platform. Terminate the generator battery cable. After removal of the power distribution box access cover with its nut and wiring users should disconnect fuel charging wiring electrical connectors found at inner fender splash shield positions. The A/C Pressure Transducer, cylinder head temperature sensor jumper, camshaft position sensor, generator, throttle position sensor, radio ignition interference capacitor, and idle air control valve receive their disconnect from the fuel charging wiring electrical connector. The resistor and solenoid from the Exhaust Gas Recirculation (EGR) vacuum regulator and the differential pressure feedback EGR system need to lose their electrical connection. First remove the bolts securing the throttle body cables then position both cables and the bracket aside before disconnecting them from their respective ports. Void the bolts then arrange the fuel charging wiring safely before unhooking hoses from the differential pressure feedback EGR system and the vacuum hose from the EGR valve. Remove the main chassis vacuum supply hose from both the throttle body adapter and the crankcase ventilation tube at two locations as well as the vacuum hose from the throttle body adapter. Detach the vacuum lines which serve the EGR vacuum regulator solenoid together with the EGR tube attached to the EGR valve. Start by removing isolation valve bolts and then proceed to detach the four bolts that secure the fuel injection supply manifold with its fuel injectors assembly. The heating water hose must be detached from the intake manifold while the upper radiator hose needs releasing from the water outlet adapter. Start by removing ignition coils through the eight bolts followed by removing both the bolts from the generator support bracket and the water outlet adapter. Separate the water thermostat from its O-ring before you remove the bolts which hold the intake manifold with its integral gaskets. Finally, clean the sealing surfaces.
Related 2004 Ford Crown Victoria Parts
 2004 Ford Crown Victoria Fuel Pump
 2004 Ford Crown Victoria Air Filter
 2004 Ford Crown Victoria Air Filter Box
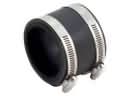 2004 Ford Crown Victoria Air Intake Coupling
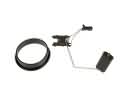 2004 Ford Crown Victoria Fuel Level Sensor
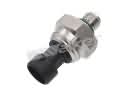 2004 Ford Crown Victoria Fuel Pressure Sensor
 2004 Ford Crown Victoria Fuel Tank Sending Unit
 2004 Ford Crown Victoria Fuel Tank Strap
 2004 Ford Crown Victoria Fuel Tank Vent Valve
 2004 Ford Crown Victoria Gas Cap
 2004 Ford Crown Victoria Intake Manifold Gasket
 2004 Ford Crown Victoria Mass Air Flow Sensor