FordParts
My Garage
My Account
Cart
OEM 2005 Ford Explorer Catalytic Converter
Cat. Converter- Select Vehicle by Model
- Select Vehicle by VIN
Select Vehicle by Model
orMake
Model
Year
Select Vehicle by VIN
For the most accurate results, select vehicle by your VIN (Vehicle Identification Number).
4 Catalytic Converters found


2005 Ford Explorer Catalytic Converter Part Number: 4L2Z-5F250-KA
Product Specifications- Other Name: Converter Assembly; Exhaust Pipe; Converter & Pipe
- Manufacturer Note: TAR
- Replaces: 3L2Z-5F250-AA
- Base No.: 5F250
- Item Weight: 40.40 Pounds
- Item Dimensions: 66.3 x 38.2 x 12.4 inches
- Condition: New
- Fitment Type: Direct Replacement
- SKU: 4L2Z-5F250-KA
- Warranty: This genuine part is guaranteed by Ford's factory warranty.

2005 Ford Explorer Converter & Pipe Part Number: 4L2Z-5F250-EA
Product Specifications- Other Name: Converter Assembly; Catalytic Converter; Exhaust Pipe
- Manufacturer Note: RAD
- Base No.: 5F250
- Item Dimensions: 17.9 x 14.4 x 9.4 inches
- Condition: New
- Fitment Type: Direct Replacement
- SKU: 4L2Z-5F250-EA
- Warranty: This genuine part is guaranteed by Ford's factory warranty.

2005 Ford Explorer Catalytic Converter Part Number: 4L2Z-5F250-GA
Product Specifications- Other Name: Converter Assembly
- Manufacturer Note: OAF
- Base No.: 5F250
- Item Dimensions: 17.3 x 14.3 x 9.6 inches
- Condition: New
- Fitment Type: Direct Replacement
- SKU: 4L2Z-5F250-GA
- Warranty: This genuine part is guaranteed by Ford's factory warranty.

2005 Ford Explorer Catalytic Converter Part Number: 4L2Z-5F250-FA
Product Specifications- Other Name: Converter Assembly
- Manufacturer Note: SUP
- Base No.: 5F250
- Item Weight: 31.90 Pounds
- Item Dimensions: 18.0 x 14.4 x 9.3 inches
- Condition: New
- Fitment Type: Direct Replacement
- SKU: 4L2Z-5F250-FA
- Warranty: This genuine part is guaranteed by Ford's factory warranty.
2005 Ford Explorer Catalytic Converter
If you're seeking quality and affordability, look no further than our extensive inventory of genuine 2005 Ford Explorer Catalytic Converter available at FordPartsDeal.com. You can confidently purchase our OEM 2005 Ford Explorer Catalytic Converter as they are supported by the manufacturer's warranty and our hassle-free return policy, alongside the benefit of our fast delivery service.
2005 Ford Explorer Catalytic Converter Parts Q&A
- Q: How should one service the catalytic converter to ensure proper installation and avoid damage on 2005 Ford Explorer?A: Do not use oil/grease on isolators. Use new torque-prevailing fasteners and specified torques. Hoist and support exhaust, align tab/notch, remove clamps, muffler-to-cat hardware, crossmember and shields, then detach sensors. Clean flares, support converter, transfer sensors with anti-seize, replace stud nuts. Reassemble per torques, start engine, check/align for leaks.
Related 2005 Ford Explorer Parts
 2005 Ford Explorer Muffler
 2005 Ford Explorer Canister Purge Valve
 2005 Ford Explorer EGR Valve
 2005 Ford Explorer Exhaust Manifold
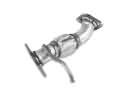 2005 Ford Explorer Exhaust Pipe
 2005 Ford Explorer PCV Valve
 2005 Ford Explorer Catalytic Converter Gasket
 2005 Ford Explorer EGR Valve Gasket
 2005 Ford Explorer Exhaust Hanger
 2005 Ford Explorer Exhaust Heat Shield
 2005 Ford Explorer Exhaust Manifold Gasket
 2005 Ford Explorer Muffler Hanger Straps