FordParts
My Garage
My Account
Cart
OEM 2006 Ford E-150 Windshield
Glass Windshield- Select Vehicle by Model
- Select Vehicle by VIN
Select Vehicle by Model
orMake
Model
Year
Select Vehicle by VIN
For the most accurate results, select vehicle by your VIN (Vehicle Identification Number).
1 Windshield found


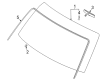
2006 Ford E-150 Windshield, Front Part Number: 9C2Z-1503100-A
$227.07 MSRP: $333.43You Save: $106.36 (32%)Product Specifications- Other Name: Glass - Windscreen; Windshield Glass, Front; Windshield, Front
- Position: Front
- Replaces: 6C2Z-1503100-AA, 7C2Z-1503100-B
- Base No.: <03100
- Item Weight: 38.10 Pounds
- Condition: New
- Fitment Type: Direct Replacement
- SKU: 9C2Z-1503100-A
- Warranty: This genuine part is guaranteed by Ford's factory warranty.
2006 Ford E-150 Windshield
If you're seeking quality and affordability, look no further than our extensive inventory of genuine 2006 Ford E-150 Windshield available at FordPartsDeal.com. You can confidently purchase our OEM 2006 Ford E-150 Windshield as they are supported by the manufacturer's warranty and our hassle-free return policy, alongside the benefit of our fast delivery service.
2006 Ford E-150 Windshield Parts Q&A
- Q: How to reseal a windshield on 2006 Ford E-150?A: The windshield resealing process begins with windshield wiper pivot arm removal then requires the cowl top vent panel and the A-pillar trim panels to be eliminated. Take exterior the overhead console by first removing its screw then disconnecting its electrical connectors when applicable. The dome lamp assembly should be removed through its electrical connector separation along with prying it from the headliner. Disassemble the sun visors before you remove the interior rear view mirror. Use an alcohol-free cleanser to wipe the crease produced by glass intersecting with urethane both within the windshield top and sides as well as outside along the windshield bottom. The urethane applicator tip requires cutting to specification and a high-ratio electric or battery-operated caulk gun should be used to apply a continuous bead of Urethane Adhesive to the cleaned area while smoothing the gaps into a single continuous bead. The urethane backfill needs completion followed by removing any remaining residue. The cure time for urethane adhesive must exceed one hour to perform leak tests; further urethane adhesive applications may be necessary. Install the interior rear view mirror and sun visors along with the dome lamp assembly if present followed by the overhead console and A-pillar trim panels and finally the windshield wiper pivot arms after the curing process. Wash down both areas of the windshield glass with a solution containing no alcohol.
Related 2006 Ford E-150 Parts
 2006 Ford E-150 Car Mirror
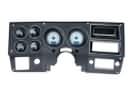 2006 Ford E-150 Dash Panels
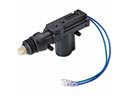 2006 Ford E-150 Door Lock Actuators
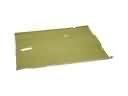 2006 Ford E-150 Floor Pan
 2006 Ford E-150 Fuel Door
 2006 Ford E-150 Fuel Filler Housing
 2006 Ford E-150 Hood Cable
 2006 Ford E-150 Hood Hinge
 2006 Ford E-150 Window Crank Handles
 2006 Ford E-150 Window Regulator
 2006 Ford E-150 Wiper Arm
 2006 Ford E-150 Wiper Motor