FordParts
My Garage
My Account
Cart
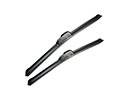
OEM Ford E-150 Windshield
Glass Windshield- Select Vehicle by Model
- Select Vehicle by VIN
Select Vehicle by Model
orMake
Model
Year
Select Vehicle by VIN
For the most accurate results, select vehicle by your VIN (Vehicle Identification Number).
2 Windshields found


Ford E-150 Windshield, Front Part Number: 3C2Z-1503100-AA
$213.86 MSRP: $314.03You Save: $100.17 (32%)

Ford E-150 Windshield, Front Part Number: 9C2Z-1503100-A
$227.07 MSRP: $333.43You Save: $106.36 (32%)
Ford E-150 Windshield
OEM Windshield boasts unmatched quality. Each part goes through full quality checks. They adhere to Ford's official factory standards. These steps remove flaws and inconsistencies. So you can get Windshield with long life and a perfect fit. Come to our website and find genuine Ford E-150 parts. We keep a wide inventory of OEM E-150 parts at the highly affordable prices. It's easy to search, compare, and pick what you need. You'll love the clear info and simple checkout. We offer top-rated customer service, and we reply fast. We also ship promptly to ensure your order arrives on time.
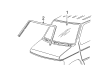
The Ford E-150 Windshield operates as a crucial element which displays both exceptional reliability and performance capabilities throughout the dependable Ford E-150 vehicle range with its safety features. Available for the Ford E-150 the windshield serves dual purposes by giving excellent visibility and safeguarding passengers from outdoor dangers through laminated safety glass construction. This windshield provides model compatibility throughout multiple E-150 generations because it works with various versions of this classic vehicle range. The windshield of the car serves vital roles by ensuring safety by supporting the entire vehicle structure in addition to its visibility responsibilities. Consistent maintenance for Ford E-150 Windshield components must be performed since small defects can negatively affect both safety and visibility during driving. The car Windshield adopts modern technologies which create two standout features for automotive consumers by blocking UV rays and minimizing exterior noise to improve driving comfort. The investment in a quality Ford car Windshield produces high value because replacement typically costs within $110-$140 range thus improving both efficiency and safety. Quality is a core brand value at the automaker which shines through in their model part thus turning it into an essential feature of the vehicle.
Ford E-150 Windshield Parts and Q&A
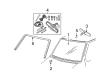
- Q: How to remove and install windshield glass on Ford E-150?A:Windshield glass removal requires users to uninstall the Wiper Pivot arms together with cowl grille panels followed by drilling rivets which will separate windshield glass stops. The rest of this process starts by extracting the inside rear view mirror as well as the RH and LH A-pillar trim panels, overhead console (if present), dome lamp assembly (if present), Sun Visors and their respective clips then finally it requires lowering the front portion of the headliner. Prior to urethane adhesive cutting you need to clean every portion of the windshield pinch welds free from all foreign substances. Cut the urethane adhesive with the Deluxe Windshield Removal Tool that has water-based lubrication starting at the top center and working towards the bottom corners but the technician should provide windshield glass support to stop it from falling. The Pumper should be used to move the windshield glass away from the body structure while another technician helps with glass removal before placing the glass on a secure work surface with its inner face pointing up. Remove the windshield header seal. When installing the pinch weld repair all existing corrosion until it achieves structural stability before scratching it. The area on the pinch weld requires urethane adhesive cutting to expose a 1.0-1.5 mm surface base before cleaning with shop towels or a compressor blowing oil-free air. Affix the windshield glass stops through riveting. The original windshield glass can be reused only after removing the remaining urethane adhesive but you should leave behind a thin adhesive layer for the bonding process. A cleaned windshield header seal goes onto the glass surface before cleaning the inside with glass cleaner. Follow manufacturer directions when using the same urethane adhesive and glass primer by applying the primer before allowing the solution to dry for at least six minutes. Use specified urethane adhesive applicator tip settings to apply the urethane adhesive along the pinch weld urethane bead after trimming the urethane while eliminating any adhesive gaps. It is mandatory to refrain from driving the vehicle until the urethane adhesive completes its curing process according to manufacturer recommendations. Client assistance is required to place the windshield glass following window opening to address air pressure difficulties. Urethane adhesive needs to be filled into the cavities between the LH and RH sides of the windshield header seal and the sheet metal extending 50 mm from the A-pillar bases. Check for air and water leaks after the urethane adhesive achieves full cure. Additionally you should add more adhesive where needed. End the installation by moving the front headliner section then putting in sun visors with their clips as well as Dome Lights, overhead storage, interior rearview mirror and the left and right A-pillar trims, cowl grille panels and wiper pivot arms.