FordParts
My Garage
My Account
Cart
OEM 2006 Ford Freestyle Shock Absorber
Suspension Shock Absorber- Select Vehicle by Model
- Select Vehicle by VIN
Select Vehicle by Model
orMake
Model
Year
Select Vehicle by VIN
For the most accurate results, select vehicle by your VIN (Vehicle Identification Number).
4 Shock Absorbers found

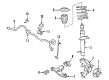
2006 Ford Freestyle Strut, Front Driver Side Part Number: 7F9Z-18124-AL
$90.52 MSRP: $123.17You Save: $32.65 (27%)Product Specifications- Other Name: Shock Absorber Assembly - Front; Suspension Strut, Front Left
- Position: Front Driver Side
- Replaces: 5F9Z-18124-KL
- Base No.: 18124
- Item Weight: 12.70 Pounds
- Item Dimensions: 9.3 x 26.7 x 10.5 inches
- Condition: New
- Fitment Type: Direct Replacement
- SKU: 7F9Z-18124-AL
- Warranty: This genuine part is guaranteed by Ford's factory warranty.
2006 Ford Freestyle Strut, Front Passenger Side Part Number: 7F9Z-18124-AR
$89.56 MSRP: $121.87You Save: $32.31 (27%)Ships in 1-2 Business DaysProduct Specifications- Other Name: Shock Absorber Assembly; Suspension Strut, Front Right
- Position: Front Passenger Side
- Replaces: 5F9Z-18124-KR
- Base No.: 18124
- Item Weight: 10.70 Pounds
- Item Dimensions: 7.5 x 7.7 x 27.5 inches
- Condition: New
- Fitment Type: Direct Replacement
- SKU: 7F9Z-18124-AR
- Warranty: This genuine part is guaranteed by Ford's factory warranty.

2006 Ford Freestyle Shock Absorber, Rear Part Number: 8G1Z-18125-B
$108.30 MSRP: $181.82You Save: $73.52 (41%)Ships in 1-2 Business DaysProduct Specifications- Other Name: Shock Absorber Assembly; Rear Suspension Strut Kit; Complete Strut; Shock; Strut
- Position: Rear
- Replaces: 5F9Z-18125-AA, 6G1Z-18125-A, 8A4Z-18125-A, AST-350, AST-87, ASH-1111, 8G1Z-18125-A, AST-215
- Base No.: 18125
- Item Weight: 5.10 Pounds
- Item Dimensions: 24.9 x 4.2 x 4.2 inches
- Condition: New
- Fitment Type: Direct Replacement
- Require Quantity: 2
- SKU: 8G1Z-18125-B
- Warranty: This genuine part is guaranteed by Ford's factory warranty.


2006 Ford Freestyle Shock Absorber, Rear Part Number: 5F9Z-18125-FA
$58.62 MSRP: $79.77You Save: $21.15 (27%)Product Specifications- Other Name: Shock Absorber Assembly; Suspension Shock Absorber, Rear Left, Rear Right; Suspension Strut Assembly Kit; Complete Strut; Shock
- Position: Rear
- Replaces: 5F9Z-18125-EA, 8A4Z-18125-R, ASH-1110, AST-88, ASH-1109, 8A4Z-18125-L
- Base No.: 18125
- Item Weight: 5.30 Pounds
- Item Dimensions: 4.2 x 4.1 x 25.1 inches
- Condition: New
- Fitment Type: Direct Replacement
- SKU: 5F9Z-18125-FA
- Warranty: This genuine part is guaranteed by Ford's factory warranty.
2006 Ford Freestyle Shock Absorber
If you're seeking quality and affordability, look no further than our extensive inventory of genuine 2006 Ford Freestyle Shock Absorber available at FordPartsDeal.com. You can confidently purchase our OEM 2006 Ford Freestyle Shock Absorber as they are supported by the manufacturer's warranty and our hassle-free return policy, alongside the benefit of our fast delivery service.
2006 Ford Freestyle Shock Absorber Parts Q&A
- Q: How to service the shock absorber and spring assembly on a 2WD on 2006 Ford Freestyle?A: In order to service the shock absorber and spring system on a 2WD vehicle, measure the hub-to-fender distance, strip the interior trim and toss in the upper shock nut. Lift the car, remove the brake caliper and proceed with the process of installing the shock assembly again, ensuring that the re-installation process meets the required torque standards.
Related 2006 Ford Freestyle Parts
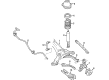
 2006 Ford Freestyle Axle Beam
 2006 Ford Freestyle Axle Support Bushings
 2006 Ford Freestyle Coil Springs
 2006 Ford Freestyle Control Arm
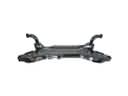 2006 Ford Freestyle Front Cross-Member
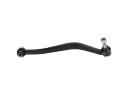 2006 Ford Freestyle Lateral Arm
 2006 Ford Freestyle Shock And Strut Mount
 2006 Ford Freestyle Steering Knuckle
 2006 Ford Freestyle Sway Bar Kit
 2006 Ford Freestyle Sway Bar Link
 2006 Ford Freestyle Torsion Bar
 2006 Ford Freestyle Trailing Arm