FordParts
My Garage
My Account
Cart
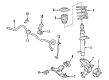
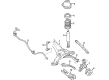
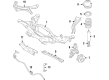
OEM Ford Freestyle Shock Absorber
Suspension Shock Absorber- Select Vehicle by Model
- Select Vehicle by VIN
Select Vehicle by Model
orMake
Model
Year
Select Vehicle by VIN
For the most accurate results, select vehicle by your VIN (Vehicle Identification Number).
6 Shock Absorbers found


Ford Freestyle Shock Absorber, Rear Part Number: 8G1Z-18125-B
$106.88 MSRP: $195.67You Save: $88.79 (46%)Ships in 1-2 Business Days
Ford Freestyle Strut, Front Passenger Side Part Number: 7F9Z-18124-AR
$99.61 MSRP: $137.79You Save: $38.18 (28%)Ships in 1-2 Business Days
Ford Freestyle Shock Absorber Part Number: 7F9Z-18125-B
Ford Freestyle Shock Absorber, Rear Part Number: 5F9Z-18125-FA
Ford Freestyle Strut, Front Driver Side Part Number: 7F9Z-18124-AL
Ford Freestyle Shock Absorber Part Number: 7F9Z-18125-C
Ford Freestyle Shock Absorber
OEM Shock Absorber boasts unmatched quality. Each part goes through full quality checks. They adhere to Ford's official factory standards. These steps remove flaws and inconsistencies. So you can get Shock Absorber with long life and a perfect fit. Come to our website and find genuine Ford Freestyle parts. We keep a wide inventory of OEM Freestyle parts at the highly affordable prices. It's easy to search, compare, and pick what you need. You'll love the clear info and simple checkout. We offer top-rated customer service, and we reply fast. We also ship promptly to ensure your order arrives on time.
Shock absorber is one of the most important parts of a car's suspension system and is widely recognized for their durability and effectiveness in improving the handling of different models of Ford Freestyle car models. Operating to immobilize or reduce the shock impulses, the Shock Absorber is of utmost importance in enhancing ride quality and handling, so that the drivers could effectively maneuver through the jagged terrains. The shock absorbers of the Ford Freestyle are state of the art, with options such as twin-tube and mono-tube which gives long lasting and heat resistant valve. Specialistic aspects as PSD and ASD help increase the Freestyle Shock Absorber's ability to respond to the driving conditions, in order to deliver both comfort and control. This flexibility does not only help increase the productivity but also plays a major role in the protection of the car and because of this, it is fit for use by families and other adventurers. The Ford Freestyle launched in 2005 and sold up until 2009 was meant to act as the staple between sedans and small SUVs and this performance-focused design is apparent in the car's innovative shock absorber system. The Ford Freestyle has a large cabin and different layouts of the seats in a vehicle which gives it an advantage in the automotive industry and as for the Ford Freestyle's Shock Absorber, it's clear that Ford is serious about engineering a great product. In summary, one can conclude that the Ford Freestyle Shock Absorber is a useful device that contributes to the general usage of the car and provides safe and comfortable ride for all its occupants.
Ford Freestyle Shock Absorber Parts and Q&A
- Q: How to service the shock absorber and spring assembly on a 2WD on Ford Freestyle?A:A proper shock absorber and spring service requires measuring the hub center to fender lip distance when the vehicle sits level on the ground. First remove the interior trim to reach the upper shock absorber nut before throwing away this nut. First disconnect the wheel and tire assembly before the vehicle needs support through the use of proper jack stands under the front section. Support the Brake Caliper during removal instead of letting it hang from the flexible hose and remove the guide-pin bolts before placing it aside. Reinstall the caliper afterward by tightening its bolts to 31 Nm (23 ft. lbs.). A hoist will elevate the vehicle to reach the suspension components while the transmission jack should be positioned below the wheel knuckle at the Trailing Arm attachment point until the toe-link becomes parallel to the ground. First remove the trailing arm-to-knuckle bolt before lowering the transmission jack and then take out the trailing arm-to-subframe bolt for disposal. First lift the jack underneath the shock absorber mount until it compresses the spring and shock absorber before removing the lower arm-to-knuckle bolt. The procedure is completed by loosening the shock absorber and spring assembly's lower nut and bolts. The transmission jack should be lowered while discarding its lower nut and bolt after which you should maintain hold on the assembly while guiding the lower arm downward to remove the shock absorber and spring. The spring should be taped to the upper rubber spring seat before you place the shock absorber assembly into position for installation while ensuring proper alignment with the upper mount. Before tightening the new lower bolt install it onto its designated position in the lower arm. First lower the vehicle partially before placing a floor jack underneath the lower arm to lift until the shock absorber top reaches the upper mount. A second person should help raise the vehicle until the shock absorber properly seats and then install and tighten a new shock absorber nut to 83 Nm (61 ft. lbs.). Reinstall interior components as the floor jack leaves position before conducting second lift of the car. Place the transmission jack below the wheel knuckle to adjust the wheel hub at the proper curb height before tightening the subframe-to-lower arm bolt to 125 Nm (92 ft. lbs.) then install and torque the knuckle-to-lower arm bolt to 110 Nm (81 ft. lbs.). After aligning the trailing arm with the wheel knuckle place a loose bolt then increase height of transmission jack until trailing arm and subframe bushing become parallel. The installation begins by adding a new trailing arm-to-subframe bolt which requires torque until it reaches 110 Nm (81 ft. lbs.) before proceeding to fasten the trailing arm-to-knuckle bolt to 105 Nm (77 ft. lbs.). Complete the procedure by lowering the vehicle to only partial height then fasten the brake caliper along with the guide pin bolts to 31 Nm (23 ft. lbs.).

Related Ford Freestyle Parts
 Ford Freestyle Axle Beam
 Ford Freestyle Coil Springs
 Ford Freestyle Control Arm
 Ford Freestyle Control Arm Bushing
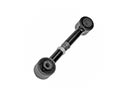 Ford Freestyle Lateral Link
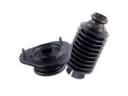 Ford Freestyle Shock and Strut Boot
 Ford Freestyle Steering Knuckle
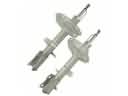 Ford Freestyle Strut Housing
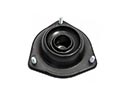 Ford Freestyle Strut Mounts
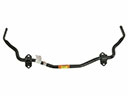 Ford Freestyle Sway Bars
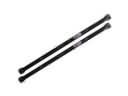 Ford Freestyle Torsion Bar
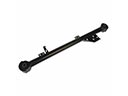 Ford Freestyle Trailing Arm
Browse Ford Freestyle Shock Absorber by Years
2007
2006
2005