FordParts
My Garage
My Account
Cart
OEM 2006 Lincoln LS Drive Shaft
Axle Shaft- Select Vehicle by Model
- Select Vehicle by VIN
Select Vehicle by Model
orMake
Model
Year
Select Vehicle by VIN
For the most accurate results, select vehicle by your VIN (Vehicle Identification Number).
1 Drive Shaft found

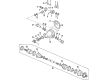
2006 Lincoln LS Drive Shaft Part Number: 3W4Z-4R602-BB
Product Specifications- Other Name: Shaft Assembly - Drive; Driveshaft; Drive Shaft Assembly
- Base No.: 4R602
- Item Dimensions: 25.2 x 6.1 x 15.6 inches
- Condition: New
- Fitment Type: Direct Replacement
- SKU: 3W4Z-4R602-BB
- Warranty: This genuine part is guaranteed by Ford's factory warranty.
2006 Lincoln LS Drive Shaft
If you're seeking quality and affordability, look no further than our extensive inventory of genuine 2006 Lincoln LS Drive Shaft available at FordPartsDeal.com. You can confidently purchase our OEM 2006 Lincoln LS Drive Shaft as they are supported by the manufacturer's warranty and our hassle-free return policy, alongside the benefit of our fast delivery service.
2006 Lincoln LS Drive Shaft Parts Q&A
- Q: How Can Drive Shaft Runout and Balancing Be Effectively Serviced and Repaired on 2006 Lincoln LS?A: The first step of driveshaft servicing and repair begins with placing the vehicle in neutral position on a hoist while removing the bolts from the heat shield then securing this component away from the driveshaft for safety when balancing. After removing the rear wheel and tire combination install the wheels correctly with tight wheelnuts so the nuts stay secure. The hood should be opened for cooling purposes while a helper takes over the driver seat and shuts off traction control systems when present. The balancing operation should be taken at a maximum speed of 70 mph since the assistant needs time to reach the speed when the imbalance becomes easy to detect. A suitable marker inside a 305 mm (12 inch) long piece of plastic pipe should be used to make light contact with the driveshaft for marking the heavy side with protection against moving parts and hot exhaust components. Check the mark left by the assistant after engine shutdown and shut-off because any visible partial mark indicates an unbalanced condition. An imbalance exists in the driveshaft when technicians must install the 1.23-gram (red) weighted nut on the bolt that faces the opposite side of the mark in the flex coupling which functions as the light side of the driveshaft. The marking procedure should be repeated for a 360-degree outcome when all components need to be reinstalled before conducting a vehicle road test. The marking process should be repeated after installing a 2.75-gram (silver) weighted nut instead of the 1.23-gram (red) weighted nut if vibration continues to exist. The installation of all components needs to occur after marking at 360 degrees followed by a vehicle road test. Moving the weighted nut to adjacent bolts for repeated marking tests should be done if this new mark shows vibration reduction. A new driveshaft assembly installation must be performed along with retesting when the best condition is reached during these steps while reinstalling all vehicle components before performing road tests.
Related 2006 Lincoln LS Parts
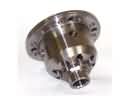 2006 Lincoln LS Differential
 2006 Lincoln LS Axle Shaft
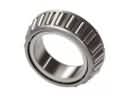 2006 Lincoln LS Differential Bearing
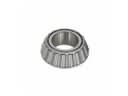 2006 Lincoln LS Differential Pinion Bearing
 2006 Lincoln LS Differential Seal
 2006 Lincoln LS Driveshaft Yokes
 2006 Lincoln LS Pinion Washer
 2006 Lincoln LS Slip Yoke