FordParts
My Garage
My Account
Cart
OEM 2006 Lincoln Mark LT Intake Manifold
Engine Intake Manifold- Select Vehicle by Model
- Select Vehicle by VIN
Select Vehicle by Model
orMake
Model
Year
Select Vehicle by VIN
For the most accurate results, select vehicle by your VIN (Vehicle Identification Number).
1 Intake Manifold found


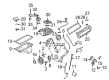
2006 Lincoln Mark LT Intake Manifold Part Number: 5L1Z-9424-A
Product Specifications- Other Name: Manifold Assembly - Inlet; Engine Intake Manifold; Lower Manifold
- Replaces: 5L1Z-9424-AB
- Base No.: 9424
- Item Weight: 22.10 Pounds
- Item Dimensions: 23.5 x 19.4 x 15.8 inches
- Condition: New
- Fitment Type: Direct Replacement
- SKU: 5L1Z-9424-A
- Warranty: This genuine part is guaranteed by Ford's factory warranty.
2006 Lincoln Mark LT Intake Manifold
If you're seeking quality and affordability, look no further than our extensive inventory of genuine 2006 Lincoln Mark LT Intake Manifold available at FordPartsDeal.com. You can confidently purchase our OEM 2006 Lincoln Mark LT Intake Manifold as they are supported by the manufacturer's warranty and our hassle-free return policy, alongside the benefit of our fast delivery service.
2006 Lincoln Mark LT Intake Manifold Parts Q&A
- Q: How to service and repair the intake manifold on 2006 Lincoln Mark LT?A: The process of servicing or repairing the intake manifold starts with bolt removal from the throttle body and four manifold bolts and then proceeds to the fuel rail bolt removal. The service requires removal of fuel injector-to-fuel rail locking clips before separating the injectors from the rail and discarding the 2 O-ring seals for each injector. Start by removing the vacuum tube assembly then unfasten the rod locking clips from the charge motion control valve (CMCV) before extracting the stud bolt and 2 bolts and CMCV itself. To proceed with the intake manifold maintenance, remove the 2 bolts together with the positive crankcase ventilation (PCV) heater element while discarding the O-ring seal and then detach the engine noise shield insulator. To begin the assembly process you should first fit the engine noise shield insulator onto the intake manifold. Install the PCV heater element by applying clean engine oil on the new O-ring seal before fastening it with 2 bolts at 6 Nm (53 inch lbs.). Position the CMCV before installing its stud bolt and two bolts which should be tightened to 10 Nm (89 inch lbs.) then insert the CMCV rod locking clips. The vacuum tube assembly requires attachment to the intake manifold while all new O-ring seals must receive engine oil lubrication before their installation onto fuel injector components. Fasten the fuel injectors to the fuel rail by using locking clips to mount them. Install the fuel rail component with the attached fuel injectors onto the intake manifold by tightening 4 fuel rail bolts to 10 Nm (89 inch lbs.). Complete installation of the TB by bolting it down in two steps that require first a 9 Nm (80 inch lbs.) torque followed by an additional 90 degrees rotation.
Related 2006 Lincoln Mark LT Parts
 2006 Lincoln Mark LT Air Filter
 2006 Lincoln Mark LT Air Filter Box
 2006 Lincoln Mark LT Fuel Filter
 2006 Lincoln Mark LT Fuel Pump
 2006 Lincoln Mark LT Fuel Pump Gasket
 2006 Lincoln Mark LT Fuel Pump Seal
 2006 Lincoln Mark LT Fuel Pump Tank Seal
 2006 Lincoln Mark LT Fuel Tank
 2006 Lincoln Mark LT Fuel Tank Sending Unit
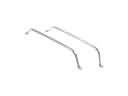 2006 Lincoln Mark LT Fuel Tank Strap
 2006 Lincoln Mark LT Intake Manifold Gasket
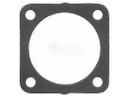 2006 Lincoln Mark LT Throttle Body Gasket