FordParts
My Garage
My Account
Cart
OEM 2006 Lincoln Navigator Shock Absorber
Suspension Shock Absorber- Select Vehicle by Model
- Select Vehicle by VIN
Select Vehicle by Model
orMake
Model
Year
Select Vehicle by VIN
For the most accurate results, select vehicle by your VIN (Vehicle Identification Number).
2 Shock Absorbers found


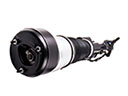
2006 Lincoln Navigator Shock Absorber, Front Part Number: 6L7Z-18124-BD
$117.62 MSRP: $160.07You Save: $42.45 (27%)Ships in 1-2 Business DaysProduct Specifications- Other Name: Shock Absorber Assembly; Suspension Shock Absorber, Front; Strut
- Position: Front
- Replaces: 5L1Z-18124-BA, 6L1Z-18124-BD, ASH-733, ASH-965, ASH-971, 6L1Z-18124-BA, 6L7Z-18124-AC, 6L1Z-18124-BC, 6L7Z-18124-AD, 6L7Z-18124-E, 6L1Z-18124-AC, 6L1Z-18124-AD, 6L7Z-18124-BC, ASH-813, ASH-966, ASH-24626
- Base No.: 18124
- Item Weight: 8.60 Pounds
- Item Dimensions: 26.5 x 3.5 x 3.3 inches
- Condition: New
- Fitment Type: Direct Replacement
- Require Quantity: 2
- SKU: 6L7Z-18124-BD
- Warranty: This genuine part is guaranteed by Ford's factory warranty.

2006 Lincoln Navigator Shock Absorber Part Number: 6L7Z-18124-BC
$117.62 MSRP: $160.07You Save: $42.45 (27%)Product Specifications- Other Name: Shock Absorber Assembly; Strut
- Replaced by: 6L7Z-18124-BD
- Item Weight: 8.20 Pounds
- Item Dimensions: 27.2 x 3.5 x 3.5 inches
- Condition: New
- Fitment Type: Direct Replacement
- Require Quantity: 2
- SKU: 6L7Z-18124-BC
- Warranty: This genuine part is guaranteed by Ford's factory warranty.
2006 Lincoln Navigator Shock Absorber
If you're seeking quality and affordability, look no further than our extensive inventory of genuine 2006 Lincoln Navigator Shock Absorber available at FordPartsDeal.com. You can confidently purchase our OEM 2006 Lincoln Navigator Shock Absorber as they are supported by the manufacturer's warranty and our hassle-free return policy, alongside the benefit of our fast delivery service.
2006 Lincoln Navigator Shock Absorber Parts Q&A
- Q: How to service and repair the front shock absorber and spring assembly on 2006 Lincoln Navigator?A: You should start front shock absorber and spring assembly service by first placing the vehicle in neutral and hoisting it up. Replace the discarded upper nuts of the shock absorber and spring assembly with new ones and torque them to 40 Nm (30 ft. lbs.). Use the hex holding tool to stop the stud from turning when you detach the tie-rod end from the wheel knuckle by stripping the tie-rod end nut; remove this nut since it will get discarded and then tighten the new nut to 150 Nm (111 ft. lbs.). After removing the lower nut which connects the shock absorber assembly to the spring you can dispose of this component while adding a new nut which requires a torque setting of 475 Nm (295 ft. lbs.) during reinstallation. The next procedure step should be taken when both the spring components and shock components need servicing. Reference the order of shock absorber assembly parts including upper mount and spring by using a suitable tension release tool for the shock absorber. The installer should hold the shock rod steady to stop its rotation while discarding the nut and replacing it with a new one which needs to get tightened to 30 Nm (22 ft. lbs.). Closing the repair process requires users to reverse the steps of upper mount and dust boot and insulator removal.
Related 2006 Lincoln Navigator Parts
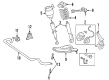
 2006 Lincoln Navigator Air Suspension
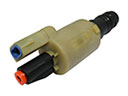 2006 Lincoln Navigator Air Suspension Solenoid
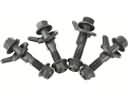 2006 Lincoln Navigator Alignment Bolt
 2006 Lincoln Navigator Ball Joint
 2006 Lincoln Navigator Coil Springs
 2006 Lincoln Navigator Lateral Link
 2006 Lincoln Navigator Shock And Strut Mount
 2006 Lincoln Navigator Steering Knuckle
 2006 Lincoln Navigator Sway Bar Bracket
 2006 Lincoln Navigator Sway Bar Kit
 2006 Lincoln Navigator Sway Bar Link
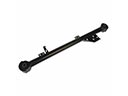 2006 Lincoln Navigator Trailing Arm