FordParts
My Garage
My Account
Cart
OEM 2009 Ford Expedition A/C Condenser
Air Conditioning Condenser- Select Vehicle by Model
- Select Vehicle by VIN
Select Vehicle by Model
orMake
Model
Year
Select Vehicle by VIN
For the most accurate results, select vehicle by your VIN (Vehicle Identification Number).
1 A/C Condenser found


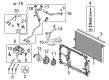
2009 Ford Expedition Condenser Part Number: AL1Z-19712-B
$192.72 MSRP: $320.00You Save: $127.28 (40%)Ships in 1 Business DayProduct Specifications- Other Name: Condenser Assembly; A/C Condenser; Condenser A/C
- Manufacturer Note: Includes Power Steering Cooler
- Replaces: 9L1Z-19712-A, 7L1Z-19712-A, YJ-549, 8L1Z-19712-A, 8L1Z-19712-B, 7L1Z-19712-B, AL1Z-19712-A, YJ-542, YJ-523, YJ-524
- Base No.: 19712
- Item Weight: 9.20 Pounds
- Item Dimensions: 44.5 x 20.4 x 3.2 inches
- Condition: New
- Fitment Type: Direct Replacement
- SKU: AL1Z-19712-B
- Warranty: This genuine part is guaranteed by Ford's factory warranty.
2009 Ford Expedition A/C Condenser
If you're seeking quality and affordability, look no further than our extensive inventory of genuine 2009 Ford Expedition A/C Condenser available at FordPartsDeal.com. You can confidently purchase our OEM 2009 Ford Expedition A/C Condenser as they are supported by the manufacturer's warranty and our hassle-free return policy, alongside the benefit of our fast delivery service.
2009 Ford Expedition A/C Condenser Parts Q&A
- Q: How to Service and Repair the A/C Condenser Core on 2009 Ford Expedition?A: First service all repairs to the HVAC condenser core through the use of vehicle position on a hoist with neutral condition. Take the refrigerant for recovery after disconnecting the battery cables. First service technicians must eliminate the upper sight shield and then unfasten the right and left headlamp assemblies as well as the air cleaner outlet tube. After disconnecting the bolts at the junction box there you should set it aside for future use. Following the removal of the power steering cooler line clip you should remove the condenser inlet fitting bolt and detach the fitting by discarding the O-ring and gasket seals. Tighten the new fitting to 15 Nm (133 lb-in) during installation. After removing the condenser outlet fitting nut you should disconnect the fitting while discarding the old O-ring and gasket seals and proceeding to tighten it to 15 Nm (133 lb-in). The first step is to remove the two cooling module and two cooling fan shroud bolts before the clamps are opened to disconnect the two power steering cooler lines from the condenser core. Asynchronously disengage the LH air deflector from condenser brackets while you remove each of its three retaining pins then place the deflector to one side before removing two following RH outer air deflector retaining pins. Proceed with the detaching of the RH air deflector by using a pin-type retainer removal process from the condenser bracket. Each of the nine lower radiator splash shield pin-type retainers needs to be taken out before setting the shield away. Loosen the clamps then detach the two transmission cooler lines from the transmission cooler before removing its pin-type retainer from the condenser core bracket. Four condenser mounts must be raised through a rearward position of the cooling module before detaching to extract the condenser underneath the vehicle. The assembly detachment of the condenser core and transmission cooler requires positioning the cooling module to the rear until the condenser can be lifted up to depress the retaining tabs on both lower brackets before removing the four mounting brackets from the module. A forward movement of the condenser top section enables detachment of the top bracket lip from the cooling module before the condenser core and bracket can be removed. The installation process follows the opposite order of removal with new gasket and O-ring seals and proper PAG oil lubrication of the refrigerant system. The final steps involve filling the power steering fluid until it reaches the correct level, filling transmission fluid to its proper mark and performing evacuation then leak tests and charging the refrigeration cells with cleaner PAG oil.
Related 2009 Ford Expedition Parts
 2009 Ford Expedition Blower Motor Resistor
 2009 Ford Expedition Blend Door Actuator
 2009 Ford Expedition Blower Motor
 2009 Ford Expedition A/C Accumulator
 2009 Ford Expedition A/C Clutch
 2009 Ford Expedition A/C Compressor
 2009 Ford Expedition A/C Compressor Cut-Out Switches
 2009 Ford Expedition A/C Hose
 2009 Ford Expedition A/C Idler Pulley
 2009 Ford Expedition A/C Service Cap
 2009 Ford Expedition A/C System Valve Core
 2009 Ford Expedition HVAC Pressure Switch