FordParts
My Garage
My Account
Cart
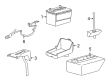
OEM 2009 Ford Mustang Battery Cable
Car Battery Cable- Select Vehicle by Model
- Select Vehicle by VIN
Select Vehicle by Model
orMake
Model
Year
Select Vehicle by VIN
For the most accurate results, select vehicle by your VIN (Vehicle Identification Number).
3 Battery Cables found


2009 Ford Mustang Battery Cable Part Number: 9R3Z-14300-AA
Product Specifications- Other Name: Cable Assembly - Battery To Battery; Battery Cables; Positive Cable
- Base No.: 14300
- Item Weight: 3.50 Pounds
- Item Dimensions: 7.5 x 13.3 x 21.0 inches
- Condition: New
- Fitment Type: Direct Replacement
- SKU: 9R3Z-14300-AA
- Warranty: This genuine part is guaranteed by Ford's factory warranty.
2009 Ford Mustang Battery Cable Part Number: 9R3Z-14300-CA
Product Specifications- Other Name: Cable Assembly - Battery To Battery; Battery Cables; Positive Cable
- Base No.: 14300
- Item Weight: 4.90 Pounds
- Item Dimensions: 27.8 x 3.5 x 10.5 inches
- Condition: New
- Fitment Type: Direct Replacement
- SKU: 9R3Z-14300-CA
- Warranty: This genuine part is guaranteed by Ford's factory warranty.
2009 Ford Mustang Battery Cable Part Number: 9R3Z-14300-BA
Product Specifications- Other Name: Cable Assembly - Battery To Battery; Battery Cables; Positive Cable
- Base No.: 14300
- Item Weight: 3.40 Pounds
- Item Dimensions: 16.1 x 5.6 x 15.8 inches
- Condition: New
- Fitment Type: Direct Replacement
- SKU: 9R3Z-14300-BA
- Warranty: This genuine part is guaranteed by Ford's factory warranty.
2009 Ford Mustang Battery Cable
If you're seeking quality and affordability, look no further than our extensive inventory of genuine 2009 Ford Mustang Battery Cable available at FordPartsDeal.com. You can confidently purchase our OEM 2009 Ford Mustang Battery Cable as they are supported by the manufacturer's warranty and our hassle-free return policy, alongside the benefit of our fast delivery service.
2009 Ford Mustang Battery Cable Parts Q&A
- Q: How to service and repair the battery cables on a 4.0L SOHC engine on 2009 Ford Mustang?A: You should begin battery cable maintenance on a 4.0L sohc engine by ensuring the vehicle stands in neutral position on a hoist. You should detach the battery together with starter solenoid terminal cover and its attachment nut for moving the starter solenoid positive cable terminal to the correct place when you reinstall it using a torque of 12 Nm (106 lb-in). Position the starter solenoid wire terminal nut aside before installation and tighten it to 5 Nm (44 lb-in). Proceed with removing the bolt to enable a position of the battery cable harness bracket. Reinstall the bolt at a torque of 27 Nm (20 lb-ft). The technician disconnects the battery cable harness locator from behind the lh cylinder head and removes the bolt to position the battery ground cable engine terminal aside before tightening it to 27 Nm (20 lb-ft) when reinstalling. Proceed with taking out the battery cable harness locator from the rh cylinder head and the bulkhead and the rh strut tower. Open the bussed electrical center (bec) cover while removing the bolt before positioning the bec terminal which needs to be tightened to 10 Nm (89 lb-in) when reinstalling it. The procedure starts with removing the battery cable harness locator from the engine bracket before setting the generator b+ boot aside to uninstall the nut holding the generator b+ terminal in place. Reinstall by tightening the terminal to 17 Nm (150 lb-in). The process starts by disconnecting the battery cable in-line connector and proceeding to remove the battery cables. Finish the installation by carrying out the opposite procedure steps.
Related 2009 Ford Mustang Parts
 2009 Ford Mustang Alternator
 2009 Ford Mustang Starter
 2009 Ford Mustang Alternator Bracket
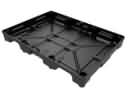 2009 Ford Mustang Battery Tray
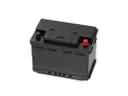 2009 Ford Mustang Car Batteries