My Garage
Cart

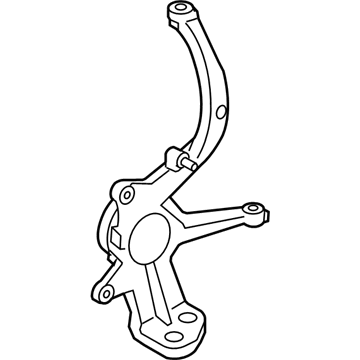
OEM 2009 Mercury Milan Steering Knuckle

Front Steering Knuckle
  • Select Vehicle by Model
  • Select Vehicle by VIN
Select Vehicle by Model
Make
Model
Year
or
Select Vehicle by VIN
For the most accurate results, select vehicle by your VIN (Vehicle Identification Number).

2 Steering Knuckles found

  • 2009 Mercury Milan Steering Knuckle - BE5Z-3K186-A
    2009 Mercury Milan Steering Knuckle Diagram - BE5Z-3K186-A
    View related parts

    2009 Mercury Milan Knuckle, Front Driver Side Part Number: BE5Z-3K186-A

    $325.22 MSRP: $540.00
    You Save: $214.78 (40%)
    Ships in 1-2 Business Days
    ADD TO CART
    Product Specifications
    • Other Name: Knuckle - Front Wheel; Steering Knuckle, Front Left
    • Position: Front Driver Side
    • Replaces: 7E5Z-3K186-L, 8E5Z-3K186-A
    • Base No.: 3K185
    • Item Weight: 21.20 Pounds
    • Item Dimensions: 7.7 x 10.8 x 25.3 inches
    • Condition: New
    • Fitment Type: Direct Replacement
    • SKU: BE5Z-3K186-A
    • Warranty: This genuine part is guaranteed by Ford's factory warranty.
    More Info
    Fits the following 2009 Mercury Milan Submodels:
    • Base, Hybrid, Premier | 4 Cyl 2.3 L GAS, 4 Cyl 2.5 L FULL HYBRID EV-GAS (FHEV), 4 Cyl 2.5 L GAS, 6 Cyl 3.0 L FLEX, 6 Cyl 3.0 L GAS
  • 2009 Mercury Milan Steering Knuckle - BE5Z-3K185-A
    2009 Mercury Milan Steering Knuckle Diagram - BE5Z-3K185-A
    View related parts

    2009 Mercury Milan Knuckle, Front Passenger Side Part Number: BE5Z-3K185-A

    $336.97 MSRP: $576.36
    You Save: $239.39 (42%)
    Ships in 1-2 Business Days
    ADD TO CART
    Product Specifications
    • Other Name: Knuckle - Front Wheel; Steering Knuckle, Front Right
    • Position: Front Passenger Side
    • Replaces: 7E5Z-3K185-R, 8E5Z-3K185-A
    • Base No.: 3K185
    • Item Weight: 21.20 Pounds
    • Item Dimensions: 7.7 x 11.1 x 25.8 inches
    • Condition: New
    • Fitment Type: Direct Replacement
    • SKU: BE5Z-3K185-A
    • Warranty: This genuine part is guaranteed by Ford's factory warranty.
    More Info
    Fits the following 2009 Mercury Milan Submodels:
    • Base, Hybrid, Premier | 4 Cyl 2.3 L GAS, 4 Cyl 2.5 L FULL HYBRID EV-GAS (FHEV), 4 Cyl 2.5 L GAS, 6 Cyl 3.0 L FLEX, 6 Cyl 3.0 L GAS

2009 Mercury Milan Steering Knuckle

If you're seeking quality and affordability, look no further than our extensive inventory of genuine 2009 Mercury Milan Steering Knuckle available at FordPartsDeal.com. You can confidently purchase our OEM 2009 Mercury Milan Steering Knuckle as they are supported by the manufacturer's warranty and our hassle-free return policy, alongside the benefit of our fast delivery service.

2009 Mercury Milan Steering Knuckle Parts Q&A

  • Q: How to service and repair the steering knuckle in the front suspension on 2009 Mercury Milan?
    A: When working on the front suspension steering knuckle it is necessary to start by taking off the wheel along with its tire. Workers should detach the wheel speed sensor bolt and harness bolt when present to put the wheel speed sensor safely aside. Start by removing the brake flexible hose bracket-to-wheel knuckle bolt and safely putting the hose and bracket to one side. The brake should be applied for halfshaft rotation prevention before removing the wheel hub nut for disposal. The brake hose needs proper support through mechanic's wire as you remove the bolts that secure the caliper and anchor plate assembly to prevent brake hose damage. The brake disc requires removal of both its bolts before you take out the disk itself. Set the wheel hub apart from the halfshaft by using a Front Hub Remover before tossing away the upper ball joint nut. The Steering Arm Remover should be used to take apart the upper ball joint from its position on the wheel knuckle. Use the Tie-Rod End Remover to unlink the tie-rod end from the wheel knuckle while disregarding hammer usage. Then dispose of the tie-rod end cotter pin and nut before completing the operation. Before detaching lower ball joint nuts the installer should position a block of wood between lower arm and outer CV joint to avoid damaging the outer Constant Velocity boot. You should use the Ball Joint Separator with Adapter alongside minor wheel knuckle tapping to detach the wheel knuckle's two lower ball joints before proceeding to remove this component. Update the wheel knuckle by using two new lower ball joint nuts to fasten it at 200 Nm (148 lb-ft torques. You should put the tie-rod end onto a new nut while adding a new cotter pin followed by tightening it to 48 Nm (35 lb-ft). Next, position the upper ball joint and fasten it with a new nut while also tightening to 48 Nm (35 lb-ft). The wheel speed sensor together with its harness bolt must be installed before tightening to 23 Nm (17 lb-ft). The brake caliper anchor plate should be positioned followed by tightening two bolts to 90 Nm (66 lb-ft). Next, install the brake flexible hose bracket with its bolt and torque it to 20 Nm (177 lb-in). Manifest the brake disc before tightening two bolts to 20 Nm (177 lb-in). Workers must use the Halfshaft Installer to guide the halfshaft insertion into the wheel hub but should avoid halfshaft nut tightening when the vehicle remains stationary due to wheel bearing hazards; proper halfshaft nut torque should reach 255 Nm (189 lb-ft) only after applying brake pressure to immobilize the halfshaft. To activate the locking feature place the new nut directly against the keyway while its surface rests beneath the keyway diameter by 1 mm (0.039 in).