FordParts
My Garage
My Account
Cart
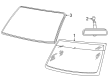
OEM Ford Explorer Sport Trac Windshield
Glass Windshield- Select Vehicle by Model
- Select Vehicle by VIN
Select Vehicle by Model
orMake
Model
Year
Select Vehicle by VIN
For the most accurate results, select vehicle by your VIN (Vehicle Identification Number).
3 Windshields found


Ford Explorer Sport Trac Windshield, Front Part Number: 6L2Z-7803100-AA
$466.98 MSRP: $732.17You Save: $265.19 (37%)Ships in 1-2 Business Days
Ford Explorer Sport Trac Windshield, Front Part Number: F57Z-7803100-A
Ford Explorer Sport Trac Windshield
OEM Windshield boasts unmatched quality. Each part goes through full quality checks. They adhere to Ford's official factory standards. These steps remove flaws and inconsistencies. So you can get Windshield with long life and a perfect fit. Come to our website and find genuine Ford Explorer Sport Trac parts. We keep a wide inventory of OEM Explorer Sport Trac parts at the highly affordable prices. It's easy to search, compare, and pick what you need. You'll love the clear info and simple checkout. We offer top-rated customer service, and we reply fast. We also ship promptly to ensure your order arrives on time.
Ford Explorer Sport Trac Windshield Parts and Q&A
- Q: How to service and repair a windshield on Ford Explorer Sport Trac?A:Service and repair work on the windshield starts with removal of right-hand (RH) and left-hand (LH) side A-pillar trim panels together with sun visors and their retainers and optional overhead console and roof opening panel trim. The service and repair start by removing the interior mirror while lowering the headliner front section and then moving to the cowl panel grille. The heated windshield electrical connectors require disconnection by removing their connectors from both retainer and stud. A flat screwdriver helps to lower the setting blocks until they release. Clean the windshield pinch weld area with an oil-free compressed air or shop towel before starting to cut the urethane adhesive. Use protective gloves together with eye protection whenever performing this process to stay safely protected from injuries. Take care to avoid damaging the paint or primer at the pinch weld spot to stop rust formation from occurring. You should insert the blade of the Deluxe Windshield Removal Tool into its slot so the flat side faces the glass while keeping the urethane adhesive bead on the pinch weld for a dry fit of the new windshield. Before making cuts apply water on the urethane adhesive and keep the windshield glass elevated to prevent it from falling. Start the urethane adhesive cutting process at the ceiling center and proceed to the floor corners before using The Pumper to create windshield space from the car body. Two technicians are needed to remove windshield installations yet the reinstall process requires windshield taping at the stops to ensure proper alignment. Set the work area with the windshield glass before beginning to cut it out. Use the top adjusters to lift the blocks until they meet the surface height before setting the lock mechanism. Set the new windshield glass against its designated urethane adhesive bead position in the opening while making alignment marks. Later combine the interior side with the exterior sides of the glass. Position glass assemblies for dry-fitting with their interior aspect facing toward the ceiling. Address all corrosion damage on the pinch weld since this component supports structure yet protect it from scratching. After cleaning the pinch weld region with oil-free compressed air or a shop towel remove a 1 mm to 2 mm adhesive base from the section before continuing. The warranty requires you to apply glass primer on the original windshield and trim the urethane adhesive to a thin layer before bonding. Check the flat foil connectors at the bottom of the new windshield for damage then carefully clean the interior surface of the glass. The glass primer needs to be applied per manufacturer guidelines then require six minutes of dry time. A high-ratio electric or battery-operated caulk gun should be used to distribute urethane adhesive across the pinch weld bead perimeter while making sure the bead remains even without any voids. Driveway prohibition applies until the urethane adhesive adhesive reachs full cure based upon manufacturer specified guidelines. The installer should first open vehicle windows before installing the windshield to stop air pressure from affecting the bond. Test the windshield for leaks only after a one-hour urethane cure period and alignment mark usage. Follow the installation process by connecting heated windshield electrical wires if present then install the cowl panel grille before raising the headliner and putting in place interior mirror, sun visors and retainers while also adding the overhead console and roof opening panel trim and ending with RH and LH side A-pillar trim panel installation. Clear glass cleaner should be used to clean both exterior and interior windshield surfaces.
- Q: How to reseal a windshield on Ford Explorer Sport Trac?A:The windshield resealing process starts by taking off the windshield side garnish mouldings as well as removing the interior rear view mirror followed by removing the overhead console and if necessary the roof opening panel trim. The visibility starts with taking out the sun visors by first unscrewing them then separating the electrical connector before clipping off the sun visor clips along with their screws. The front section of the headliner must be lowered partway towards the windshield opening before supporting it with proper materials. After dismantling the cowl grille proceed with cleaning the interface between glass and existing urethane on the inside areas at the top and sides and on the outside portion at the bottom of the windshield with alcohol-free cleaner. Use both an electric or battery-operated caulk gun with a correctly cut urethane applicator tip to spread a continuous bead of essex 400-HV urethane adhesive on the cleaned area until all gaps become part of the continuous bead. The technician follows up by filling the urethane application area before cleaning away any remaining substance. Testing for air and water leaks should start only after the urethane adhesive cures for at least one hour; you may need to supplement the adhesive if required. Reinstall the cowl grille together with the front headliner segment and sun visor clips and screws followed by sun visors along with their electrical connector if present and roof opening panel trim if necessary before placing the overhead console and interior rear view mirror in position on its mounting tab. The windshield side garnish can replace after finishing the glass cleaning process with alcohol-free cleaner from inside and out.


Related Ford Explorer Sport Trac Parts
 Ford Explorer Sport Trac Axle Beam
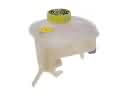 Ford Explorer Sport Trac Brake Master Cylinder Reservoir
 Ford Explorer Sport Trac Car Mirror
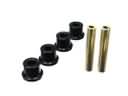 Ford Explorer Sport Trac Crossmember Bushing
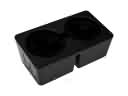 Ford Explorer Sport Trac Cup Holder
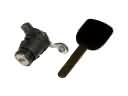 Ford Explorer Sport Trac Door Lock Cylinder
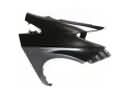 Ford Explorer Sport Trac Fender
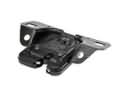 Ford Explorer Sport Trac Trunk Latch
 Ford Explorer Sport Trac Trunk Lid Latch
 Ford Explorer Sport Trac Weather Strip
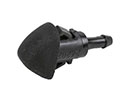 Ford Explorer Sport Trac Windshield Washer Nozzle
 Ford Explorer Sport Trac Wiper Motor