
Popular OEM Ford Explorer Sport Trac Parts
- Body & Hardware Parts View More >
- Electrical Parts View More >
- Air & Fuel Delivery Parts View More >
- Steering Parts View More >
- Emission Control & Exhaust Parts View More >
- Charging & Starting Parts View More >
- Engine Parts View More >
- Belts & Cooling Parts View More >
- Suspension Parts View More >
- Brakes Parts View More >
- A/C & Heating Parts View More >
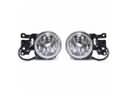
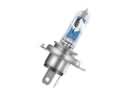
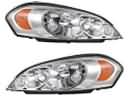
- Headlights & Lighting Parts View More >


Why Buy Genuine Ford Explorer Sport Trac Parts From FordPartsDeal.com
FordPartsDeal.com offers a smart and convenient way to buy genuine parts online. We sell new OEM Ford Explorer Sport Trac parts, including Transmission. Authorized dealers directly provide all the Ford Explorer Sport Trac parts and assemblies to ensure the optimal quality and fit. We also provide all properly fitting Ford Explorer Sport Trac parts, such as Driveline & Axles specific to your model. When you shop here, you get real Ford value at highly competitive prices. All our products come with the same Ford warranty available at other dealerships. Our easy-to-use catalog helps you quickly identify the right part for your car. You'll receive fast shipping from our warehouse network, keeping your Ford Explorer Sport Trac running smoothly. Our staff consists of Ford professionals who are ready to assist you. We aim to treat each customer as if they were stepping out of a Ford showroom. VIN verification and our live support ensure that the part you order is the right Ford Explorer Sport Trac part for your vehicle.
Between 2001 and 2010 the Ford Explorer Sport Trac emerged as a crucial part of the mid-size pickup segment manufactured by Ford Motor Company. At its launch the first Ford Explorer Sport Trac model featured the 4.0L Cologne SOHC V6 power unit with 210 horsepower and 254 lb-ft of torque and the included 5-speed automatic transmission configuration. This equipment system enabled drivers to achieve complete performance which suited city driving as well as wilderness off-roading requirements. A V8 engine addition and upgraded six-speed automatic transmission replaced the 5-speed transmission after the 2009 model year as the Sport Trac received this power increase. During its 2007 redesign the Ford Explorer Sport Trac received an extended wheelbase reaching 130.5 inches which achieved increased stability together with improved ride comfort. The Ford Explorer Sport Trac came with XLS, XLT and Limited trim levels that provided assortment of features for various customer needs. The Ford Explorer Sport Trac delivered enough towing capabilities together with outstanding motor strength to meet the needs of individuals requiring utility features while maintaining their luxurious driving experience. Genuine Ford-produced parts for Sport Tracs ensure vehicle performance along with integrity following all Ford-manufactured specifications. These components allow owners to stretch out both the operational time and lifetime of their Ford Explorer Sport Trac until it earns recognition for dependable purposes.
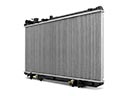
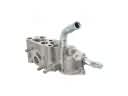
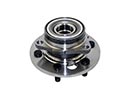
Ford Explorer Sport Trac engine cooling issues center on a plastic intake manifold that cracks and leaks. Expect a sweet odor, puddles near the front passage on the Explorer Sport Trac, overheating at idle, and warning lights. The molded coolant passage fatigues and splits under heat cycling. Later designs use a metal front passage that resists cracking. Replacement of the intake manifold with the updated Ford design restores reliability. The Explorer Sport Trac suspension wheel end may develop wheel bearing failure, heard as a rising hum. Play at the wheel or hub heat may also appear. Replace the wheel bearing, check the hub surfaces, and set axle nut torque correctly. Transmission concerns on the Explorer Sport Trac involve the 5 speed automatic transmission in the drivetrain, especially early 2002 builds. Symptoms include harsh shifts, delayed engagement, slipping, or fluid leaks during operation. Causes range from outdated calibration to valve body wear on the Explorer Sport Trac. Service may include leak repair, software updates, solenoid or valve body work, or a rebuild for clutch damage. Ford updates improved durability, and Ford Explorer Sport Trac maintenance helps, including timely fluid service and quality parts.
Ford Explorer Sport Trac Parts and Q&A
- Q: How to service and repair the water pump on Ford Explorer Sport Trac?A:In order to service the water pump, one has to first drain some engine cooling system, unbolt the accessory drive belt, the fan shroud and the fan blade. Disassemble the heater and lower radiator hose, disturb the water pump pulley and the pump. Wipe the sealing surfaces and reverse the procedure of removing it to install.
- Q: How to remove and replace the rear bumper cover on Ford Explorer Sport Trac?A:To fit in the rear bumper cover on the Explorer, Mountaineer or Explorer Sport Trac, use six screws to take out the cover as well as the splash shield. Unscrew both the license plate connector, peel the corners outwards and un screw the cover. Installation Transfer units and undo the process.
- Q: How to service and repair the power steering pump on a 4.0L engine on Ford Explorer Sport Trac?A:It takes about 15 minutes to service power steering pump of a 4.0L engine and the steps involved include: removing the fluid and hoisting the vehicle. Disassemble pump pulley, pump hoses and bolts. Take off the pump, put on a new Teflon seal, and fix the pump with bolts. Re-connect hoses, tighten fittings and refill system.


