FordParts
My Garage
My Account
Cart
OEM Ford Freestar Seat Cushion
Seat Pad Cushion- Select Vehicle by Model
- Select Vehicle by VIN
Select Vehicle by Model
orMake
Model
Year
Select Vehicle by VIN
For the most accurate results, select vehicle by your VIN (Vehicle Identification Number).
2 Seat Cushions found

Ford Freestar Element Part Number: 3F2Z-17632A23-CA
$181.88 MSRP: $251.62You Save: $69.74 (28%)Ships in 1-2 Business Days
Ford Freestar Seat Cushion Pad, Rear Part Number: 3F2Z-1763840-CA
Ford Freestar Seat Cushion
OEM Seat Cushion boasts unmatched quality. Each part goes through full quality checks. They adhere to Ford's official factory standards. These steps remove flaws and inconsistencies. So you can get Seat Cushion with long life and a perfect fit. Come to our website and find genuine Ford Freestar parts. We keep a wide inventory of OEM Freestar parts at the highly affordable prices. It's easy to search, compare, and pick what you need. You'll love the clear info and simple checkout. We offer top-rated customer service, and we reply fast. We also ship promptly to ensure your order arrives on time.
The Ford Freestar Seat Cushion is a part of the automobile that guarantees comfort for the Ford Freestar model, famous for sturdiness and speed. This Seat Cushion affords basic support; it is crucial for long drives, correcting possible design errors, which can cause uneasiness. The Ford Freestar built as the third generation of the Windstar is compatible with different models to provide the drivers with the Seat Cushion as enhance across the models. Meantime, the Seat Cushion is equipped with the modern components like the beaded designs that increase the air circulation and provide a massaging effect on the back, hips, and thighs to increase blood flow and cool the drivers. Furthermore, sheepskin choices are also provided, the cause of temperature regulation and moisture management for a comfortable ride regardless of the climate. The Ford Freestar Seat Cushion also demonstrates the effectiveness in increasing the level of comfort; at the same time, it is a crucial factor contributing to safety and productivity as it minimizes driver fatigue during long drives. Thus, at the present time, Seat Cushion, developed with the consideration of the driver's healthiest posture, is an important addition to the automotive parts supply and an addition to the Ford Freestar. In conclusion, the Ford Freestar Seat Cushion mirrors the company's pledge to creating products that meet the customers' needs at their optimal and deliver the optimal experience to every passenger in the vehicle.
Ford Freestar Seat Cushion Parts and Q&A
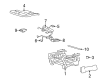
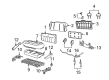
- Q: How to service the rear seat cushion of the second-row bucket seat on Ford Freestar?A:You should start service operations on the rear seat cushion of the second-row bucket seat by removing the second row bucket seat and backrest. The service involves loosening 9 screws which hold the seat bottom cover in place before disconnecting the 6 nuts between the seat riser and seat track so you can detach the riser then perform a 25 Nm (18 lb-ft) installation torque check. Installation of a new seat riser strut requires using all service kit parts and orienting the rod end toward the front of the seat for correct offset alignment while removing the 2 bolts and the strut then tightening them to 25 Nm (18 lb-ft). To install the seat track on the cushion pan start by removing its four bolts using a torque of 25 Nm (18 lb-ft) before reinstallation. The reinstallation procedure requires tightening the lower anchors and tethers for children (LATCH) to 50 Nm (37 lb-ft). Following the removal of J-clips technicians should pull the seat cushion trim cover and foam pad from the cushion pan with caution regarding damage to the hook and loop strip. Reassembly requires discarding all hog rings before you detach the foam pad from the seat cushion trim cover. After completion, follow the reverse order of disassembly.
- Q: What precautions should be taken when servicing the front driver side seat cushion on Ford Freestar?A:The front driver side seat cushion servicing demands safety glasses usage to protect against accidental air bag discharges because the air bag module contains sodium hydroxide which irritates skin after deployment. The process should begin only after depowering the supplemental restraint system (SRS) while bearing in mind that removing the RCM fuse with the ignition switch ON will cause the air bag warning lamp to illuminate due to a design feature. This normal lighting does not indicate any system faults exist. Replace all components of the seat backrest as well as the side air bag module and possibly the seat backrest frame after a deployed side air bag. Begin the procedure by taking out the driver seat followed by disabling the SRS and then removing any seat control knob present. After that unlatch the recliner handle cover tab and detach the handle. The LH side shield screw behind the recliner handle must be taken out before the front and rear LH side shield screws followed by seat control switch disconnect if equipped and finally the LH side shield removal. Disconnect the RH side shield after you remove its two screws and detach the shield. The seat side air bag requires electrical connector detachment before running it through the seat cushion frame in order to remove the backrest. During climate-controlled seat maintenance it is necessary to detach the backrest thermo-electric device (TED) electrical connector then remove the backrest climate-controlled seat duct from its connection to the blower. Memory seats require disconnecting three membrane connectors from each motor position sensor and detaching pin-type retainers mounted on the seat cushion frame. Disconnect the 2 heater mat electrical connectors from the backrest heater mat while also removing all electric connectors and pin-type retainers which secure the seat cushion assembly to its frame. Remove all electrical connectors from the safety belt buckle pretensioner before removing its bolt and pretensioner hardware which should be torqued to 40 Nm (30 lb-ft) before reinstallation. To detach the seat backrest from the seat cushion use a torque wrench at 58 Nm (43 lb-ft) to tighten the three manual track bolts or four power track bolts. First disconnect electrical connectors as well as pin-type retainers to detach the seat cushion frame from the seat track and riser system. Put in a torque wrench to secure the 4 seat track-to-seat cushion frame bolts at 25 Nm (18 lb-ft) torque. First detach the J-clips and disassemble the seat cushion hog rings and trim cover before proceeding to the foam pad. The heated seat module should be removed along with disconnecting its wires when present while handling the cushion heater mat with care from the foam pad. To access climate-control seats begin with screw removal of the seat cushion then disconnect the climate-controlled seat duct along with the TED and the seat cushion TED bezel. Next detach electrical connectors from the seat fan motor while extracting 3 screws from the fan motor and the climate-controlled seat module using 2 screws before separating the electrical connector from the module. The process for memory seats begins with disconnecting driver seat module electrical connectors and then removing both the screw and driver seat module. Reinstallation of the driver seat along with reverse disassembly procedure completes the assembly while repowering the SRS.


Related Ford Freestar Parts
 Ford Freestar Seat Covers
 Ford Freestar Air Deflector
 Ford Freestar Dimmer Switch
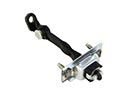 Ford Freestar Door Check
 Ford Freestar Door Hinge
 Ford Freestar Door Lock Cylinder
 Ford Freestar Floor Pan
 Ford Freestar Fuel Door Hinge
 Ford Freestar Grille
 Ford Freestar Wheelhouse
 Ford Freestar Window Regulator
 Ford Freestar Wiper Motor
Browse Ford Freestar Seat Cushion by Years
2007
2006
2005
2004