FordParts
My Garage
My Account
Cart
OEM Ford Freestyle Timing Cover
Engine Timing Cover- Select Vehicle by Model
- Select Vehicle by VIN
Select Vehicle by Model
orMake
Model
Year
Select Vehicle by VIN
For the most accurate results, select vehicle by your VIN (Vehicle Identification Number).
1 Timing Cover found

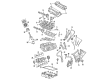
Ford Freestyle Timing Cover, Front Part Number: 5F9Z-6019-BA
Ford Freestyle Timing Cover
OEM Timing Cover boasts unmatched quality. Each part goes through full quality checks. They adhere to Ford's official factory standards. These steps remove flaws and inconsistencies. So you can get Timing Cover with long life and a perfect fit. Come to our website and find genuine Ford Freestyle parts. We keep a wide inventory of OEM Freestyle parts at the highly affordable prices. It's easy to search, compare, and pick what you need. You'll love the clear info and simple checkout. We offer top-rated customer service, and we reply fast. We also ship promptly to ensure your order arrives on time.
The Timing Cover of Ford Freestyle is a vital component proven to be reliable and proving the performance of the Ford vehicles. Intended to shield the timing mechanism like the timing belt, timing chain, or cam belt, the Timing Cover is usually made from aluminum, plastic, or steel. Such a design reduces the possibilities of the timing system's confined parts being affected by building debris, thus keeping the Ford Freestyle functional and safe for use on the road. The Timing Cover also frequently contains gaskets that increases the security of the timing belt, which interest the stability of the vehicle. Compatibility with different models of Ford Freestyle contributes to this relevance because it offers a comparable design concept for different Ford Freestyle cars hence protecting all the Freestyle vehicles. The Ford Freestyle is popular for its crossover appearance, it has the capability of being both fashionable and modest, and more specifically, the Timing Cover is a component that is essential in the performance of the Ford Freestyle. it is resistant and matches with the ford timing cover which has earned a position in the automotive market regarding quality and safety. The timing cover known for playing a vital role in the operation of the vehicle's system requires timely replacement and is therefore considered one of the essential components in the part's Freestyle. In general, the Ford Freestyle Timing Cover is not just an add-on; it is a vital part of the car as it determines the car's functionality and durability which complements Ford's brand slogan of Built to Last.
Ford Freestyle Timing Cover Parts and Q&A
- Q: How to service and repair the engine front timing cover on Ford Freestyle?A:Cleaning operations are essential to service or repair the engine front cover to avoid engine failure due to foreign materials. You should start the process by hoisting the vehicle in neutral mode while disconnecting the battery ground cable. Start by removing the Oil Pan along with the crankshaft front seal and then proceed to take off both the LH and RH valve covers. Remove first the bolt from the accessory drive belt tensioner before taking off the three power steering pump nuts to position the pump with its attached fluid reservoir to the side. Disconnect both crankshaft position (CKP) and camshaft position (CMP) sensor electric wiring. Disassemble the generator from the engine front cover by removing its stud nut along with bolt and nut before proceeding to detach the three pin-style retainers together with the radiator splash shield. The A/C compressor should be supported with mechanic's wire while the personnel detach its two bolts and nuts before removing its bracket-to-engine front cover bolts. Remove the engine front cover by first detaching the stud bolt ground wire then taking off the 14 bolts, the stud bolt, and the front cover while discarding the gaskets. To seal the surfaces a plastic scraping tool and silicone gasket remover must be used while applying silicone gasket and sealer to create a 6 mm (0.23 inch) diameter dot. Each bolt among the 14 and stud bolt requires a torque of 25 Nm (18 ft. lbs.) before tightening according to the specified order while installing the engine front cover. Secure the engine front cover ground wire with its stud bolt nut until it reaches 20 Nm (15 ft. lbs.) torque value. Install the accessory drive belt tensioner first then bolt it to 45 Nm (33 ft. lbs.), after which tighten the two A/C compressor bracket-to-engine front cover bolts to 25 Nm (18 ft. lbs.). Install the A/C compressor into position then fasten it with two bolts and two nuts tightened to 25 Nm (18 ft. lbs.). Reinstall the radiator splash shield after securing its pin-type retainers while you install the generator to engine front cover bolt at 48 Nm (35 ft. lbs.) followed by 8 Nm (71 inch lbs.) on the stud and 48 Nm (35 ft. lbs.) on the stud nut. Install the power steering pump along with its fluid reservoir afterward connect the three power steering pump nuts at 25 Nm (18 ft. lbs.). To complete the installation reinstall the accessory drive belt tensioner along with its bolt at 48 Nm (35 ft. lbs.), the LH and RH valve covers, the crankshaft front seal, and lastly the oil pan followed by reconnecting the battery ground cable.

Related Ford Freestyle Parts
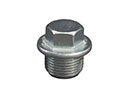 Ford Freestyle Oil Drain Plug
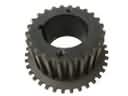 Ford Freestyle Crankshaft Gear
 Ford Freestyle Cylinder Head
 Ford Freestyle Cylinder Head Gasket
 Ford Freestyle Dipstick
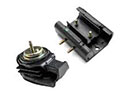 Ford Freestyle Motor And Transmission Mount
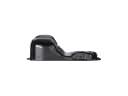 Ford Freestyle Oil Pan
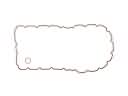 Ford Freestyle Oil Pan Gasket
 Ford Freestyle Timing Chain
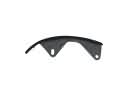 Ford Freestyle Timing Chain Guide
 Ford Freestyle Timing Chain Tensioner
 Ford Freestyle Valve Cover Gasket