My Garage
Cart
Make sure this part fits

Ford 5F9Z-6019-BA
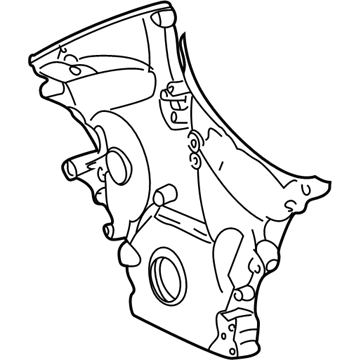
Timing Cover, Front

2005-2007 Ford 5F9Z6019BA

Customer Questions & Expert Answers (4)
Ford 5F9Z-6019-BA Timing Cover, Front
  • Part Description
    Cover - Cylinder Front; Engine Timing Cover
  • Base No.
    6019
  • Position
    Front
  • Manufacturer
    Ford
  • Manufacturer's Notes
    This part is discontinued.
Make sure this part fits
  • Related Parts
  • Product Specifications
  • Vehicle Fitment
  • Customer Questions & Expert Answers
  • Product Specifications

    BrandGenuine Ford
    Base No.6019
    Manufacturer Part Number5F9Z-6019-BA
    Part DescriptionCover - Cylinder Front; Engine Timing Cover
    Other NamesFront Cover
    Item Dimensions13.4 x 13.8 x 4.2 inches
    Item Weight10.90 Pounds
    PositionFront
    ConditionNew
    Fitment TypeDirect Replacement
    ManufacturerFord
    SKU5F9Z-6019-BA
    WarrantyThis genuine Ford part is guaranteed by Ford's factory warranty.
    Shipping & ReturnShipping Policy Return Policy
    Warning: California's Proposition 65
  • Vehicle Fitment

    Year Make Model Trim Engine
    2005-2007 Ford Five HundredLimited, SE, SEL6 Cyl 3.0 L GAS
    2005-2007 Ford FreestyleLimited, SE, SEL6 Cyl 3.0 L GAS
    2005-2007 Mercury MontegoLuxury, Premier6 Cyl 3.0 L GAS
  • Customer Questions & Expert Answers

    Q:
    Do you think this 5F9Z-6019-BA will fit my car? Posted by FordPartsDeal Specialist
    A:
    Select Your Vehicle model to verify if part number 5F9Z-6019-BA fits your car.
    Posted by FordPartsDeal Specialist
    Q:
    How to service and repair the engine front timing cover on Ford Five Hundred? Posted by Customer
    A:
    Cleaning operations are essential to service or repair the engine front cover to avoid engine failure due to foreign materials. You should start the process by hoisting the vehicle in NEUTRAL mode while disconnecting the battery ground cable. Start by removing the oil pan along with the crankshaft front seal and then proceed to take off both the LH and RH valve covers. Remove first the bolt from the accessory drive belt tensioner before taking off the three power steering pump nuts to position the pump with its attached fluid reservoir to the side. Disconnect both crankshaft position (CKP) and camshaft position (CMP) sensor electric wiring. Disassemble the generator from the engine front cover by removing its stud nut along with bolt and nut before proceeding to detach the three pin-style retainers together with the radiator splash shield. The A/C compressor should be supported with mechanic's wire while the personnel detach its two bolts and nuts before removing its bracket-to-engine front cover bolts. Remove the engine front cover by first detaching the stud bolt ground wire then taking off the 14 bolts, the stud bolt, and the front cover while discarding the gaskets. To seal the surfaces a plastic scraping tool and silicone gasket remover must be used while applying silicone gasket and sealer to create a 6 mm (0.23 inch) diameter dot. Each bolt among the 14 and stud bolt requires a torque of 25 Nm (18 ft. lbs.) before tightening according to the specified order while installing the engine front cover. Secure the engine front cover ground wire with its stud bolt nut until it reaches 20 Nm (15 ft. lbs.) torque value. Install the accessory drive belt tensioner first then bolt it to 45 Nm (33 ft. lbs.), after which tighten the two A/C compressor bracket-to-engine front cover bolts to 25 Nm (18 ft. lbs.). Install the A/C compressor into position then fasten it with two bolts and two nuts tightened to 25 Nm (18 ft. lbs.). Reinstall the radiator splash shield after securing its pin-type retainers while you install the generator to engine front cover bolt at 48 Nm (35 ft. lbs.) followed by 8 Nm (71 inch lbs.) on the stud and 48 Nm (35 ft. lbs.) on the stud nut. Install the power steering pump along with its fluid reservoir afterward connect the three power steering pump nuts at 25 Nm (18 ft. lbs.). To complete the installation reinstall the accessory drive belt tensioner along with its bolt at 48 Nm (35 ft. lbs.), the LH and RH valve covers, the crankshaft front seal, and lastly the oil pan followed by reconnecting the battery ground cable.
    Posted by FordPartsDeal Specialist
    Q:
    How to Service and Repair the Engine Front Timing Cover on Ford Freestyle? Posted by Customer
    A:
    Prior to servicing or repairing the engine front cover you must maintain cleaning procedures to stop engine failure from foreign materials. The first step requires placing the vehicle on a hoist with the NEUTRAL position selected while disconnecting the battery ground cable. The crankshaft front seal requires removal with the LH and RH valve covers together with the bolt and accessory drive belt tensioner and power steering pump nuts. The power steering pump and fluid reservoir should then be set aside. The first step includes disconnecting the buttons of the crankshaft position (CKP) sensor and camshaft position (CMP) sensor then scientists proceed to remove the two generator-to-engine front cover stud nuts and studs followed by the three pin-type retainers and the radiator splash shield. The procedure starts with removing the two A/C compressor bolts and two nuts while using mechanic's wire to support the A/C compressor. Then detach the ground wire from the engine front cover stud bolt and take out the two oil pan-to-front cover bolts. Discard the gaskets while you remove the fifteen bolts, stud bolt, together with the engine front cover. The installation process requires cleaning all seal surfaces with silicone gasket remover and plastic scrape tools that must protect the oil pan gasket from damage. The installation requires three new gaskets in the front cover with a 6 mm (0.23 inch) diameter application of silicone gasket and sealer as joint dots. The proper sequence to bolt and tighten the fifteen bolts and stud bolt to 25 Nm (18 ft. lbs.) must be followed after positioning the engine front cover. The next operations include attaching two front cover to oil pan bolts at 25 Nm torque (18 ft. lbs.) before removing engine oil through the oil pan plug followed by reinstallation and torquing to 26 Nm (19 ft. lbs.). Fasten the ground wire to the stud bolt of the engine front cover while tightening its connecting nut to 20 Nm (15 ft. lbs.). To complete this part secure the accessory drive belt tensioner adjacent to its bolt which should be torqued to 45 Nm (33 ft. lbs.). Then apply 25 Nm (18 ft. lbs.) torque to the two bolts that attach the A/C compressor bracket to the engine front cover. Position the A/C compressor and apply two bolts and two nuts while tightening to 25 Nm (18 ft. lbs.). Afterward, replace the radiator splash shield by inserting its three pin-type retainers. Secure both generator-to-engine front cover studs at 8 Nm (71 inch lbs.) before tightening the two generator-to-engine front cover stud nuts to 48 Nm (35 ft. lbs.). Reconnect the camshaft position (CMP) sensor and crankshaft position (CKP) sensor electrical connectors before positioning the power steering pump along with its fluid reservoir. Then install three power steering pump nuts by tightly torquing them to 25 Nm (18 ft. lbs.). Fitting the accessory drive belt tensioner, bolt and tightening it to 48 Nm (35 ft. lbs.) marks the first step before installing the left-hand and right-hand valve covers and crankshaft front seal and engine filling with new engine oil and battery ground cable reconnection.
    Posted by FordPartsDeal Specialist
    Q:
    How to Service and Repair the Engine Front Timing Cover on Mercury Montego? Posted by Customer
    A:
    Maintenance of the engine front cover must be performed with clean conditions to stop engine failure from foreign objects. Placing the vehicle on a hoist in NEUTRAL position while grounding the battery is the first step. You must remove the crankshaft front seal and left-hand and right-hand valve covers together with the bolt and accessory drive belt tensioner before unfastening the three power steering pump nuts then putting away the power steering pump along with fluid reservoir. Disconnect the crankshaft position (CKP) sensor and camshaft position (CMP) sensor electrical connectors and proceed to remove the two generator-to-engine front cover stud nuts and studs. Remove the three pin-type retainers and the radiator splash shield before unfastening both A/C compressor bolts and nuts while supporting the unit with mechanic's wire. To proceed remove the two bracket-to-engine front cover bolts from the A/C compressor followed by separating the ground wire from the engine front cover stud bolt and removing the two oil pan-to-front cover bolts. You should first discard the gaskets together with the engine front cover and fifteen bolts along with the stud bolt. Usage of silicone gasket remover along with a plastic scraping tool is required for sealing surface preparation before installation but metal scrapers or abrasive tools must be avoided. Place three new gaskets on the front cover followed by application of 6 mm (0.23 in) diameter silicone gasket and sealer dots on mating surfaces. Place the engine front cover in position before installing all fifteen bolts and the stud bolt with a torque of 25 Nm (18 lb-ft) according to their installation sequence. Secure both oil pan-to-front cover bolts with 25 Nm (18 lb-ft) torque before draining the engine oil through removing and reinstalling the oil pan plug at 26 Nm (19 lb-ft). Secure the ground wire at the engine front cover stud bolt and apply 20 Nm (15 lb-ft) torque to the nut. Position the A/C compressor before installing both bolts and two nuts to 25 Nm (18 lb-ft). Fasten the radiator splash shield first with its three pin-type retainers before tightening the two generator-to-engine front cover studs up to 8 Nm (71 lb-in) then the two generator-to-engine front cover stud nuts to 48 Nm (35 lb-ft). Install the power steering pump along with its fluid reservoir before secure the three power steering pump nuts to 25 Nm (18 lb-ft). Position the accessory drive belt tensioner along with its bolt, apply torque of 45 Nm (33 lb-ft), reinstall both valve covers and the crankshaft front seal before filling the engine with new clean engine oil and reattaching the battery ground cable.
    Posted by FordPartsDeal Specialist
    If you have any questions about this product, please don't hesitate to ask us. We will be happy to help you!

OEM Ford 5F9Z-6019-BA, Excellent Performance and Perfect Fitment

To ensure reliability, purchase Ford part # 5F9Z-6019-BA Timing Cover, Front. It is sometimes referred to as Ford Timing Cover. For those Ford owners who aspire to maintain their vehicles in optimal shape, opting for OEM parts is a wise choice. Precisely engineered, these components adhere to stringent factory guidelines and are produced in state-of-the-art facilities using cutting-edge technologies. Moreover, they are subjected to thorough testing to certify their resilience and safety, thereby making them a dependable option for Ford owners.

FordPartsDeal.com is a leading supplier of genuine Ford parts such as Ford 5F9Z6019BA Timing Cover, Front. A vast selection of genuine Ford parts is available on our website, all offered at discounted prices. Every OEM Ford part is covered by the manufacturer's warranty, which also applies to our hassle-free return policy. Enjoy fast delivery service, ensuring you get your parts when you need them. Your shopping experience here is guaranteed to be pleasurable. For detailed Ford parts information, click here.
Choose FordPartsDeal for discounted prices, exceptional service and fast delivery