FordParts
My Garage
My Account
Cart
OEM Ford Taurus Engine Mount
Engine Motor Mount- Select Vehicle by Model
- Select Vehicle by VIN
Select Vehicle by Model
orMake
Model
Year
Select Vehicle by VIN
For the most accurate results, select vehicle by your VIN (Vehicle Identification Number).
42 Engine Mounts found


Ford Taurus Transmission Mount Part Number: GB5Z-6068-A
$46.02 MSRP: $65.83You Save: $19.81 (31%)


Ford Taurus Mount Bracket, Front Passenger Side Part Number: 8M8Z-6038-A
$113.72 MSRP: $175.00You Save: $61.28 (36%)Ships in 1-2 Business Days

Ford Taurus Transmission Mount, Front Upper Part Number: DG1Z-6038-F
$66.30 MSRP: $96.50You Save: $30.20 (32%)


Ford Taurus Front Mount Part Number: 8G1Z-6038-A
$78.78 MSRP: $114.67You Save: $35.89 (32%)Ships in 1-2 Business Days


Ford Taurus Transmission Mount Part Number: DA8Z-6068-A
$79.38 MSRP: $122.17You Save: $42.79 (36%)Ships in 1-3 Business Days


Ford Taurus Front Mount Part Number: AA5Z-6038-D
$109.69 MSRP: $159.67You Save: $49.98 (32%)


Ford Taurus Transmission Mount, Upper Part Number: AA5Z-6038-B
$91.37 MSRP: $133.00You Save: $41.63 (32%)

Ford Taurus Motor Mount, Front Part Number: DG1Z-6038-E
$107.56 MSRP: $156.57You Save: $49.01 (32%)

Ford Taurus Front Mount Part Number: DA8Z-6038-C
$143.58 MSRP: $209.00You Save: $65.42 (32%)Ships in 1-3 Business Days


Ford Taurus Torsion Arm, Lower Part Number: 9G1Z-6068-A
$53.24 MSRP: $76.17You Save: $22.93 (31%)Ships in 1-2 Business Days


Ford Taurus Torque Arm, Front Part Number: DG1Z-6068-A
$58.85 MSRP: $85.67You Save: $26.82 (32%)Ships in 1-2 Business Days

Ford Taurus Front Mount Part Number: F7DZ-6038-AA
$200.40 MSRP: $277.24You Save: $76.84 (28%)Ships in 1-2 Business Days


Ford Taurus Strut Assembly Bracket Part Number: YF1Z-6F055-BA
$13.78 MSRP: $18.75You Save: $4.97 (27%)
Ford Taurus Transmission Mount Bracket Part Number: DA8Z-6031-B
$110.58 MSRP: $160.97You Save: $50.39 (32%)Ships in 1-3 Business Days
Ford Taurus Transmission Mount Part Number: DA8Z-6038-B
$295.10 MSRP: $433.33You Save: $138.23 (32%)Ships in 1-3 Business Days


Ford Taurus Front Mount Part Number: YF1Z-6038-AA


Ford Taurus Transmission Mount, Front Lower Part Number: AA5Z-6068-B
$133.97 MSRP: $195.00You Save: $61.03 (32%)

Ford Taurus Strut Assembly Part Number: YF1Z-6F050-AA


Ford Taurus Transmission Mount Part Number: F6DZ-6F063-A


Ford Taurus Strut Assembly Part Number: 4F1Z-6F050-AA
| Page 1 of 3 |Next >
1-20 of 42 Results
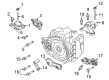
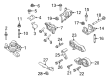
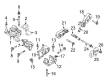
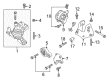
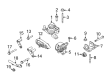
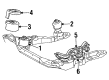
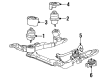
Ford Taurus Engine Mount
OEM Engine Mount boasts unmatched quality. Each part goes through full quality checks. They adhere to Ford's official factory standards. These steps remove flaws and inconsistencies. So you can get Engine Mount with long life and a perfect fit. Come to our website and find genuine Ford Taurus parts. We keep a wide inventory of OEM Taurus parts at the highly affordable prices. It's easy to search, compare, and pick what you need. You'll love the clear info and simple checkout. We offer top-rated customer service, and we reply fast. We also ship promptly to ensure your order arrives on time.
Ford Taurus Engine Mount Parts and Q&A
- Q: How to remove and install the engine mount on Ford Taurus?A:The first step to remove the engine mount involves taking off the exhaust flexible pipe. Position a floor jack together with the Oil Pan Holding Fixture under the oil pan making sure the fixture matches with the mounting bosses while maintaining caution against any potential damage. The first step requires removal of the engine coolant degas bottle while the second step involves detaching the wiring harness retainer from the engine mount bracket stud bolt and subsequent removal of the nut and bolt and engine mount brace. After properly removing the four engine mount nuts along with the four engine mount studs it is essential to detach the three bolts and the engine mount from its position. The front cover engine mount stud holes should receive pressurized air cleaning for debris removal before installing the engine mount along with the three bolts while keeping them loose. After cleaning the engine mount studs along with fresh studs apply new thread sealer before screwing in the four engine mount studs which need to be torqued to 20 Nm (177 lb-in). Crank the engine mount bolts which number three to 90 Nm (66 lb-ft) tension while the four engine mount nuts require a torque of 63 Nm (46 lb-ft). The complete installation procedure includes tightening the engine mount brace along with its bolt and nut to 20 Nm (177 lb-in). Subsequently install the wiring harness retainer to the engine mount bracket stud bolt before reattaching the engine coolant degas bottle and the exhaust flexible pipe.

Related Ford Taurus Parts
 Ford Taurus Camshaft
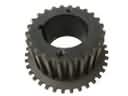 Ford Taurus Crankshaft Gear
 Ford Taurus Cylinder Head Bolts
 Ford Taurus Cylinder Head Gasket
 Ford Taurus Dipstick
 Ford Taurus Engine Mount Bracket
 Ford Taurus Motor And Transmission Mount
 Ford Taurus Oil Drain Plug
 Ford Taurus Oil Pump Gasket
 Ford Taurus Piston Ring Set
 Ford Taurus Timing Chain Tensioner
 Ford Taurus Valve Stem Seal
Browse Ford Taurus Engine Mount by Years
2019
2018
2017
2016
2015
2014
2013
2012
2011
2010
2009
2008
2007
2006
2005
2004
2003
2002
2001
2000
1999
1998
1997
1996
1995
1994
1993
1992
1991
1990
1989
1988
1987
1986