FordParts
My Garage
My Account
Cart
OEM Lincoln MKS A/C Accumulator
Accumulator- Select Vehicle by Model
- Select Vehicle by VIN
Select Vehicle by Model
orMake
Model
Year
Select Vehicle by VIN
For the most accurate results, select vehicle by your VIN (Vehicle Identification Number).
4 A/C Accumulators found


Lincoln MKS Dehydrator Part Number: BG1Z-19959-B
$74.92 MSRP: $123.27You Save: $48.35 (40%)Ships in 1-2 Business Days

Lincoln MKS Dehydrator Part Number: BB5Z-19C836-A
$48.53 MSRP: $79.27You Save: $30.74 (39%)Ships in 1-2 Business DaysLincoln MKS Dehydrator Part Number: BA5Z-19959-B
$99.89 MSRP: $164.36You Save: $64.47 (40%)Ships in 1-2 Business Days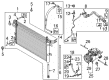
Lincoln MKS Dehydrator Part Number: EB5Z-19C836-A
$33.55 MSRP: $53.27You Save: $19.72 (38%)Ships in 1-2 Business Days
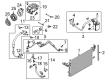
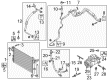
Lincoln MKS A/C Accumulator
OEM A/C Accumulator boasts unmatched quality. Each part goes through full quality checks. They adhere to Lincoln's official factory standards. These steps remove flaws and inconsistencies. So you can get A/C Accumulator with long life and a perfect fit. Come to our website and find genuine Lincoln MKS parts. We keep a wide inventory of OEM MKS parts at the highly affordable prices. It's easy to search, compare, and pick what you need. You'll love the clear info and simple checkout. We offer top-rated customer service, and we reply fast. We also ship promptly to ensure your order arrives on time.
Lincoln MKS A/C Accumulator is essential component, which proves the efficiency of the Lincoln MKS A/C system. Well known for the high capacity of A/C accumulation, this part of the mechanism has the main purpose of purging the central labyrinth from contamination and humidity that may lead to terrible consequences for the overall effectiveness of the system and its lifespan. If you are interested in A/C Accumulator for different Lincoln MKS models that were manufactured between 2008 and 2016, then welcome to order it in our online store because we offer exactly what is required for efficient operation of your car's air conditioning system: to do this, it is interconnected with the condenser and the expansion valve. It is designed and built to have bullet cylindrical shape that would ensure reduced tendencies of accumulation of debris which are known to reduce efficiency of the whole A/C system. The Lincoln MKS A/C Accumulator service is not only a tool for performing its individual duties; it is an integral part of making the automobile safer and more comfortable for its user. In particular, the A/C Accumulator has currently available extra features that make it stand out from competitors in the automotive industry, namely, a highly enhanced set of technologies for moisture removal, and increased durability that is not easily affected by wear and tear arising from regular road use. It not only enhances the performance of the Lincoln MKS but also enhances its status as a luxurious car that puts all its efforts on enhancing the comfort of the driver and the passengers. In conclusion, it can be said that the Lincoln MKS A/C Accumulator is one of these components that reflects the main idea of Lincoln brand - quality and innovation, making every trip in the car enjoyable and safe.
Lincoln MKS A/C Accumulator Parts and Q&A
- Q: How to Service and Repair the A/C Accumulator on Lincoln MKS?A:The A/C accumulator servicing and repair process needs controlled exposure to outside air for removal and installation while deployment of the accumulator must occur after other components in multi-component A/C repairs. The shipping caps should stay installed until fittings are ready for connection while immediate evacuation of the A/C system becomes necessary to stop moisture from contaminating the desiccant. A new accumulator must be replaced only when the ailing A/C compressor causes system contamination or when physical damages appear on the shell or desiccant due to exceeding one hour of pressure equalization with outside air. You should not replace the accumulator during repair when there is present any positive refrigerant pressure. Begin by evacuating the refrigerant before separating the condenser outlet fitting nut and minus adapter while discarding the O-ring and gasket seals so tighten the new components to 15 Nm (133 lb-in) upon installation. The accumulator outlet line clip needs removal to disconnect the fitting by unfastening its bolt, discard the O-ring seal and gasket seal before tightening the new fitting to 15 Nm (133 lb-in) torque. The two accumulator bolts should be removed before installation of new ones at 9 Nm (80 lb-in). The installation requires following the removal steps in reverse order and including the installation of replacement gasket and O-ring rubber seals and precise PAG oil addition to the refrigerant system before evacuating the system and performing leak tests and final charger.

Related Lincoln MKS Parts
 Lincoln MKS Blend Door Actuator
 Lincoln MKS A/C Compressor
 Lincoln MKS A/C Compressor Clutch
 Lincoln MKS A/C Compressor Cut-Out Switches
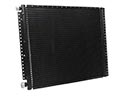 Lincoln MKS A/C Condenser
 Lincoln MKS A/C Idler Pulley
 Lincoln MKS A/C Service Cap
 Lincoln MKS A/C System Valve Core
 Lincoln MKS Blower Motor
 Lincoln MKS Blower Motor Resistor
 Lincoln MKS Evaporator
 Lincoln MKS Heater Core