FordParts
My Garage
My Account
Cart
OEM Lincoln MKZ Axle Shaft
Car Axle Shaft- Select Vehicle by Model
- Select Vehicle by VIN
Select Vehicle by Model
orMake
Model
Year
Select Vehicle by VIN
For the most accurate results, select vehicle by your VIN (Vehicle Identification Number).
29 Axle Shafts found


Lincoln MKZ Axle Assembly, Front Passenger Side Part Number: HG9Z-3B436-F
$219.85 MSRP: $365.05You Save: $145.20 (40%)Ships in 1 Business Day


Lincoln MKZ Axle Assembly, Front Driver Side Part Number: DP5Z-3B437-A
$171.00 MSRP: $322.15You Save: $151.15 (47%)Ships in 1-3 Business Days


Lincoln MKZ Axle Assembly, Front Passenger Side Part Number: AE5Z-3A428-B
$113.64 MSRP: $186.98You Save: $73.34 (40%)Ships in 1-2 Business Days

Lincoln MKZ Axle Assembly, Front Driver Side Part Number: HG9Z-3B437-E
$141.99 MSRP: $233.64You Save: $91.65 (40%)


Lincoln MKZ Axle Assembly, Front Driver Side Part Number: HG9Z-3B437-B
$168.06 MSRP: $276.53You Save: $108.47 (40%)Ships in 1-2 Business Days
Lincoln MKZ Axle Assembly, Front Passenger Side Part Number: DG9Z-3B436-BT
$193.16 MSRP: $320.73You Save: $127.57 (40%)Ships in 1-2 Business Days
Lincoln MKZ Axle Assembly, Front Passenger Side Part Number: HG9Z-3B436-D
$203.67 MSRP: $338.18You Save: $134.51 (40%)Ships in 1-2 Business Days

Lincoln MKZ Axle Assembly, Front Driver Side Part Number: DG9Z-3B437-AF
$177.91 MSRP: $292.73You Save: $114.82 (40%)Ships in 1-2 Business Days

Lincoln MKZ Axle Assembly, Front Driver Side Part Number: HG9Z-3B437-C
$160.23 MSRP: $263.64You Save: $103.41 (40%)Ships in 1-3 Business Days
Lincoln MKZ Axle Assembly, Front Passenger Side Part Number: HG9Z-3B436-J
$180.12 MSRP: $296.36You Save: $116.24 (40%)Ships in 1-3 Business Days
Lincoln MKZ Axle Assembly, Front Passenger Side Part Number: HG9Z-3B436-C
$203.53 MSRP: $337.95You Save: $134.42 (40%)Ships in 1-2 Business DaysLincoln MKZ Axle Assembly, Front Passenger Side Part Number: HG9Z-3B436-G
$182.69 MSRP: $303.35You Save: $120.66 (40%)Ships in 1-3 Business Days
Lincoln MKZ Axle Assembly, Front Passenger Side Part Number: HG9Z-3B436-K
$223.33 MSRP: $370.82You Save: $147.49 (40%)Ships in 1-3 Business DaysLincoln MKZ Axle Assembly, Front Passenger Side Part Number: HG9Z-3B436-H
$243.09 MSRP: $403.64You Save: $160.55 (40%)Ships in 1-3 Business Days
Lincoln MKZ Axle Assembly, Front Driver Side Part Number: HG9Z-3B437-D
$164.13 MSRP: $270.05You Save: $105.92 (40%)Ships in 1-2 Business Days
Lincoln MKZ Axle Assembly, Front Driver Side Part Number: AE5Z-3A427-D
$116.79 MSRP: $185.45You Save: $68.66 (38%)


Lincoln MKZ Axle Assembly, Front Driver Side Part Number: AH6Z-3A427-A


Lincoln MKZ Intermediate Shaft, Front Part Number: AE5Z-3A329-D


Lincoln MKZ Intermediate Shaft, Front Part Number: 7H6Z-3A329-B

Lincoln MKZ Intermediate Shaft, Front Part Number: 7H6Z-3A329-A
| Page 1 of 2 |Next >
1-20 of 29 Results
Lincoln MKZ Axle Shaft
OEM Axle Shaft boasts unmatched quality. Each part goes through full quality checks. They adhere to Lincoln's official factory standards. These steps remove flaws and inconsistencies. So you can get Axle Shaft with long life and a perfect fit. Come to our website and find genuine Lincoln MKZ parts. We keep a wide inventory of OEM MKZ parts at the highly affordable prices. It's easy to search, compare, and pick what you need. You'll love the clear info and simple checkout. We offer top-rated customer service, and we reply fast. We also ship promptly to ensure your order arrives on time.
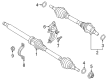
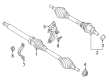
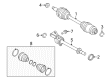
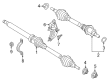
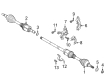
The Lincoln MKZ Axle Shaft one of the important Assembly that clearly defines the specification of Lincoln vehicle. Intended to deliver power from the differential to the four drive wheels, the MKZ Axle Shaft is instrumental in allowing smooth and fluid movement of vehicles, and contributes to general driving behavior. Made from materials such as steel, these axle shafts are made to be strong enough to suit the various terrains that the Lincoln MKZ is used on, to ensure the vehicle is well handled especially during cornering fully. The Lincoln Axle Shaft has been designed to be adaptable to all MKZ models and their solid axle and halfshaft versions. Realms of solid axle is durability and relatively simple design in contrast to halfshafts that facilitate separated wheel movement thus improving the safety, as well as efficiency of the car, in question - MKZ. These features/attributes of each kind of axle are deliberately chosen to produce or match the performance attributes that are wanted in the Lincoln MKZ to differentiate it from other vehicles in the market. However, what is more, the Axle Shaft includes additional features that take its functioning to the next level, making the driving seamless. In proving its quality that Lincoln puts into its products, the Axle Shaft does not only help in boosting the performance of the Lincoln MKZ but also adding to the brand's valor that embodies luxury and quality enabling the axel shaft as a necessary equipment for every Lincoln MKZ owner.
Lincoln MKZ Axle Shaft Parts and Q&A
- Q: How to Service and Repair the Front Drive Axle Shafts on Lincoln MKZ?A:Service and repair operations for the front drive halfshafts should start with removing the right halfshaft initially. Unbolt the intermediate shaft support bearing bracket using the two fasteners. The removal process requires supporting both ends of the intermediate shaft because damaging transaxle seals must be avoided completely. The circlip must be discarded after it is removed from the outboard end of the intermediate shaft. To install the intermediate shaft position a new 30 mm (1.181 inch) circlip onto its outboard end. Install the intermediate shaft into the transaxle while making sure its splines match the position of the side gears yet maintaining the security of the circlip. Attaching and torquing the two intermedium shaft bracket bolts must reach 40 Nm (30 ft. lbs.). Finally, reinstall the right halfshaft.
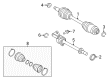
- Q: How to Service and Repair the Right Axle Shaft on Lincoln MKZ?A:Service and repair of the right axle shaft starts by taking off the front tire along with the wheel. First utilize the brake to stop the axle shaft rotation and afterward take out and dispose of the front wheel hub nut. Move on to remove the front as well as rear lower Control Arm nuts. Disconnection of the lower ball joints requires the Ball Joint Separator and Adapter while tapping the wheel knuckle when needed for separation. Remove the axle shaft from the wheel hub by using the Front Wheel Hub Remover yet always place wood between the lower arm and outer constant velocity (CV) joint to safeguard the boot during detachment. Begin by removing both the damper fork bolt along with the flagnut which connects the damper fork to the lower control arm. Then disconnect the brake caliper hose bolt. A jackstand secures the knuckle while you pull it outward before rotating it in a rear direction. First detach the lower control arm-to-subframe bolt before pulling out the lower control arm. Use a brass drift tool to disconnect the right side axle shaft from the intermediate shaft. Then push the strut toward the front before removing the axle shaft which needs to be placed in front of the damper fork before extraction. The intermediate shaft requires its circlip to be discarded first. Installation requires the correct diameter circlip according to application needs and a new intermediate shaft circlip needs to be installed. Push the right side shaft straight out to verify the circlip secures in place before lining up both shaft splines with each other, and then slide the stub shaft inward until the circlip locks the shafts. Put the axle shaft into the wheel hub then position the knuckle correctly before tightening the lower control arm subframe bolt to 103 Nm (76 lb-ft). First fasten the damper fork bolt along with flagnut to the lower control arm then tighten them to 109 Nm (80 lb-ft) after which install the brake caliper hose bolt with 22 Nm (16 lb-ft) torque followed by front and rear lower control arm nut tightening to 200 Nm (148 lb-ft). Put the axle shaft through the wheel hub with the Axle Shaft Installer; afterward tighten the new front wheel hub nut to 255 Nm (185 lb-ft). However, keep the vehicle off the ground while installing to stop wheel bearing damage. The new nut should receive a minimum 1 mm (0.039 in) insertion depth into the keyway before using it as a locking feature and reinstallment of front tires and wheels should proceed.


Related Lincoln MKZ Parts
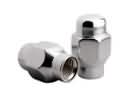 Lincoln MKZ Lug Nuts
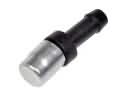 Lincoln MKZ Axle Vent
 Lincoln MKZ Bump Stop
 Lincoln MKZ Coil Springs
 Lincoln MKZ Control Arm Bolt
 Lincoln MKZ CV Boot
 Lincoln MKZ Front Cross-Member
 Lincoln MKZ Lateral Link
 Lincoln MKZ Rear Crossmember
 Lincoln MKZ Steering Knuckle
 Lincoln MKZ Strut Bearing
 Lincoln MKZ Strut Mounts
Browse Lincoln MKZ Axle Shaft by Years
2020
2019
2018
2017
2016
2015
2014
2013
2012
2011
2010
2009
2008
2007