FordParts
My Garage
My Account
Cart
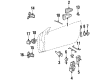
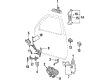
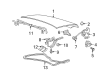
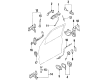
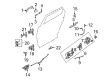
OEM Mercury Door Latch Cable
Door Lock Release Cable- Select Vehicle by Model
- Select Vehicle by VIN
Select Vehicle by Model
orMake
Model
Year
Select Vehicle by VIN
For the most accurate results, select vehicle by your VIN (Vehicle Identification Number).
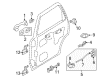
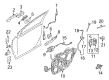
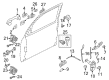
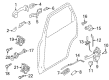
18 Door Latch Cables found


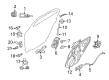
Mercury Cable, Rear Driver Side Part Number: 6E5Z-54221A01-B
$18.93 MSRP: $26.85You Save: $7.92 (30%)Ships in 1-3 Business DaysProduct Specifications- Other Name: Cable Assembly; Door Latch Cable, Rear Left; Door Latch Cable
- Position: Driver Side
- Replaces: 6E5Z-54221A01-A


Mercury Cable, Front Part Number: BE5Z-54221A00-A
$23.29 MSRP: $33.03You Save: $9.74 (30%)Ships in 1-2 Business DaysProduct Specifications- Other Name: Cable Assembly; Door Latch Cable, Front; Door Latch Cable
- Manufacturer Note: RH/LH
- Position: Front
- Replaces: 6E5Z-54221A00-E, 6E5Z-54221A00-C

Mercury Cable Assembly, Rear Passenger Side Part Number: YL8Z-78266A46-AA
$43.33 MSRP: $61.98You Save: $18.65 (31%)Product Specifications- Other Name: Door Latch Cable, Rear Right; Cable; Door Latch Cable
- Position: Rear Passenger Side
- Replaces: 5L8Z-78264A00-DD
Mercury Cable, Rear Passenger Side Part Number: 6E5Z-54221A00-D
$21.53 MSRP: $30.53You Save: $9.00 (30%)Ships in 1-3 Business DaysProduct Specifications- Other Name: Cable Assembly; Door Latch Cable, Rear Right; Door Latch Cable
- Position: Passenger Side
- Replaces: 6E5Z-54221A00-B


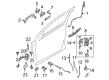
Mercury Control Cable, Front Part Number: 5F9Z-74221A00-AA
Product Specifications- Other Name: Cable Assembly; Door Latch Cable, Front; Lock Cable; Actuator Cable; Door Latch Cable
- Manufacturer Note: RH/LH
- Position: Front


Mercury Cable, Front Part Number: 8L8Z-78221A00-A
Product Specifications- Other Name: Cable Assembly; Door Latch Cable, Front; Door Latch Cable
- Manufacturer Note: RH/LH
- Position: Front
Mercury Cable Assembly, Rear Driver Side Part Number: YL8Z-78266A47-AA
Product Specifications- Other Name: Door Latch Cable, Rear Left; Cable; Door Latch Cable
- Position: Driver Side
- Replaces: 6L8Z-78264A01-DB, 6L8Z-78264A01-DAD

Mercury Control Cable Part Number: F8RZ-63221A00-AA
Product Specifications- Other Name: Cable Assembly; Door Latch Cable
- Manufacturer Note: RH and LH , front door

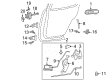
Mercury Cable Assembly, Front Part Number: F6DZ-54221A00-AA
Product Specifications- Other Name: Door Latch Cable, Front; Control Cable; Door Latch Cable
- Manufacturer Note: RH AND LH - FRONT DOOR
- Position: Front

Mercury Release Cable, Rear Part Number: F6AZ-5443329-AA
Product Specifications- Other Name: Cable Assembly - Control; Deck Lid Release Cable, Rear; Trunk Release Cable; Door Latch Cable
- Position: Rear

Mercury Control Cable Part Number: F5RZ54221A00A
Product Specifications- Other Name: Cable Assembly; Door Latch Cable
Mercury Control Cable Part Number: F5RZ-54221A00-AA
Product Specifications- Other Name: Cable Assembly; Door Latch Cable

Mercury Cable, Rear Part Number: 8L8Z-78266A46-A
Product Specifications- Other Name: Cable Assembly - Control; Door Latch Cable, Rear; Door Latch Cable
- Manufacturer Note: RH/LH
- Position: Rear

Mercury Latch Cover, Front Driver Side Part Number: 8G1Z-74221A01-A
Product Specifications- Other Name: Cable; Door Lock Rod Cover, Front Left; Door Latch Cable, Front Left; Release Cable; Door Latch Cable
- Position: Driver Side

Mercury Latch Rods, Rear Part Number: 7L2Z-78266A46-A
Product Specifications- Other Name: Cable Assembly - Control; Door Latch Cable, Rear; Cable; Door Latch Cable
- Manufacturer Note: RH/LH
- Position: Rear

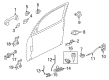
Mercury Cable, Front Driver Side Part Number: 6L8Z-78221A01-AA
Product Specifications- Other Name: Cable Assembly; Door Latch Cable, Front Left; Door Latch Cable
- Position: Driver Side
- Replaces: 4L8Z-78221A01-AA
Mercury Cable, Front Passenger Side Part Number: 6L8Z-78221A00-AA
Product Specifications- Other Name: Cable Assembly; Door Latch Cable, Front Right; Door Latch Cable
- Position: Passenger Side
- Replaces: 4L8Z-78221A00-AA

Mercury Lock Cable, Rear Part Number: 5F9Z-7440180-AA
Product Specifications- Other Name: Cable Assembly - Control; Door Latch Cable, Rear; Release Cable; Cable; Door Latch Cable
- Manufacturer Note: RH/LH
- Position: Rear
Mercury Door Latch Cable
If you own Mercury and want to keep it in top shape, choosing OEM Door Latch Cable is a smart move. They are precisely engineered and follow strict factory standards. They are made in advanced facilities that use cutting edge technology. Each part goes through thorough testing to confirm strength and safety, so you can trust it. FordPartsDeal.com gives you genuine Mercury Door Latch Cable at some of the affordable online prices without cutting quality. Every OEM Mercury part includes the manufacturer's warranty, easy returns, and super-fast delivery. So why wait? Shop now and get your vehicle back to peak condition.
Mercury Door Latch Cable use soft handle pops the latch, allowing the doors to respond swiftly and dependably. Following the launch of its own cars in the year 1939, Mercury received accolades due to their cushioned suspension, cabin quietness, and crisp designs that reconciled everyday road feel and worth. Drivers were fond of the fact that the Mercury models such as Cougar and Grand Marquis were able to easily absorb the bumps and still exhibited a smooth look in the driveway despite the years of use. Within every cabin of the Mercury, the road noise was kept at bay with thicker insulation, the wide seats made long journeys more comfortable and the controls were easy to use and kept the driver focused on the road which was the mission statement of mid sized comfort car. Despite the updates of comfort over the decades, Mercury maintained a spirited spirit in the name of its rapid messenger until the discontinuation of production in 2011, and thrilled its faithful customers all around the world. A new Door Latch Cable maintains that convenience. In order to install the Door Latch Cable, it is important to drop the window, disconnect the battery, screw them out, pop clips using gentle prying tools, and raise the door panel. Unzip the vapor barrier one clip at a time, and take note of each clip, unhook the cable ends of handle and latch, and push the old line out of there. Install the new Door Latch Cable, through the path, clipping it into guides, attaching ends into the handle and latch until they pop, pushing gently while ensuring continued steady movement, resealing the barrier, pushing the panel back in place, and finally testing the door once more.
Related Mercury Parts
 Mercury Ashtray
 Mercury Cigarette Lighter
 Mercury Door Lock Actuator Motor
 Mercury Door Lock Cylinder
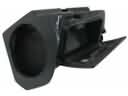 Mercury Glove Box
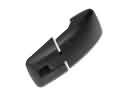 Mercury Liftgate Hinge
 Mercury Liftgate Lift Support
 Mercury Liftgate Lock Actuator
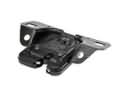 Mercury Trunk Latch
 Mercury Trunk Lid Latch
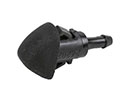 Mercury Windshield Washer Nozzle
 Mercury Wiper Motor