FordParts
My Garage
My Account
Cart
OEM Mercury Villager Oil Pan
Oil Drain Pan- Select Vehicle by Model
- Select Vehicle by VIN
Select Vehicle by Model
orMake
Model
Year
Select Vehicle by VIN
For the most accurate results, select vehicle by your VIN (Vehicle Identification Number).
3 Oil Pans found

Mercury Villager Oil Pan Part Number: F6XZ-6675-AA
Mercury Villager Oil Pan Part Number: F4XY6675A

Mercury Villager Oil Pan Part Number: F3XY-6675-A
Mercury Villager Oil Pan
OEM Oil Pan boasts unmatched quality. Each part goes through full quality checks. They adhere to Mercury's official factory standards. These steps remove flaws and inconsistencies. So you can get Oil Pan with long life and a perfect fit. Come to our website and find genuine Mercury Villager parts. We keep a wide inventory of OEM Villager parts at the highly affordable prices. It's easy to search, compare, and pick what you need. You'll love the clear info and simple checkout. We offer top-rated customer service, and we reply fast. We also ship promptly to ensure your order arrives on time.
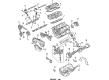
The Villager Oil Pan is among the several components that define the reliability as well as the performance of the Mercury Villager minivan. Located in the engine block, the oil pan plays a significant role as the storage place of the engine oil which in turn plays a vital role in lubrication of moving parts which is very vital in periodical maintenance of an engine. Manufactured to suit different operation situations, the Mercury Villager Oil Pan helps solve problems such as movement inside the vehicle that can lead to oil slosh during corners to boost efficiency and safety. Originally designed from stamped steel, present version of the Mercury Villager Oil Pan sometimes come with cast aluminium that enhances both durability and performance. Due to its compatibility with all generations of the Mercury Villager, as well as the two models, this oil pan is one of the best for preserving the make's quality. The location of the oil pan is strategically placed in a manner that enables it hold enough oil in order to enable the oil pump to supply oil to all the parts of the engine so as to prevent overheating as well as wearing of the same. Moreover, the Mercury Villager Oil Pan specifically differs from other models for sale on the automotive market since it is strengthened and implemented meticulously for the car's durability. The Mercury Villager Oil Pan plays an important role in promoting both the power and safety of the Mercury Villager engine; therefore, the product serves as a proof of the brand's focus on quality and durability.
Mercury Villager Oil Pan Parts and Q&A
- Q: How to service and repair the oil pan on Mercury Villager?A:The first step in repairing an oil pan requires the removal of the battery ground cable followed by removing the Dipstick for oil level inspection. You must drain engine oil by opening the drain plug of the oil pan following splash shield removal and care for the drain plug before installing it with a new washer. The first step involves unplugging the Heated Oxygen Sensor (H02S) wire harness before placing a screw-type jack beneath the crankshaft pulley to which you should add a shop rag for protection. Begin by taking out through bolts from both left-hand (LH) and right-hand (RH) engine support insulators and proceed with transverse member bolts removal. When disconnecting the H02S electrical connector users should move the exhaust outlet pipe away by taking out adjacent nuts and bolt. First remove the exhaust outlet pipe bracket and the transaxle to engine separator plate through the removal of respective bolts. After that remove the LH transaxle-to-engine brace by taking out the bolts and nut. After removing the oil pan, discard the seals along with the specified sequence of removing oil pan bolts. Apply new oil pan seals before installing them onto clean surfaces of the oil pan. Apply Silicone Gasket and Sealant F7AZ-19554-EA or equivalent which meets Ford specification WSE-M4G323-A4 both to the seals and as a bead along the oil pan. Position the oil pan while installing its bolts according to their specified tightening sequence. The installation begins with the transaxle-to-engine separator plate while also including exhaust outlet pipe bracket and LH transaxle-to-engine brace installation. The exhaust outlet pipe nuts and bolt follow in the sequence. The H02S electrical connector needs installation before adding the transverse member while securing LH and RH engine support insulators. After removing the screw-type jack allow the H02S wire harness installation while reattaching the engine splash shield. Stop the vehicle before lowering it to reinstall the oil level dipstick and then fill the engine with Super Premium SAE SW-30 Motor Oil XO-5W30-QSP or equivalent WSS-M2C153-G specification oil to the indicated level. Reconnect the battery ground cable afterward.

Related Mercury Villager Parts
 Mercury Villager Engine Mount
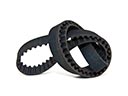 Mercury Villager Timing Belt
 Mercury Villager Crankshaft Seal
 Mercury Villager Cylinder Head
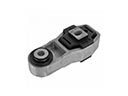 Mercury Villager Engine Mount Torque Strut
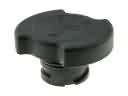 Mercury Villager Oil Filler Cap
 Mercury Villager Oil Filter
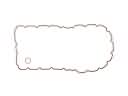 Mercury Villager Oil Pan Gasket
 Mercury Villager Oil Pump
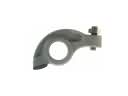 Mercury Villager Rocker Arm
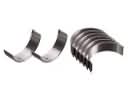 Mercury Villager Rod Bearing
 Mercury Villager Valve Stem Seal