My Garage
Cart
Make sure this part fits

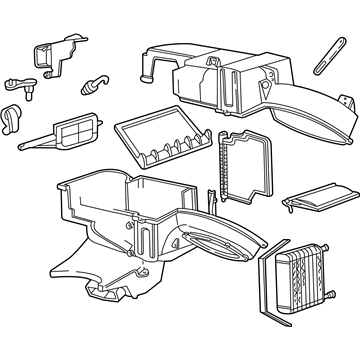
Ford 2F1Z-19850-DA
Evaporator Core

2002-2005 Ford 2F1Z19850DA

Customer Questions & Expert Answers (4)
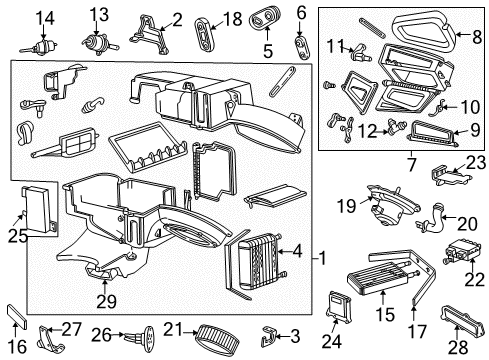
Ford 2F1Z-19850-DA Evaporator Core
  • Part Description
    Evaporator Assembly; A/C Evaporator Core Case; A/C Evaporator Core Repair Kit
  • Base No.
    19850
  • Manufacturer
    Ford
  • Manufacturer's Notes
    This part is discontinued.
Make sure this part fits
  • Related Parts
  • Product Specifications
  • Vehicle Fitment
  • Customer Questions & Expert Answers
  • Product Specifications

    BrandGenuine Ford
    Base No.19850
    Manufacturer Part Number2F1Z-19850-DA
    Part DescriptionEvaporator Assembly; A/C Evaporator Core Case; A/C Evaporator Core Repair Kit
    Other NamesHousing Assembly; Case Assembly; A/C Evaporator Core; A/C Evaporator; Evaporator
    Manufacturer NoteUse the following to attach 19850 to firewall: (3) 1L2Z-19C856-AA washers and N804109S309 nuts., with EATC, BEFORE 8/27/04
    Item Weight17.60 Pounds
    ConditionNew
    Fitment TypeDirect Replacement
    ManufacturerFord
    SKU2F1Z-19850-DA
    WarrantyThis genuine Ford part is guaranteed by Ford's factory warranty.
    Shipping & ReturnShipping Policy Return Policy
    Warning: California's Proposition 65
  • Vehicle Fitment

    Year Make Model Trim Engine
    2002-2005 Ford TaurusLX, SE, SE Comfort, SEL, SES6 Cyl 3.0 L FLEX, 6 Cyl 3.0 L GAS
    2002-2005 Mercury SableGS, LS, LS Premium, Platinum Edition6 Cyl 3.0 L FLEX, 6 Cyl 3.0 L GAS
  • Customer Questions & Expert Answers

    Q:
    Can you verify if 2F1Z-19850-DA is the right one for my car? Posted by FordPartsDeal Specialist
    A:
    Select Your Vehicle model to verify if part number 2F1Z-19850-DA fits your car.
    Posted by FordPartsDeal Specialist
    Q:
    How is the evaporator core serviced as a core and housing assembly on Ford Taurus? Posted by Customer
    A:
    The service for the evaporator core must include its housing assembly components along with the evaporator core along with internal doors and seals and door linkage. The service begins with evacuating the heater core and evaporator core housing before proceeding to uninstall the heater-to-dash panel seal then the air conditioner tubes-to-dash panel seal and air conditioner evaporator drain tube seal. The service for vehicles equipped with Electronic Automatic Temperature Control (EATC) begins with the disconnection of the electrical connector from the Remote Climate Control (RCC) module followed by the removal of two nuts then separating the vacuum harness finally taking out the RCC module. The staff should start by taking out the screws and shield and then disconnecting the electrical connector before removing the temperature blend door actuator. Release the assist spring and lever of the evaporator damper door by separating them carefully without bending the lever. The vacuum harness on vehicles with manual climate control needs to be detached from its bracket point. The first step to remove the heater core requires you to unscrew its cover before rotating the temperature blend door to take out the heater core. Cars with manual climate control need additional steps that include removing the blower motor together with the blower motor resistor. The EATC vehicle process requires the vacuum hose detachment followed by a combined extraction of both the blower motor assembly and in-car temperature sensor hose removal. Next proceed by removing the bracket together with the recirculation air duct before disconnecting the vacuum hose followed by screw removal. Remove the vacuum control motor by detaching the two labeled vacuum hoses followed by disconnecting these vacuum lines. Follow the vacuum and wiring harness installation instructions mentioned at removal time and then install the vacuum control motor and screw before connecting the vacuum hoses. Replace the shield followed by the recirculation air duct and bracket together. The installation of EATC vehicles requires first inserting the in-car temperature sensor hose before adding the blower motor with speed control elements as separate components. The blower motor together with the blower motor resistor needs to be installed in manual climate control vehicles. You should install the heater core with the cover following installation of the temperature blend door rotation. The vacuum harness requires installation onto the mounting bracket which serves manual climate control vehicles. Affix the metal link and A/C evaporator case damper door lever along with its assist spring while avoiding any damage to the lever. The temperature blend door actuator installation requires its electrical connector to be attached. The shield receives replacement after installing screws while ECC vehicles will also have their RCC module mounted with screws and vacuum harness and electrical connection established. The last step includes the installation of heater-to-dash panel seal with air conditioner tubes-to-dash panel seal and air conditioner evaporator drain tube seal before installing the heater core and evaporator core housing.
    Posted by FordPartsDeal Specialist
    Q:
    How is the evaporator core serviced as a core and housing assembly on Mercury Sable? Posted by Customer
    A:
    The evaporator core servicing consists of replacing all core and housing parts including its components: evaporator core along with internal doors and seals and door linkage. Moving into the new housing requires you to transfer both the blower motor assembly with its wheel element together with the heater core apparatus including its cover and also the dash panel seals and vacuum actuators. Replacement of a suction accumulator should only be necessary for two main reasons: failed detection from contaminated A/C compressor system or damaged suction accumulator condition. The heater core must be removed first together with the evaporator core housing after which follows heater-to-dash panel seal then air conditioner tubes-to-dash panel seal and air conditioner evaporator drain tube seal. To access the remote climate control module on vehicles that use electronic automatic temperature control staff must disconnect the electrical connector and remove two nuts then disconnect the vacuum harness followed by two screws removal. You should begin by removing the screws followed by the shield before extracting both the temperature blend door actuator and its electrical connector and the screws. The help spring of the A/C evaporator case damper door needs to detach before you remove its lever without bending it either direction. The metal link should be taken off while the vacuum harness needs detaching from its mounting bracket only if the vehicle has manual climate control. The process requires unscrewing and rotating the temperature blend door followed by taking out the heater core and its cover. You must remove blower motor screws and blower motor resistor screws in vehicles which have manual climate control. When working on vehicles with electronic automatic temperature control you must detach the vacuum hose then remove screws before extracting the blower motor and blower motor speed control unit together. Disconnect the vacuum hose from the in-vehicle temperature sensor hose and bracket and air inlet duct before removing their three screws. The two vacuum hoses require labeling before disconnecting them and then removing the screw while lifting and rotating the vacuum control motor before motor removal with detailed note-taking on both vacuum positions and wiring harness locations. When installing follow the opposite process of removal by placing the vacuum and wiring harness according to the instructions then reattach the vacuum hoses then install the shield and screws. Install the air inlet duct followed by the bracket as well as the in-vehicle temperature sensor hose and blower motor assembly before adding the heater core with its cover. The vacuum harness should be mounted to the bracket while you install the metal link followed by slow insertion of the A/C evaporator case damper door lever and assist spring. The process begins by reinstalling the temperature blend door actuator as well as the shield and screws before installing the RCC module with proper connection security. Install the heater core seal and the air conditioning equipment tube-to-dash panel seal before you replace the heater core and evaporator core housing.
    Posted by FordPartsDeal Specialist
    Q:
    What is the next step after removing the temperature blend door actuator for the 2005 Mercury Sable? Posted by Customer
    A:
    Detach the A/C evaporator case damper door assist spring and carefully remove the damper door lever without bending it.
    Posted by FordPartsDeal Specialist
    See expert answers on similar Evaporator
    If you have any questions about this product, please don't hesitate to ask us. We will be happy to help you!

OEM Ford 2F1Z-19850-DA, Excellent Performance and Perfect Fitment

To ensure reliability, purchase Ford part # 2F1Z-19850-DA Evaporator Core. It is sometimes referred to as Ford Evaporator. For those Ford owners who aspire to maintain their vehicles in optimal shape, opting for OEM parts is a wise choice. Precisely engineered, these components adhere to stringent factory guidelines and are produced in state-of-the-art facilities using cutting-edge technologies. Moreover, they are subjected to thorough testing to certify their resilience and safety, thereby making them a dependable option for Ford owners.

FordPartsDeal.com is a leading supplier of genuine Ford parts such as Ford 2F1Z19850DA Evaporator Core. A vast selection of genuine Ford parts is available on our website, all offered at discounted prices. Every OEM Ford part is covered by the manufacturer's warranty, which also applies to our hassle-free return policy. Enjoy fast delivery service, ensuring you get your parts when you need them. Your shopping experience here is guaranteed to be pleasurable. For detailed Ford parts information, click here.
Choose FordPartsDeal for discounted prices, exceptional service and fast delivery