FordParts
My Garage
My Account
Cart
Auxiliary Air Conditioner
2005 Ford Escape Blend Door Actuator, A/C Hose
Currently shopping for
2005 Ford Escape
Change VehicleCategories Close X
Currently selected
A/C & Heating
Other Categories
Air & Fuel Delivery
Belts & Cooling
Body & Hardware
Brakes
Charging & Starting
Driveline & Axles
Electrical
Emission Control & Exhaust
Engine
Headlights & Lighting
Interior & Exterior Trim
Maintenance & Lubrication
Steering
Suspension
Transmission
How to use OE catalog
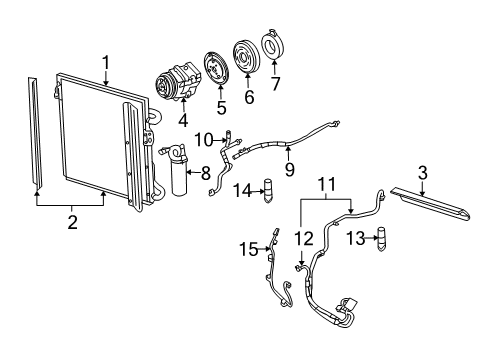
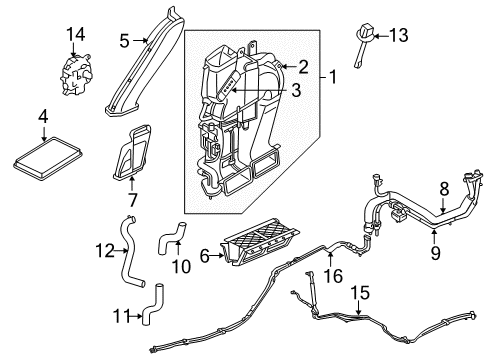
Diagram (1 of 1): Air Conditioner & Heater - Auxiliary Air Conditioner
Sort by:
Ref No.
Ref No.
Part No. & Part Description
Price & Qty.
Part No. &
Part Description
Part Description
- 1
 MSRP: $555.98 Your Price: $405.231
- 2


- 3

- 4

 MSRP: $33.95 Your Price: $21.381
- 5

- 6


- 7
 MSRP: $25.89 Your Price: $19.021
- 8
 MSRP: $158.21 Your Price: $114.371
- 9


- 10

- 11

- 12

- 13

 MSRP: $195.00 Your Price: $116.151
- 14


 MSRP: $46.55 Your Price: $29.311
- 15

- 16

OEM 2005 Ford Escape Parts for Auxiliary Air Conditioner
Genuine OEM 2005 Ford Escape parts are made using the original design, the high standards, in the Ford official factories, and all of these ensure that they always fit perfectly and easily. FordPartsDeal.com is a trusted source for finding these authentic OEM Auxiliary Air Conditioner parts at very competitive prices. Our professional team is here to help you choose the right 2005 Ford Escape Blend Door Actuator, A/C Hose, and our fast delivery options ensure that your parts are always delivered quickly.
A/C Hose, Blend Door Actuator Installation and Repair Tips for 2005 Ford Escape
- Q: How to service the A/C Hose from the condenser to the evaporator on 2005 Ford Escape?A: To service the condenser-to-evaporator line, position the vehicle on a hoist in neutral and recover A/C refrigerant. Remove the front bumper and disconnect high-pressure cut-off switch connector. Remove bracket and peanut nuts, disconnect the spring-lock coupling and line, fit new mineral oil-lubricated O-rings, then reverse, evacuate, leak-test, and charge.
- Q: How to service and repair the auxiliary temperature blend door actuator and auxiliary mode door actuator on 2005 Ford Escape?A: The auxiliary temperature blend door actuator and mode door actuator require servicing by placing the car on a hoist. Cut out the brackets and panels that are required, carefully tightened on re- installing. Unplug the actuator electrical connector, disengage it and ensure the actuator is working by disengaging and reengaging it. Uninstallation Reverse the process of removal to install again.