FordParts
My Garage
My Account
Cart
A/C Condenser, Compressor & Lines
2009 Ford Edge A/C Compressor, A/C Condenser, A/C Hose
Currently shopping for
2009 Ford Edge
Change VehicleVehicle Options
6 Cyl 3.5 L GASVehicle Options
6 Cyl 3.5 L GASCategories Close X
Currently selected
A/C & Heating
Other Categories
Air & Fuel Delivery
Belts & Cooling
Body & Hardware
Brakes
Charging & Starting
Driveline & Axles
Electrical
Emission Control & Exhaust
Engine
Headlights & Lighting
Interior & Exterior Trim
Maintenance & Lubrication
Steering
Suspension
Transmission
Categories Close X
How to use OE catalog
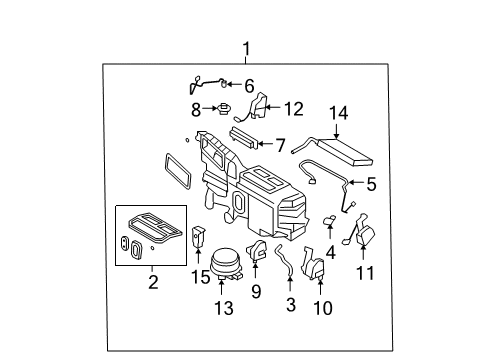
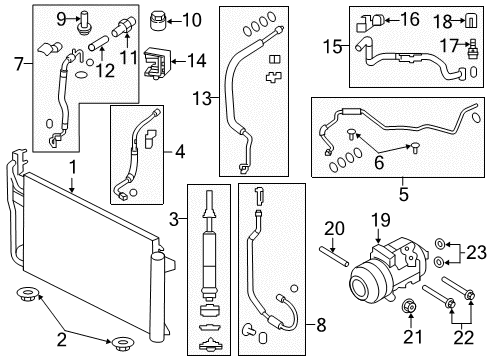
Diagram (1 of 1): Air Conditioner & Heater - Condenser, Compressor & Lines
Sort by:
Ref No.
Ref No.
Part No. & Part Description
Price & Qty.
Part No. &
Part Description
Part Description
- 1
 MSRP: $278.18 Your Price: $169.071
- 2


- 3
 MSRP: $60.73 Your Price: $37.641
- 4

- 5
 MSRP: $60.00 Your Price: $36.731
- 6

- 7
 MSRP: $352.15 Your Price: $254.561
- 8

 MSRP: $164.55 Your Price: $98.011
- 9


 MSRP: $11.33 Your Price: $7.131
- 10

 MSRP: $7.27 Your Price: $4.511
- 11


 MSRP: $153.82 Your Price: $96.87
- 12

 MSRP: $7.27 Your Price: $4.581
- 13


- 14

 MSRP: $6.67 Your Price: $4.701
- 15
 MSRP: $60.00 Your Price: $37.791
- 16
 MSRP: $18.75 Your Price: $13.781
- 17

 MSRP: $11.11 Your Price: $7.001
- 18

 MSRP: $7.27 Your Price: $4.511
- 19
 MSRP: $554.55 Your Price: $333.981
- 20
 MSRP: $5.00 Your Price: $2.944
- 21


 MSRP: $4.00 Your Price: $2.354
- 22
 MSRP: $5.00 Your Price: $2.944
- 23
 MSRP: $8.50 Your Price: $5.366
 - 23MSRP: $14.58 Your Price: $9.181

 MSRP: $3.49 Your Price: $2.26

 MSRP: $6.97 Your Price: $4.50
 MSRP: $4.00 Your Price: $2.35

 7T4Z-19C836-A
Accumulator Assy - Air Conditioning- Part Notes: Cartridge Type
- Production Date: 11/2006-07/2010
- Callout Name: 19C836
- Replaced By: 7T4Z-19C836-B
MSRP: $60.73 Your Price: $38.91
OEM 2009 Ford Edge Parts for A/C Condenser, Compressor & Lines
Genuine OEM 2009 Ford Edge parts are made using the original design, the high standards, in the Ford official factories, and all of these ensure that they always fit perfectly and easily. FordPartsDeal.com is a trusted source for finding these authentic OEM A/C Condenser, Compressor & Lines parts at very competitive prices. Our professional team is here to help you choose the right 2009 Ford Edge A/C Compressor, A/C Condenser, A/C Hose, and our fast delivery options ensure that your parts are always delivered quickly.
A/C Condenser, A/C Hose Installation and Repair Tips for 2009 Ford Edge
- Q: What are the steps and precautions for replacing the A/C condenser in this on 2009 Ford Edge?A: The A/C condenser has factory fitted desiccant bag which should be replaced immediately it is not installed or there is a risk of moisture contamination. Only use O-ring seals. Refrigerant recovery, drain cooling fluid and component removal to access condenser. Install the new condenser with opposite procedure and good lubrication and refrigerant charging.
- Q: How to service and repair the evaporator outlet A/C hose on 2009 Ford Edge?A: In order to repair the evaporator outlet line, get the refrigerant, unscrew the ground strap nut and bracket bolt (tighten to 11 Nm), unscrew the spring lock coupler, and unscrew the TXV fitting (tighten to 8 Nm). Install new lubricated with clean PAG oil O-rings, evacuate, leak test, and charge up the system.