FordParts
My Garage
My Account
Cart
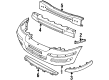
OEM 2001 Ford Windstar Bumper
Bumper Fascia- Select Vehicle by Model
- Select Vehicle by VIN
Select Vehicle by Model
orMake
Model
Year
Select Vehicle by VIN
For the most accurate results, select vehicle by your VIN (Vehicle Identification Number).
13 Bumpers found

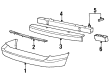
2001 Ford Windstar Impact Bar Part Number: XF2Z-17906-AA
$91.66 MSRP: $126.81You Save: $35.15 (28%)Ships in 1-2 Business DaysProduct Specifications- Other Name: Bumper
- Manufacturer Note: Bar only , order 17K835 cover separately
- Replaces: F68Z-17906-AA
- Base No.: 17906
- Item Weight: 13.40 Pounds
- Item Dimensions: 68.0 x 9.3 x 7.8 inches
- Condition: New
- Fitment Type: Direct Replacement
- SKU: XF2Z-17906-AA
- Warranty: This genuine part is guaranteed by Ford's factory warranty.

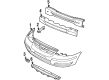
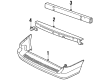
2001 Ford Windstar Bumper Cover Part Number: YF2Z-17K835-AA
Product Specifications- Other Name: Cover
- Manufacturer Note: Primed, smooth - includes integral step pad, must drill holes for w/park aid. completely interchangeable with YF2Z 17K835-BA, SE, SEL, Limited - w/ or w/o reverse park aid
- Replaces: YF2Z-17B807-EA, YF2Z-17K835-BA
- Base No.: 17K835
- Item Weight: 8.50 Pounds
- Condition: New
- Fitment Type: Direct Replacement
- SKU: YF2Z-17K835-AA
- Warranty: This genuine part is guaranteed by Ford's factory warranty.

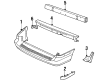
2001 Ford Windstar Impact Bar, Front Part Number: 3F2Z-17757-AA
Product Specifications- Other Name: Bumper Assembly - Front; Bumper Impact Bar, Front
- Position: Front
- Replaces: XF2Z-17757-AA
- Base No.: 17757
- Item Weight: 15.40 Pounds
- Item Dimensions: 8.2 x 6.1 x 54.6 inches
- Condition: New
- Fitment Type: Direct Replacement
- SKU: 3F2Z-17757-AA
- Warranty: This genuine part is guaranteed by Ford's factory warranty.
 Product Specifications
- Other Name: Cover
- Base No.: 17K835
- Item Weight: 11.60 Pounds
- Condition: New
- Fitment Type: Direct Replacement
- SKU: XF2Z-17K835-AAB
- Warranty: This genuine part is guaranteed by Ford's factory warranty.
- Product Specifications
- Other Name: Cover
- Replaces: YF2Z-17K835-CAA
- Base No.: 17K835
- Item Weight: 8.70 Pounds
- Condition: New
- Fitment Type: Direct Replacement
- SKU: XF2Z-17K835-AAD
- Warranty: This genuine part is guaranteed by Ford's factory warranty.
2001 Ford Windstar Bumper Cover, Green Part Number: XF2Z-17K835-AAC
Product Specifications- Other Name: Cover
- Base No.: 17K835
- Item Weight: 8.10 Pounds
- Condition: New
- Fitment Type: Direct Replacement
- SKU: XF2Z-17K835-AAC
- Warranty: This genuine part is guaranteed by Ford's factory warranty.
- Product Specifications
- Other Name: Cover
- Manufacturer Note: Harvest Gold - must drill holes for w/park aid, Base(GL), LX - w/ or w/o reverse park aid, used w/ (B2) Harvest Gold
- Base No.: 17K835
- Item Weight: 12.90 Pounds
- Condition: New
- Fitment Type: Direct Replacement
- SKU: XF2Z-17K835-AAA
- Warranty: This genuine part is guaranteed by Ford's factory warranty.
2001 Ford Windstar Bumper Cover Part Number: 1F2Z-17K835-GAA
Product Specifications- Other Name: Cover
- Base No.: 17K835
- Item Weight: 8.50 Pounds
- Condition: New
- Fitment Type: Direct Replacement
- SKU: 1F2Z-17K835-GAA
- Warranty: This genuine part is guaranteed by Ford's factory warranty.
2001 Ford Windstar Bumper Cover Part Number: 1F2Z-17D957-KAA
Product Specifications- Other Name: Cover
- Replaces: YF2Z-17D957-KB
- Base No.: 17D957
- Item Weight: 25.00 Pounds
- Condition: New
- Fitment Type: Direct Replacement
- SKU: 1F2Z-17D957-KAA
- Warranty: This genuine part is guaranteed by Ford's factory warranty.
2001 Ford Windstar Bumper Cover Part Number: 1F2Z-17D957-JAA
Product Specifications- Other Name: Cover
- Manufacturer Note: Black (lower cover) - for upper half of cover: paint to match, SE Sport
- Base No.: 17D957
- Condition: New
- Fitment Type: Direct Replacement
- SKU: 1F2Z-17D957-JAA
- Warranty: This genuine part is guaranteed by Ford's factory warranty.
2001 Ford Windstar Bumper Cover, Gray Part Number: 1F2Z-17D957-HAC
Product Specifications- Other Name: Cover
- Base No.: 17D957
- Condition: New
- Fitment Type: Direct Replacement
- SKU: 1F2Z-17D957-HAC
- Warranty: This genuine part is guaranteed by Ford's factory warranty.
2001 Ford Windstar Bumper Cover, Green Part Number: 1F2Z-17D957-HAB
Product Specifications- Other Name: Cover
- Base No.: 17D957
- Condition: New
- Fitment Type: Direct Replacement
- SKU: 1F2Z-17D957-HAB
- Warranty: This genuine part is guaranteed by Ford's factory warranty.
2001 Ford Windstar Bumper Cover, Gold Part Number: 1F2Z-17D957-HAA
Product Specifications- Other Name: Cover
- Manufacturer Note: Harvest Gold (lower cover) use with (B2) paint code for upper half of cover: paint to match, Base, LX, GL
- Base No.: 17D957
- Item Weight: 12.30 Pounds
- Condition: New
- Fitment Type: Direct Replacement
- SKU: 1F2Z-17D957-HAA
- Warranty: This genuine part is guaranteed by Ford's factory warranty.
2001 Ford Windstar Bumper
If you're seeking quality and affordability, look no further than our extensive inventory of genuine 2001 Ford Windstar Bumper available at FordPartsDeal.com. You can confidently purchase our OEM 2001 Ford Windstar Bumper as they are supported by the manufacturer's warranty and our hassle-free return policy, alongside the benefit of our fast delivery service.
2001 Ford Windstar Bumper Parts Q&A
- Q: How to service and repair the rear bumper cover on 2001 Ford Windstar?A: You need to start rear bumper cover service and repair by removing the pin-type retainers along with the six screws distributed in sets of three on both sides. Service the rear bumper cover on all vehicles by following the procedure to disconnect the parking aid wiring harness electrical connector. The next step involves removing screws before you detach the rear bumper cover. Chrome garnish mouldings on the vehicle must also be taken off. Execution of the new bumper cover involves following the opposite steps used for removal.
Related 2001 Ford Windstar Parts
 2001 Ford Windstar Air Deflector
 2001 Ford Windstar Car Mirror
 2001 Ford Windstar Door Lock
 2001 Ford Windstar Door Seal
 2001 Ford Windstar Front Door Striker
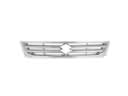 2001 Ford Windstar Grille
 2001 Ford Windstar License Plate
 2001 Ford Windstar Mirror Actuator
 2001 Ford Windstar Seat Switch
 2001 Ford Windstar Shift Indicator
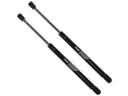 2001 Ford Windstar Trunk Lid Lift Support
 2001 Ford Windstar Windshield Washer Nozzle