FordParts
My Garage
My Account
Cart
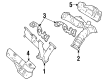
OEM 2001 Mercury Villager Exhaust Manifold
Engine Exhaust Manifold- Select Vehicle by Model
- Select Vehicle by VIN
Select Vehicle by Model
orMake
Model
Year
Select Vehicle by VIN
For the most accurate results, select vehicle by your VIN (Vehicle Identification Number).
4 Exhaust Manifolds found


 Product Specifications
- Other Name: Manifold Assembly - Exhaust; Manifold
- Manufacturer Note: Front, except Calif. Ems. (Manifold only)
- Position: Front
- Item Weight: 8.90 Pounds
- Item Dimensions: 20.5 x 13.7 x 7.8 inches
- Condition: New
- Fitment Type: Direct Replacement
- SKU: XF5Z-9431-BA
- Warranty: This genuine part is guaranteed by Ford's factory warranty.
- Product Specifications
- Other Name: Manifold Assembly - Exhaust; Manifold
- Manufacturer Note: Front, With Calif. Ems. integral catalyst
- Position: Front
- Item Weight: 8.20 Pounds
- Item Dimensions: 27.8 x 4.6 x 19.6 inches
- Condition: New
- Fitment Type: Direct Replacement
- SKU: XF5Z-9431-AA
- Warranty: This genuine part is guaranteed by Ford's factory warranty.
2001 Mercury Villager Exhaust Manifold, Rear Part Number: XF5Z-9430-AA
Product Specifications- Other Name: Manifold Assembly - Exhaust; Manifold
- Manufacturer Note: Rear, with EGR valve
- Position: Rear
- Item Weight: 16.60 Pounds
- Item Dimensions: 20.1 x 10.0 x 6.3 inches
- Condition: New
- Fitment Type: Direct Replacement
- SKU: XF5Z-9430-AA
- Warranty: This genuine part is guaranteed by Ford's factory warranty.
- Product Specifications
- Other Name: Manifold Assembly - Exhaust
- Manufacturer Note: Front , Calif. Ems., BEFORE 3/2001
- Position: Front
- Item Weight: 25.50 Pounds
- Item Dimensions: 24.2 x 8.9 x 13.8 inches
- Condition: New
- Fitment Type: Direct Replacement
- SKU: 1F5Z-9431-AA
- Warranty: This genuine part is guaranteed by Ford's factory warranty.
2001 Mercury Villager Exhaust Manifold
If you're seeking quality and affordability, look no further than our extensive inventory of genuine 2001 Mercury Villager Exhaust Manifold available at FordPartsDeal.com. You can confidently purchase our OEM 2001 Mercury Villager Exhaust Manifold as they are supported by the manufacturer's warranty and our hassle-free return policy, alongside the benefit of our fast delivery service.
2001 Mercury Villager Exhaust Manifold Parts Q&A
- Q: How to service the right-hand exhaust manifold on 2001 Mercury Villager?A: Service of the right-hand exhaust manifold begins by removing the battery ground cable along with disconnecting the electrical connectors from both the battery junction box. The battery junction box needs to be placed aside while you remove the air cleaner assembly. After you detach the bolts you must unclip the battery junction box retainer before moving the junction box away. Begin the operation by removing the exhaust heat shield after unbolted its mounting components. The next step requires the user to remove the right-hand exhaust manifold to engine lifting eye bracket by unscrewing all bolts. The installation requires separating the three left-hand exhaust manifold to right-hand exhaust manifold nuts. Lift the vehicle to access the exhaust manifold heat shield by taking out its bolts which number three. The exhaust manifold nuts require a two-step method for removal according to specified order followed by vehicle lowering before exhaust manifold extraction. The vehicle must be raised another time for disposing the exhaust manifold gasket. You must apply a new exhaust manifold gasket before lowering the vehicle to properly position the exhaust manifold. Continue to elevate the vehicle to put exhaust manifold nuts in their designated order before installing the exhaust manifold heat shield with its three securing bolts. The vehicle must be lowered so technicians can add three left-hand exhaust manifold to right-hand exhaust manifold nuts and then fasten the right-hand exhaust manifold to engine lifting eye bracket. Last, place the exhaust heat shield into position then fasten it with the provided bolts. After placing the battery junction box correctly you should clip it into its position before bolting the box securely. Complete the installation by putting back the air cleaner assembly while connecting the electrical connectors of the battery junction box and attaching the battery ground cable.
Related 2001 Mercury Villager Parts
 2001 Mercury Villager Catalytic Converter
 2001 Mercury Villager EGR Valve
 2001 Mercury Villager EGR Valve Gasket
 2001 Mercury Villager Exhaust Flange Gasket
 2001 Mercury Villager Exhaust Heat Shield
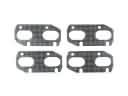 2001 Mercury Villager Exhaust Manifold Gasket
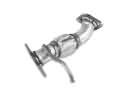 2001 Mercury Villager Exhaust Pipe
 2001 Mercury Villager Muffler
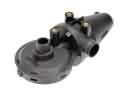 2001 Mercury Villager PCV Valve
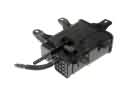 2001 Mercury Villager Vapor Canister