FordParts
My Garage
My Account
Cart
OEM 2002 Ford Thunderbird Alternator
Generator- Select Vehicle by Model
- Select Vehicle by VIN
Select Vehicle by Model
orMake
Model
Year
Select Vehicle by VIN
For the most accurate results, select vehicle by your VIN (Vehicle Identification Number).
1 Alternator found

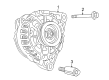
2002 Ford Thunderbird Alternator Part Number: 4U2Z-10V346-GERM
$221.77 MSRP: $352.73You Save: $130.96 (38%)Product Specifications- Other Name: Re-Manufactured Alternator Assembly
- Replaces: 4U2Z-10V346-AJRM, 4U2Z-10V346-EGRM, GLV-8450-RM, GLV-8783-RM, XW4Z-10V346-BARM, GLV-8709-RM, GL-450, GLV-9048-RM, XW4Z-10346-BA, XW4Z-10V346-BBRM
- Condition: New
- Fitment Type: Direct Replacement
- SKU: 4U2Z-10V346-GERM
- Warranty: This genuine part is guaranteed by Ford's factory warranty.
2002 Ford Thunderbird Alternator
If you're seeking quality and affordability, look no further than our extensive inventory of genuine 2002 Ford Thunderbird Alternator available at FordPartsDeal.com. You can confidently purchase our OEM 2002 Ford Thunderbird Alternator as they are supported by the manufacturer's warranty and our hassle-free return policy, alongside the benefit of our fast delivery service.
2002 Ford Thunderbird Alternator Parts Q&A
- Q: How to service and repair the alternator on 2002 Ford Thunderbird?A: The alternator servicing process starts with disconnecting the battery ground cable and eliminating the air intake tube. Demount the accessory drive belt before properly elevating the automobile. Start by removing the front valance panel after disconnecting both bolts then the pin-type retainer. Detach the RH radiator lower air deflector by uninstalling the screw along with the pin-type retainer. Unscrew the generator nut and through bolt first allowing you to set aside the B+ wire harness end after taking off the nut and folding the protective cover backward. The process begins by extracting the generator expanding bolt along with its bushing assembly however you should maintain generator hand support after removing bolts to protect the harness. First disconnect the electrical connector from the generator before removal and rotate it into optimal position to prevent damages to air conditioning and cooling lines. During the installation process first position the generator and connect the electrical connector before installing the generator by tightening the bolts according to their specified order. Start by loosely attaching the generator through bolt and nut and after that add the expanding bushing and bolt assembly. Tighten the bolt to 20 Nm (15 Lb-Ft) in the first stage and continue tightening it 90 degrees further in the second stage. After securing the generator through bolt and its nut position the B+ wire harness end at the generator and fasten the nut before tucking away the protective cover. Put back the RH radiator lower air deflector by screwing the screw in and inserting the pin-type retainer and reinstall the front valance panel using its bolts with the pin-type retainer. Finally reset the battery ground wire and position and reinstall the accessory drive belt together with the air intake tube.
Related 2002 Ford Thunderbird Parts
 2002 Ford Thunderbird Battery Cable
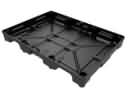 2002 Ford Thunderbird Battery Tray
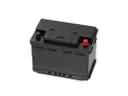 2002 Ford Thunderbird Car Batteries