FordParts
My Garage
My Account
Cart
OEM 2003 Ford Crown Victoria Timing Cover
Engine Timing Cover- Select Vehicle by Model
- Select Vehicle by VIN
Select Vehicle by Model
orMake
Model
Year
Select Vehicle by VIN
For the most accurate results, select vehicle by your VIN (Vehicle Identification Number).
1 Timing Cover found


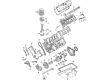
2003 Ford Crown Victoria Timing Cover, Front Part Number: 2W7Z-6019-AB
$142.32 MSRP: $207.17You Save: $64.85 (32%)Product Specifications- Other Name: Cover - Cylinder Front; Engine Timing Cover; Front Cover
- Manufacturer Note: Includes 6020 gaskets, 6B209 tensioner & attaching hardware., 2v; With guided tensioner
- Position: Front
- Replaces: 2W7Z-6019-AA
- Base No.: 6019
- Item Weight: 13.10 Pounds
- Item Dimensions: 6.6 x 22.6 x 21.7 inches
- Condition: New
- Fitment Type: Direct Replacement
- SKU: 2W7Z-6019-AB
- Warranty: This genuine part is guaranteed by Ford's factory warranty.
2003 Ford Crown Victoria Timing Cover
If you're seeking quality and affordability, look no further than our extensive inventory of genuine 2003 Ford Crown Victoria Timing Cover available at FordPartsDeal.com. You can confidently purchase our OEM 2003 Ford Crown Victoria Timing Cover as they are supported by the manufacturer's warranty and our hassle-free return policy, alongside the benefit of our fast delivery service.
2003 Ford Crown Victoria Timing Cover Parts Q&A
- Q: How to service and repair the timing cover on 2003 Ford Crown Victoria?A: Service and repair operations on the timing cover should start with disconnecting the battery ground cable and taking off both valve covers. After the water pump removal position the vehicle in an elevated position for component access beneath. You should remove and place to the side the power steering pump bolts. Open the drain plug on the oil pan followed by unfastening the four bolts on the engine front cover. First lower the vehicle before removing the crankshaft front oil seal then the bolt and the belt idler pulley. The required sequence of bolt and stud bolt extraction demands extreme caution since avoidance of metal scrapers or abrasive tools on sealing surfaces will prevent leaks thus a plastic scraping tool should be used to clean gasket material. Use a metal surface cleaner to clean both gasket surfaces and a plastic scraping tool to do the work. The engine front cover needs to be secured within four minutes while installing or the sealant must be removed to clean the area with metal surface cleaner followed by complete drying before installation. Install the engine front cover after applying sealant around the cylinder head-to-block interface and oil pan-to-cylinder block interface. Then bolt the cover loosely to the dowel but maintain it within four minutes. The installation of the front cover bolts and stud bolts follows a two-part sequence: tighten fasteners 1 through 7 to 25 Nm (18 ft. lbs.), and after that apply 48 Nm (35 ft. lbs.) to fasteners 6 through 15. You should install the bolt on the pulley after relocating it while also adding a new crankshaft front oil seal. Use this opportunity to loosely install the front oil pan bolts which should be tightened in two stages starting at 20 Nm (15 ft. lbs.) followed by a 60-degree final turn. The power steering pump needs to be placed without using the front lower hole when installing its bolts. Lower the vehicle then install the valve covers followed by the water pump before fitting the oil pan drain plug. The battery ground cable needs reinstallation before filling the engine with oil.
Related 2003 Ford Crown Victoria Parts
 2003 Ford Crown Victoria Oil Filter
 2003 Ford Crown Victoria Crankshaft Pulley
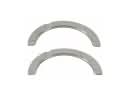 2003 Ford Crown Victoria Crankshaft Thrust Washer Set
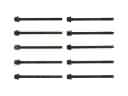 2003 Ford Crown Victoria Cylinder Head Bolts
 2003 Ford Crown Victoria Drain Plug Washer
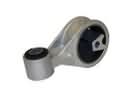 2003 Ford Crown Victoria Engine Torque Strut Mount
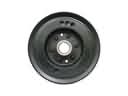 2003 Ford Crown Victoria Harmonic Balancer
 2003 Ford Crown Victoria Oil Pan
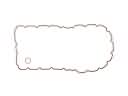 2003 Ford Crown Victoria Oil Pan Gasket
 2003 Ford Crown Victoria Timing Chain
 2003 Ford Crown Victoria Valve Cover Gasket
 2003 Ford Crown Victoria Valve Stem Seal