FordParts
My Garage
My Account
Cart
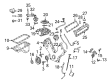
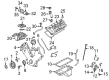
OEM 2003 Ford Expedition Intake Manifold
Engine Intake Manifold- Select Vehicle by Model
- Select Vehicle by VIN
Select Vehicle by Model
orMake
Model
Year
Select Vehicle by VIN
For the most accurate results, select vehicle by your VIN (Vehicle Identification Number).
7 Intake Manifolds found


2003 Ford Expedition Intake Manifold Part Number: 2L1Z-9424-AA
$324.61 MSRP: $476.67You Save: $152.06 (32%)Product Specifications- Other Name: Manifold Assembly - Inlet; Engine Intake Manifold; Lower Manifold
- Manufacturer Note: Includes valley stuffer 6P013
- Replaces: YL3Z-9424-CA
- Base No.: 9424
- Item Weight: 29.60 Pounds
- Item Dimensions: 21.7 x 19.6 x 12.6 inches
- Condition: New
- Fitment Type: Direct Replacement
- SKU: 2L1Z-9424-AA
- Warranty: This genuine part is guaranteed by Ford's factory warranty.

2003 Ford Expedition Intake Manifold Part Number: 2L7Z-9424-DA
$1782.00 MSRP: $2640.00You Save: $858.00 (33%)Ships in 1-3 Business DaysProduct Specifications- Other Name: Manifold Assembly - Inlet
- Base No.: 9424B
- Item Weight: 14.60 Pounds
- Item Dimensions: 18.7 x 12.3 x 9.6 inches
- Condition: New
- Fitment Type: Direct Replacement
- SKU: 2L7Z-9424-DA
- Warranty: This genuine part is guaranteed by Ford's factory warranty.


2003 Ford Expedition Intake Manifold, Lower Part Number: 4L3Z-9424-AA
Product Specifications- Other Name: Manifold Assembly - Inlet; Engine Intake Manifold, Lower
- Manufacturer Note: Lower. Includes 6N041 insulator cover
- Position: Lower
- Base No.: 9424
- Item Weight: 7.90 Pounds
- Item Dimensions: 20.4 x 15.2 x 10.4 inches
- Condition: New
- Fitment Type: Direct Replacement
- SKU: 4L3Z-9424-AA
- Warranty: This genuine part is guaranteed by Ford's factory warranty.

2003 Ford Expedition Intake Manifold Part Number: 2L7Z-9424-CA
Product Specifications- Other Name: Manifold Assembly - Inlet
- Replaces: YL7Z-9424-AA
- Base No.: 9424A
- Item Dimensions: 18.9 x 11.9 x 9.5 inches
- Condition: New
- Fitment Type: Direct Replacement
- SKU: 2L7Z-9424-CA
- Warranty: This genuine part is guaranteed by Ford's factory warranty.

2003 Ford Expedition Intake Manifold, Upper Part Number: 3L3Z-9424-DA
Product Specifications- Other Name: Manifold Assembly - Inlet; Engine Intake Manifold, Upper; Intake Plenum
- Manufacturer Note: Upper, FROM 12/9/2002
- Position: Upper
- Base No.: 9424
- Item Weight: 15.80 Pounds
- Item Dimensions: 19.9 x 16.9 x 10.0 inches
- Condition: New
- Fitment Type: Direct Replacement
- SKU: 3L3Z-9424-DA
- Warranty: This genuine part is guaranteed by Ford's factory warranty.

2003 Ford Expedition Intake Manifold, Lower Part Number: 2L1Z-9424-BC
Product Specifications- Other Name: Manifold Assembly - Inlet
- Position: Lower
- Base No.: 9424
- Item Weight: 8.60 Pounds
- Item Dimensions: 19.8 x 15.1 x 10.3 inches
- Condition: New
- Fitment Type: Direct Replacement
- SKU: 2L1Z-9424-BC
- Warranty: This genuine part is guaranteed by Ford's factory warranty.
2003 Ford Expedition Intake Manifold, Upper Part Number: 1L3Z-9424-BA
Product Specifications- Other Name: Manifold Assembly - Inlet; Engine Intake Manifold, Upper
- Position: Upper
- Base No.: 9424
- Item Weight: 16.40 Pounds
- Item Dimensions: 19.5 x 17.6 x 10.1 inches
- Condition: New
- Fitment Type: Direct Replacement
- SKU: 1L3Z-9424-BA
- Warranty: This genuine part is guaranteed by Ford's factory warranty.
2003 Ford Expedition Intake Manifold
If you're seeking quality and affordability, look no further than our extensive inventory of genuine 2003 Ford Expedition Intake Manifold available at FordPartsDeal.com. You can confidently purchase our OEM 2003 Ford Expedition Intake Manifold as they are supported by the manufacturer's warranty and our hassle-free return policy, alongside the benefit of our fast delivery service.
2003 Ford Expedition Intake Manifold Parts Q&A
- Q: How to service and repair the intake manifold on 2003 Ford Expedition?A: The intake manifold service and repair begins by first disconnecting both the ground battery cable and then removing the air cleaner outlet pipe. Remove all engine coolant before using a clamp compressor to eliminate the upper radiator hose connection. Begin the service by first removing three bolts from the appearance cover mounting bracket and then disconnecting the throttle body cam alongside the accelerator cable and speed control actuator cable and accelerator return spring. After unscrewing the bolts that hold the accelerator cable bracket you should set it and its cables aside. The service technician should disconnect seven vacuum lines: Main vacuum harness, fuel pressure regulator vacuum hose, climate control vacuum hose, Idle Air Control (IAC) fresh air hose and the Exhaust Gas Recirculation (EGR) vacuum regulator solenoid. To proceed with diagnostics disconnect the IAC unit along with the TP sensor from their electrical port as well as disengage the EGR vacuum hose and evaporative emission canister purge valve hose. First disconnect the brake booster vacuum tube nut followed by setting aside its bracket and also position the crankcase ventilation hose in a separate area. Disconnect the exhaust manifold to EGR valve tube along with the differential pressure feedback EGR system electrical connector by removing the upper fitting and loosening the lower fitting before placing the tube to the side. The service process begins by disconnecting the fuel hose spring lock coupling and the heater hose and heated throttle body hose and then by disconnecting the Positive Crankcase Ventilation (PCV) hose. Proceed by unbolting the four components to forwardly shift the throttle body adapter, then detach the heated throttle body hose followed by adapter removal where you should discard the gasket to check for throttle body adapter damage to both components. Begin by taking off the power steering reservoir upper mounting bracket then make eight ignition coil and fuel injector cable disconnects. The first step involves rotating the belt tensioner clockwise to break the drive belt connection from the generator pulley and then loosening the generator lower mounting bolts. Additionally, users must disconnect the harness routing clip and remove the bolts to set the generator aside. Start by removing bolts along with water thermostat housing and thermostat components but discard the O-ring seal then proceed to separate the nine bolts which will enable removal of the intake manifold assembly and lift it during disconnecting of the intake manifold tuning valve connector and discard all gaskets while checking for assembly damage. Installation begins with cleaning all sealing surfaces using a plastic scraper before you set new intake manifold gaskets and the upper intake manifold. Then install nine bolts loosely. Fit the intake manifold tuning valve electrical connector followed by installing the water thermostat using a new O-ring seal then begin tightening the thermostat housing bolts. Finish the bolt tightening process by first applying 2 Nm (18 inch lbs.) and then moving to 25 Nm (18 ft. lbs.) as the same time sequence for installing the intake manifold bolts. Position the generator before tightening its lower mounting bolts and installing upper bracket bolts while securing the harness routing clip. Use clockwise movements on the belt tensioner to install the drive belt while following the routing on the radiator upper air deflector. The eight fuel injector electrical connectors should be connected before adding eight ignition coils to their respective locations. Before installing the throttle body adapter you must connect the spring lock coupling on the fuel hose then place the power steering reservoir bracket and broadly position the heated throttle body adapter. Place a new gasket and throttle body adapter together before connecting the PCV hose along with heater hose and heated throttle body hose. Follow the procedure to connect the EGR valve tube and exhaust manifold then perform hand-tightening of all fittings before finishing with tight upper and lower fittings. After connecting the differential pressure feedback EGR system electrical connector install the brake booster vacuum tube with bracket along with its nut. The vacuum harness gets initially placed before connecting the evaporative emission canister purge valve vacuum hose and afterward both the evaporative emission canister purge valve hose and EGR valve vacuum hose. You should connect the TP sensor along with the IAC electrical connectors along with the EGR vacuum regulator solenoid connections as well as the IAC fresh air hose. Guide and connect the climate control vacuum hose with the fuel pressure regulator vacuum hose and the main vacuum harness. Associate the accelerator cable bracket to component bolts while connecting the throttle body cam with the accelerator cable together with speed control actuator cable and throttle return spring. Permanently install the appearance cover mounting bracket along with three bolts as you attach the upper radiator hose while laying its clamp in place and complete the installation by attaching the air cleaner outlet pipe before restoring the battery ground connection and performing engine cooling system fluid addition and air removal.
Related 2003 Ford Expedition Parts
 2003 Ford Expedition Fuel Pump
 2003 Ford Expedition Air Filter
 2003 Ford Expedition Fuel Tank
 2003 Ford Expedition Gas Cap
 2003 Ford Expedition Mass Air Flow Sensor
 2003 Ford Expedition Throttle Body
 2003 Ford Expedition Air Filter Box
 2003 Ford Expedition Fuel Filler Neck
 2003 Ford Expedition Fuel Level Sensor
 2003 Ford Expedition Fuel Pump Gasket
 2003 Ford Expedition Fuel Pump Tank Seal
 2003 Ford Expedition Fuel Tank Lock Ring