FordParts
My Garage
My Account
Cart
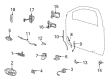
OEM 2003 Mercury Sable Door Jamb Switch
Door Jamb Interior Dome Light Switch- Select Vehicle by Model
- Select Vehicle by VIN
Select Vehicle by Model
orMake
Model
Year
Select Vehicle by VIN
For the most accurate results, select vehicle by your VIN (Vehicle Identification Number).
6 Door Jamb Switches found


2003 Mercury Sable Door Jamb Switch, Rear Driver Side Part Number: 4L3Z-13713-AA
$29.43 MSRP: $46.73You Save: $17.30 (38%)Ships in 1 Business DayProduct Specifications- Other Name: Switch Assembly - Interior Lamp; Door Jamb Switch, Front Left, Rear Left; Door Ajar Switch
- Position: Rear Driver Side
- Replaces: 4W1Z-5443262-BA
- Base No.: 13713
- Item Weight: 0.20 Pounds
- Item Dimensions: 6.1 x 4.2 x 4.2 inches
- Condition: New
- Fitment Type: Direct Replacement
- SKU: 4L3Z-13713-AA
- Warranty: This genuine part is guaranteed by Ford's factory warranty.


2003 Mercury Sable Door Jamb Switch, Rear Passenger Side Part Number: 4L3Z-14018-AA
$16.03 MSRP: $25.45You Save: $9.42 (38%)Ships in 1-2 Business DaysProduct Specifications- Other Name: Switch Assembly - Alarm; Door Jamb Switch, Front Right, Rear Right; Door Ajar Switch
- Position: Rear Passenger Side
- Base No.: 14018
- Item Weight: 0.20 Pounds
- Item Dimensions: 6.1 x 4.2 x 4.2 inches
- Condition: New
- Fitment Type: Direct Replacement
- SKU: 4L3Z-14018-AA
- Warranty: This genuine part is guaranteed by Ford's factory warranty.

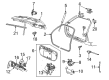
2003 Mercury Sable Release Switch, Rear Part Number: F6DZ-13713-AA
$19.44 MSRP: $26.46You Save: $7.02 (27%)Product Specifications- Other Name: Switch Assembly - Interior; Back Glass Release Switch, Rear; Switch Assembly - Interior Lamp
- Manufacturer Note: Latch asy. back window
- Position: Rear
- Base No.: 13713
- Item Weight: 0.30 Pounds
- Item Dimensions: 3.1 x 1.3 x 1.7 inches
- Condition: New
- Fitment Type: Direct Replacement
- SKU: F6DZ-13713-AA
- Warranty: This genuine part is guaranteed by Ford's factory warranty.

2003 Mercury Sable Door Ajar Switch Part Number: F1DZ-14018-A
$9.56 MSRP: $13.00You Save: $3.44 (27%)Product Specifications- Other Name: Switch Assembly; Door Jamb Switch
- Base No.: 14018
- Item Weight: 0.30 Pounds
- Item Dimensions: 3.1 x 1.3 x 1.7 inches
- Condition: New
- Fitment Type: Direct Replacement
- SKU: F1DZ-14018-A
- Warranty: This genuine part is guaranteed by Ford's factory warranty.


2003 Mercury Sable Door Jamb Switch Part Number: XF1Z-14018-AA
$11.75 MSRP: $18.18You Save: $6.43 (36%)Product Specifications- Other Name: Switch Assembly - Alarm; Door Ajar Switch; Switch
- Replaces: F5DZ-14018-AA
- Base No.: 14018
- Item Weight: 0.30 Pounds
- Item Dimensions: 6.4 x 4.1 x 4.2 inches
- Condition: New
- Fitment Type: Direct Replacement
- SKU: XF1Z-14018-AA
- Warranty: This genuine part is guaranteed by Ford's factory warranty.


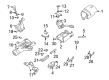
2003 Mercury Sable Lock Switch, Driver Side Part Number: YF1Z-14028-BA
Product Specifications- Other Name: Switch Assembly - Front Door; Door Lock Switch, Front, Front Left, Front Right, Rear, Rear Left, Rear Right; Switch Assembly - Front Door - Central; Door Lock Switch
- Position: Driver Side
- Base No.: 14028
- Item Weight: 0.30 Pounds
- Item Dimensions: 6.2 x 4.2 x 4.1 inches
- Condition: New
- Fitment Type: Direct Replacement
- SKU: YF1Z-14028-BA
- Warranty: This genuine part is guaranteed by Ford's factory warranty.
2003 Mercury Sable Door Jamb Switch
If you're seeking quality and affordability, look no further than our extensive inventory of genuine 2003 Mercury Sable Door Jamb Switch available at FordPartsDeal.com. You can confidently purchase our OEM 2003 Mercury Sable Door Jamb Switch as they are supported by the manufacturer's warranty and our hassle-free return policy, alongside the benefit of our fast delivery service.
2003 Mercury Sable Door Jamb Switch Parts Q&A
- Q: How to Service and Repair the Door Jamb Switch for the Alarm on 2003 Mercury Sable?A: Service and repair operations on the alarm door sensor/switch require starting with disconnecting the battery ground cable. You need to pull out both the door trim panel along with the watershield. Begin the service by first disassembling the latch lever from the door lock cylinder by taking out the E-clip followed by disconnecting the latch lever. Following this step detach the switch for door disarming by removing its electrical connection. Marking the position of the door disarm switch before removal regarding the lock cylinder will help when deciding how many configurations it can fit within. The procedure for installation involves following reverse steps of removal while using reference mark positions made during removal to correctly index the new door disarm switch to the lock cylinder.
Related 2003 Mercury Sable Parts
 2003 Mercury Sable Antenna
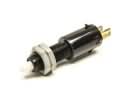 2003 Mercury Sable Brake Light Switch
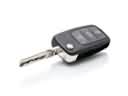 2003 Mercury Sable Car Key
 2003 Mercury Sable Headlight Switch
 2003 Mercury Sable Instrument Cluster
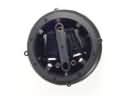 2003 Mercury Sable Mirror Actuator
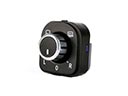 2003 Mercury Sable Mirror Switch
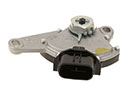 2003 Mercury Sable Neutral Safety Switch
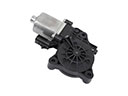 2003 Mercury Sable Power Window Motor
 2003 Mercury Sable Speedometer
 2003 Mercury Sable Transmitter
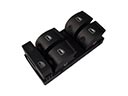 2003 Mercury Sable Window Switch