FordParts
My Garage
My Account
Cart
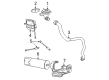
OEM 2005 Ford F-250 Super Duty Vapor Canister
Fuel Vapor Canister- Select Vehicle by Model
- Select Vehicle by VIN
Select Vehicle by Model
orMake
Model
Year
Select Vehicle by VIN
For the most accurate results, select vehicle by your VIN (Vehicle Identification Number).
2 Vapor Canisters found


2005 Ford F-250 Super Duty Vacuum Reservoir Part Number: 4C3Z-9E453-AA
$75.57 MSRP: $110.00You Save: $34.43 (32%)Product Specifications- Other Name: Reservoir - Vacuum; Reservoir
- Manufacturer Note: includes check valve at "VAC" port
- Replaces: F7UZ-9E453-LA
- Base No.: 9E453
- Item Weight: 2.10 Pounds
- Item Dimensions: 13.5 x 8.4 x 7.4 inches
- Condition: New
- Fitment Type: Direct Replacement
- SKU: 4C3Z-9E453-AA
- Warranty: This genuine part is guaranteed by Ford's factory warranty.

2005 Ford F-250 Super Duty Vapor Canister Part Number: 6C3Z-9D653-D
$461.00 MSRP: $765.45You Save: $304.45 (40%)Ships in 1-3 Business DaysProduct Specifications- Other Name: Reservoir Assembly; Vapor Canister Purge Solenoid
- Base No.: 9D653B
- Item Weight: 7.30 Pounds
- Item Dimensions: 7.0 x 7.9 x 34.8 inches
- Condition: New
- Fitment Type: Direct Replacement
- SKU: 6C3Z-9D653-D
- Warranty: This genuine part is guaranteed by Ford's factory warranty.
2005 Ford F-250 Super Duty Vapor Canister
If you're seeking quality and affordability, look no further than our extensive inventory of genuine 2005 Ford F-250 Super Duty Vapor Canister available at FordPartsDeal.com. You can confidently purchase our OEM 2005 Ford F-250 Super Duty Vapor Canister as they are supported by the manufacturer's warranty and our hassle-free return policy, alongside the benefit of our fast delivery service.
2005 Ford F-250 Super Duty Vapor Canister Parts Q&A
- Q: How to service and repair the Vapor Canister on with midship or aft axle fuel tanks on 2005 Ford F-250 Super Duty?A: Starting the procedure to repair the evaporative emission control canister on vehicles with midship or aft axle fuel tanks requires the vehicle to be set to neutral position on a hoist. Draining the battery ground cable reduces the possibility of electrical sparks forming. Follow these steps to work on the EVAP canister of midship fuel tank vehicles: start by removing the spare tire and unfastening the spare tire carrier extension tube along with the EVAP canister vent solenoid electrical harness retainer from the spare tire carrier assembly. Start by removing the two EVAP canister assembly bracket bolts then tighten them to 17 Nm (13 lb-ft) upon reinstalling them before moving on to unscrew the four spare tire carrier assembly bolts which should be tightened to 150 Nm (111 lb-ft) when reinstalling. Remove the electrical connector of the EVAP canister vent solenoid while separating the fuel vapor tube from the EVAP canister and the fuel vapor vent tube from the dust separator. After uninstalling the two EVAP canister assembly bolts you should tighten them to 17 Nm (13 lb-ft) before reinstallation. Users should remove four bolts securing the EVAP canister assembly of aft axle fuel tank vehicles while tightening these to 17 Nm (13 lb-ft) during reinstallation and take off clamps from the EVAP canister assembly. Position the EVAP canister bracket assembly on a clean working surface and remove the EVAP canister assembly from its bracket while disconnecting the EVAP filter assembly-to-EVAP canister tube. The installation process finishes with leak testing of the evaporative emission system and execution of a drive cycle for evaporative emissions repair verification.
Related 2005 Ford F-250 Super Duty Parts
 2005 Ford F-250 Super Duty Canister Purge Valve
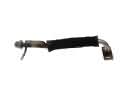 2005 Ford F-250 Super Duty EGR Tube
 2005 Ford F-250 Super Duty EGR Valve
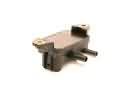 2005 Ford F-250 Super Duty EGR Valve Position Sensor
 2005 Ford F-250 Super Duty Exhaust Hanger
 2005 Ford F-250 Super Duty Exhaust Heat Shield
 2005 Ford F-250 Super Duty Exhaust Manifold
 2005 Ford F-250 Super Duty Exhaust Manifold Gasket
 2005 Ford F-250 Super Duty Exhaust Pipe
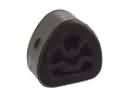 2005 Ford F-250 Super Duty Muffler Hanger Straps
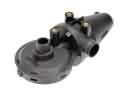 2005 Ford F-250 Super Duty PCV Valve
 2005 Ford F-250 Super Duty Tail Pipe