FordParts
My Garage
My Account
Cart
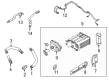
OEM Ford F-250 Super Duty Vapor Canister
Fuel Vapor Canister- Select Vehicle by Model
- Select Vehicle by VIN
Select Vehicle by Model
orMake
Model
Year
Select Vehicle by VIN
For the most accurate results, select vehicle by your VIN (Vehicle Identification Number).
18 Vapor Canisters found


Ford F-250 Super Duty Vacuum Reservoir Part Number: 4C3Z-9E453-AA
$75.57 MSRP: $110.00You Save: $34.43 (32%)


Ford F-250 Super Duty Vapor Canister Part Number: 6C3Z-9D653-E
$285.36 MSRP: $514.55You Save: $229.19 (45%)Ships in 1-2 Business Days

Ford F-250 Super Duty Vapor Canister Part Number: HC3Z-9D653-B
$491.66 MSRP: $816.36You Save: $324.70 (40%)Ships in 1 Business Day

Ford F-250 Super Duty Vapor Canister Part Number: F75Z-9D653-AC
$125.97 MSRP: $207.27You Save: $81.30 (40%)Ships in 1-2 Business Days

Ford F-250 Super Duty Vapor Canister Part Number: CC3Z-9D653-E
$176.80 MSRP: $290.91You Save: $114.11 (40%)Ships in 1-2 Business Days

Ford F-250 Super Duty Vapor Canister Part Number: BU5Z-9C985-B
$176.33 MSRP: $280.00You Save: $103.67 (38%)Ships in 1-3 Business Days
Ford F-250 Super Duty Vapor Canister Part Number: BU5Z-9C985-D
$199.76 MSRP: $320.00You Save: $120.24 (38%)Ships in 1-3 Business Days
Ford F-250 Super Duty Vapor Canister Part Number: HC3Z-9D653-D
$163.54 MSRP: $269.09You Save: $105.55 (40%)Ships in 1-3 Business Days
Ford F-250 Super Duty Vapor Canister Part Number: LC3Z-9D653-F
$519.03 MSRP: $861.82You Save: $342.79 (40%)Ships in 1-3 Business DaysFord F-250 Super Duty Vapor Canister Part Number: LC3Z-9D653-J
$942.80 MSRP: $1565.45You Save: $622.65 (40%)Ships in 1-3 Business Days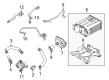
Ford F-250 Super Duty Vapor Canister Part Number: HC3Z-9D653-A
$306.60 MSRP: $509.09You Save: $202.49 (40%)Ships in 1-2 Business Days
Ford F-250 Super Duty Vapor Canister Part Number: 6C3Z-9D653-D
$467.57 MSRP: $776.36You Save: $308.79 (40%)Ships in 1-3 Business Days
Ford F-250 Super Duty Cannister - Fuel Vapour Storage Part Number: LC3Z-9D653-N
$767.60 MSRP: $1274.55You Save: $506.95 (40%)Ships in 1-2 Business DaysFord F-250 Super Duty Vapor Canister Part Number: LC3Z-9D653-E
$158.02 MSRP: $260.00You Save: $101.98 (40%)Ships in 1-3 Business DaysFord F-250 Super Duty Vapor Canister Part Number: F81Z-9D653-AA

Ford F-250 Super Duty Vacuum Reservoir Part Number: F75Z-9E453-AA
Ford F-250 Super Duty Vapor Canister Part Number: 4C3Z-9D653-CA
Ford F-250 Super Duty Vapor Canister Part Number: 1C3Z-9D653-CA
Ford F-250 Super Duty Vapor Canister
OEM Vapor Canister boasts unmatched quality. Each part goes through full quality checks. They adhere to Ford's official factory standards. These steps remove flaws and inconsistencies. So you can get Vapor Canister with long life and a perfect fit. Come to our website and find genuine Ford F-250 Super Duty parts. We keep a wide inventory of OEM F-250 Super Duty parts at the highly affordable prices. It's easy to search, compare, and pick what you need. You'll love the clear info and simple checkout. We offer top-rated customer service, and we reply fast. We also ship promptly to ensure your order arrives on time.
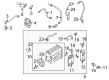
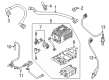
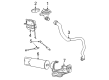
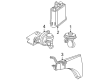
The Ford F-250 Super Duty Vapor Canister is basically an amazing evaporation emission control known as the EVAP system affordable for almost all F-250 super duty classes. This Vapor Canister similarly works to a great extent as a safety device and to improve the efficiency of the vehicle, and its primary function is to collect fuel vapors from the fuel tank and then store it from escaping into the atmosphere in form of hydrocarbons. Whenever required, the Vapor Canister expels those vapors into the engine where they are burned and therefore the efficiency in the use of fuel is gained. There have been drastic changes in the Vapor Canister mainly in new F-250 Super Duty model OBD II and cars that have additional features of Canister vent solenoid and fuel tank pressure sensor for better leak identification and emissions control. That evolution demonstrates Ford's dedication to sustainability as it does not affect the F-250 Super Duty's tough characteristics. Activated charcoal is often used in the construction of the Vapor Canister and plays a big role of improving the efficiency of the canister in adsorbing fuel vapors. The Vapor Canister is compatible with all models of F-250 Super Duty models and has helped distinguish itself in the automotive market for durability and efficiency; while adding to productivity of Ford trucks it also helps to keep the environment clean. All in all, the Ford F-250 Super Duty Vapor Canister epitomizes the company's continuous drive to make R&D breakthroughs, factory craftsmanship, and muscle resilience in the commercial grade pickup truck triangulation.
Ford F-250 Super Duty Vapor Canister Parts and Q&A
- Q: What Precautions Should Be Taken When Working with the Vapor Canister to Minimize the Risk of Explosion or Fire on Ford F-250 Super Duty?A:The safety risk from evaporative emissions system contents warrants that the battery ground cable should get disconnected to prevent electrical sparks from igniting fuel vapor or liquid. The use of open flames together with smoking must be avoided near fuel components because they contain explosive mixtures. Vehicles with a midship fuel tank need to start on a hoist while in neutral gear before removing both spare tire and carrier extension tube. To replace the EVAP canister assembly you must disconnect the spare tire carrier assembly retainer of the EVAP canister vent solenoid electrical harness before removing the two EVAP assembly bracket bolts which should be tightened to 17 Nm (13 lb-ft) when reinstalling. After removing the four spare tire carrier assembly bolts you should tighten their reinstallations to 150 Nm (111 lb-ft). The technician should disconnect the EVAP canister vent solenoid electrical connector followed by removing the fuel vapor tube quick connect coupling from the EVAP canister and the fuel vapor vent hose from the dust separator. The EVAP canister assembly of midship fuel tank equipped vehicles requires removal of its two bolts while securing them to 17 Nm (13 lb-ft) torque specifications. The EVAP canister assembly of aft-of-axle fuel tank equipped vehicles requires removal of four bolts which should be tightened to 17 Nm (13 lb-ft) during reinstallation. The clamps on the EVAP canister assembly need to be removed as well. When working with vehicles that have auxiliary fuel tanks, technicians must uninstall the four EVAP canister assembly bolts securing the bracket before torquing them to 17 Nm (13 lb-ft). The midship fuel tank equipped vehicles need the EVAP canister bracket assembly placed on a clean work surface followed by disconnecting the EVAP canister vent solenoid-to-EVAP canister hose then removing the EVAP canister assembly from its bracket. Workers should place the EVAP canister bracket assembly on a clean work surface before they remove the EVAP filter assembly-to-EVAP canister tube quick connect coupling which allows them to extract the EVAP canister assembly from the bracket for both aft-of-axle and auxiliary fuel tank equipped vehicles. Installation requires you to follow the reversal of the removal steps after completing the evaporative emission system leak check and the evaporative emission repair verification drive cycle.
- Q: How to Service and Repair the Vapor Canister on Ford F-250 Super Duty?A:The first procedure when repairing the evaporative emission control canister requires disconnecting the battery ground cable to prevent fuel vapor explosions or fires. Proceed with the connector electrical disconnect before removing the clamp and evaporative emissions (EVAP) canister purge outlet tube. The next step is to unscrew the bolt which holds the EVAP canister before you extract the canister from the vehicle. Detach the canister vent solenoid before unhooking the EVAP canister elbow when the equipment is present. Installation should follow the opposite order of removal steps while performing an EVAP system leak test before finalizing the process. The vehicle needs to perform the evaporative emission repair verification drive cycle. The proper method involves applying Merpol(R) O-ring Seal Lubricant as well as equivalent products which maintain Ford specification ESE-M99B144-B while lubricating all evaporative emission O-ring seals.


Related Ford F-250 Super Duty Parts
 Ford F-250 Super Duty Canister Purge Valve
 Ford F-250 Super Duty Crankcase Breather Hose
 Ford F-250 Super Duty EGR Tube
 Ford F-250 Super Duty EGR Valve
 Ford F-250 Super Duty EGR Valve Gasket
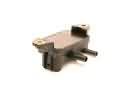 Ford F-250 Super Duty EGR Valve Position Sensor
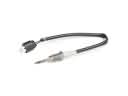 Ford F-250 Super Duty Exhaust Gas Temperature Sensor
 Ford F-250 Super Duty Exhaust Heat Shield
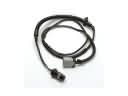 Ford F-250 Super Duty Fuel Pump Wiring Harness
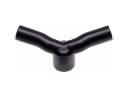 Ford F-250 Super Duty PCV Hose
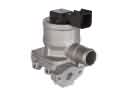 Ford F-250 Super Duty Secondary Air Injection Check Valve
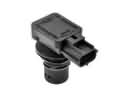 Ford F-250 Super Duty Vapor Pressure Sensor