FordParts
My Garage
My Account
Cart
OEM 2005 Lincoln Aviator Canister Purge Valve
Vapor Canister Purge Valve EVAP- Select Vehicle by Model
- Select Vehicle by VIN
Select Vehicle by Model
orMake
Model
Year
Select Vehicle by VIN
For the most accurate results, select vehicle by your VIN (Vehicle Identification Number).
1 Canister Purge Valve found


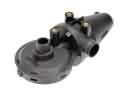
2005 Lincoln Aviator Purge Solenoid Part Number: 6L2Z-9F945-AA
$83.43 MSRP: $137.27You Save: $53.84 (40%)Ships in 1 Business DayProduct Specifications- Other Name: Solenoid Assembly; Vapor Canister Purge Solenoid; Vapor Canister Vent Solenoid; Canister Purge Valve; Vapor Canister; Vent Control Solenoid; Solenoid
- Manufacturer Note: All 3.0L
- Replaces: 5U5Z-9F945-GA
- Base No.: 9F945
- Item Weight: 1.00 Pounds
- Item Dimensions: 5.7 x 3.8 x 2.4 inches
- Condition: New
- Fitment Type: Direct Replacement
- SKU: 6L2Z-9F945-AA
- Warranty: This genuine part is guaranteed by Ford's factory warranty.
2005 Lincoln Aviator Canister Purge Valve
If you're seeking quality and affordability, look no further than our extensive inventory of genuine 2005 Lincoln Aviator Canister Purge Valve available at FordPartsDeal.com. You can confidently purchase our OEM 2005 Lincoln Aviator Canister Purge Valve as they are supported by the manufacturer's warranty and our hassle-free return policy, alongside the benefit of our fast delivery service.
2005 Lincoln Aviator Canister Purge Valve Parts Q&A
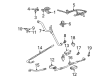
- Q: How to service the evaporative emission canister purge valve on 2005 Lincoln Aviator?A: The service process for the evaporative emission canister purge valve should start with placing the vehicle in neutral position on a hoist. Disconnecting the ground battery cable reduces the possibility of electrical sparks that could start fuel vapors. The use of flames and smoking should be strictly prohibited in areas surrounding fuel components since the mixtures remain highly combustible. The repair process requires users to use covered caps or sealing tape for all liquid and vapor fuel access points yet remove them prior to finishing installation. Use a set of pliers to take away the vacuum hose together with the two fuel vapor hoses from the EVAP canister purge valve and disconnect the electrical connector afterward. The repair starts by unplugging the electrical connector and detaching the vacuum hose together with the two fuel vapor hoses from the EVAP canister purge valve. After that, remove its securing nut followed by the extraction of the valve itself. An installation of the new valve requires cleaning with engine oil followed by tightening to 10 Nm force (89 lbs of inch torque). You should reverse the steps of removal to finish the installation process.
Related 2005 Lincoln Aviator Parts
 2005 Lincoln Aviator PCV Valve
 2005 Lincoln Aviator Catalytic Converter Gasket
 2005 Lincoln Aviator EGR Valve
 2005 Lincoln Aviator EGR Valve Gasket
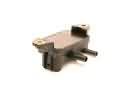 2005 Lincoln Aviator EGR Valve Position Sensor
 2005 Lincoln Aviator Exhaust Hanger
 2005 Lincoln Aviator Exhaust Heat Shield
 2005 Lincoln Aviator Exhaust Manifold
 2005 Lincoln Aviator Exhaust Pipe
 2005 Lincoln Aviator Muffler
 2005 Lincoln Aviator Muffler Hanger Straps
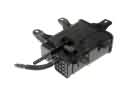 2005 Lincoln Aviator Vapor Canister