FordParts
My Garage
My Account
Cart
OEM 2005 Mercury Mariner Shock Absorber
Suspension Shock Absorber- Select Vehicle by Model
- Select Vehicle by VIN
Select Vehicle by Model
orMake
Model
Year
Select Vehicle by VIN
For the most accurate results, select vehicle by your VIN (Vehicle Identification Number).
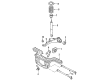
4 Shock Absorbers found


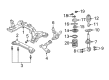
2005 Mercury Mariner Strut, Front Driver Side Part Number: 8L8Z-18124-BL
$102.56 MSRP: $172.18You Save: $69.62 (41%)Ships in 1-2 Business DaysProduct Specifications- Other Name: Shock Absorber Assembly - Front; Front Left Suspension Strut Kit; Complete Strut Set.; Shock Absorber
- Position: Front Driver Side
- Replaces: 6L8Z-18124-BB, 8L8Z-18124-AL, AST-229, 9L8Z-18124-AL, AST-303, 6L8Z-18124-AC, AST-227, 6T2Z-18124-AB, 9M6Z-18124-AL, AST-877, AST-226, 9L8Z-18124-BL, AST-876, AST-878
- Base No.: 18124
- Item Weight: 14.20 Pounds
- Item Dimensions: 32.2 x 7.5 x 7.6 inches
- Condition: New
- Fitment Type: Direct Replacement
- SKU: 8L8Z-18124-BL
- Warranty: This genuine part is guaranteed by Ford's factory warranty.


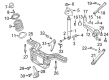
2005 Mercury Mariner Shock Absorber, Rear Part Number: 8L8Z-18125-B
$63.87 MSRP: $105.09You Save: $41.22 (40%)Ships in 1-2 Business DaysProduct Specifications- Other Name: Shock Absorber Assembly; Rear Suspension Shock Absorber Kit; Complete Strut Assembly.; Shock; Suspension Shock Absorber
- Position: Rear
- Replaces: 8L8Z-18125-A, 9L8Z-18125-C, AST-312, ASH-1182, AST-310, ASH-1181, CL8Z-18125-A, ASH-1183, 7L8Z-18125-A, ASH-24510, 8L8Z-18125-D, ASH-24512, ASH-24511, 8L8Z-18125-C, CL8Z-18125-B, 9L8Z-18125-B, AST-309, CL8Z-18125-C
- Base No.: 18125
- Item Weight: 5.20 Pounds
- Item Dimensions: 31.1 x 3.4 x 3.4 inches
- Condition: New
- Fitment Type: Direct Replacement
- Require Quantity: 2
- SKU: 8L8Z-18125-B
- Warranty: This genuine part is guaranteed by Ford's factory warranty.


2005 Mercury Mariner Shock Absorber, Rear Part Number: 3L8Z-18125-BB
$44.76 MSRP: $60.91You Save: $16.15 (27%)Product Specifications- Other Name: Shock Absorber Assembly; Suspension Shock Absorber, Rear; Shock
- Position: Rear
- Replaces: 5L8Z-18125-DB, 3L8Z-18125-CB, ASH-361, ASH-246
- Base No.: 18125
- Item Weight: 5.20 Pounds
- Item Dimensions: 36.0 x 3.1 x 3.0 inches
- Condition: New
- Fitment Type: Direct Replacement
- Require Quantity: 2
- SKU: 3L8Z-18125-BB
- Warranty: This genuine part is guaranteed by Ford's factory warranty.

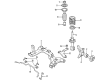
2005 Mercury Mariner Strut, Front Passenger Side Part Number: 6L8Z-18124-BA
$98.44 MSRP: $165.27You Save: $66.83 (41%)Ships in 1-2 Business DaysProduct Specifications- Other Name: Shock Absorber Assembly; Front Right Suspension Strut Kit; Complete Strut Set.; Shock Absorber
- Manufacturer Note: Warranty Eligible
- Position: Front Passenger Side
- Replaced by: 8L8Z-18124-BR
- Base No.: 18124
- Item Weight: 14.10 Pounds
- Item Dimensions: 7.7 x 7.6 x 32.2 inches
- Condition: New
- Fitment Type: Direct Replacement
- SKU: 6L8Z-18124-BA
- Warranty: This genuine part is guaranteed by Ford's factory warranty.
2005 Mercury Mariner Shock Absorber
If you're seeking quality and affordability, look no further than our extensive inventory of genuine 2005 Mercury Mariner Shock Absorber available at FordPartsDeal.com. You can confidently purchase our OEM 2005 Mercury Mariner Shock Absorber as they are supported by the manufacturer's warranty and our hassle-free return policy, alongside the benefit of our fast delivery service.
2005 Mercury Mariner Shock Absorber Parts Q&A
- Q: What Safety Precautions Should Be Taken When Servicing the Shock Absorber in the Suspension Strut and Spring Assembly on 2005 Mercury Mariner?A: It is essential to wear safety goggles during suspension strut and spring assembly servicing because spring compressors present the risk of personal injury. An impact wrench should never be applied to the nut. The first step requires installation of the strut and spring assembly into a spring compressor followed by coil spring compression until enough tension is released on the strut. You should remove the strut piston rod-to-bushing nut before moving onto the next step while you should tighten it to 76 ft. lbs (103 Nm) during reassembly. Before you remove the strut proceed to take off both coil spring insulators before extracting the coil spring then the strut upper insulator. Repeatedly check the bearing plate orientation since its arrow should always face in the outboard vehicle direction while reassembly takes place. The next step requires dissolution of the bearing along with the strut upper bushing and the dust boot and the bumper. The disassembly process should be reversed when completing this work.
Related 2005 Mercury Mariner Parts
 2005 Mercury Mariner Control Arm
 2005 Mercury Mariner Axle Beam
 2005 Mercury Mariner Axle Support Bushings
 2005 Mercury Mariner Coil Springs
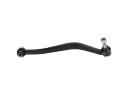 2005 Mercury Mariner Lateral Arm
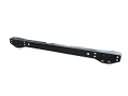 2005 Mercury Mariner Rear Crossmember
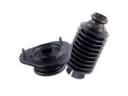 2005 Mercury Mariner Shock and Strut Boot
 2005 Mercury Mariner Steering Knuckle
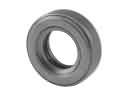 2005 Mercury Mariner Strut Bearing
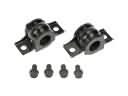 2005 Mercury Mariner Sway Bar Bracket
 2005 Mercury Mariner Sway Bar Link
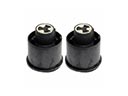 2005 Mercury Mariner Trailing Arm Bushing